ADJUSTMENTS
![]() WARNING:
WARNING:
If any parts are missing, do not operate tool until the missing parts are replaced. Failure to do so could result in possible serious personal injury.
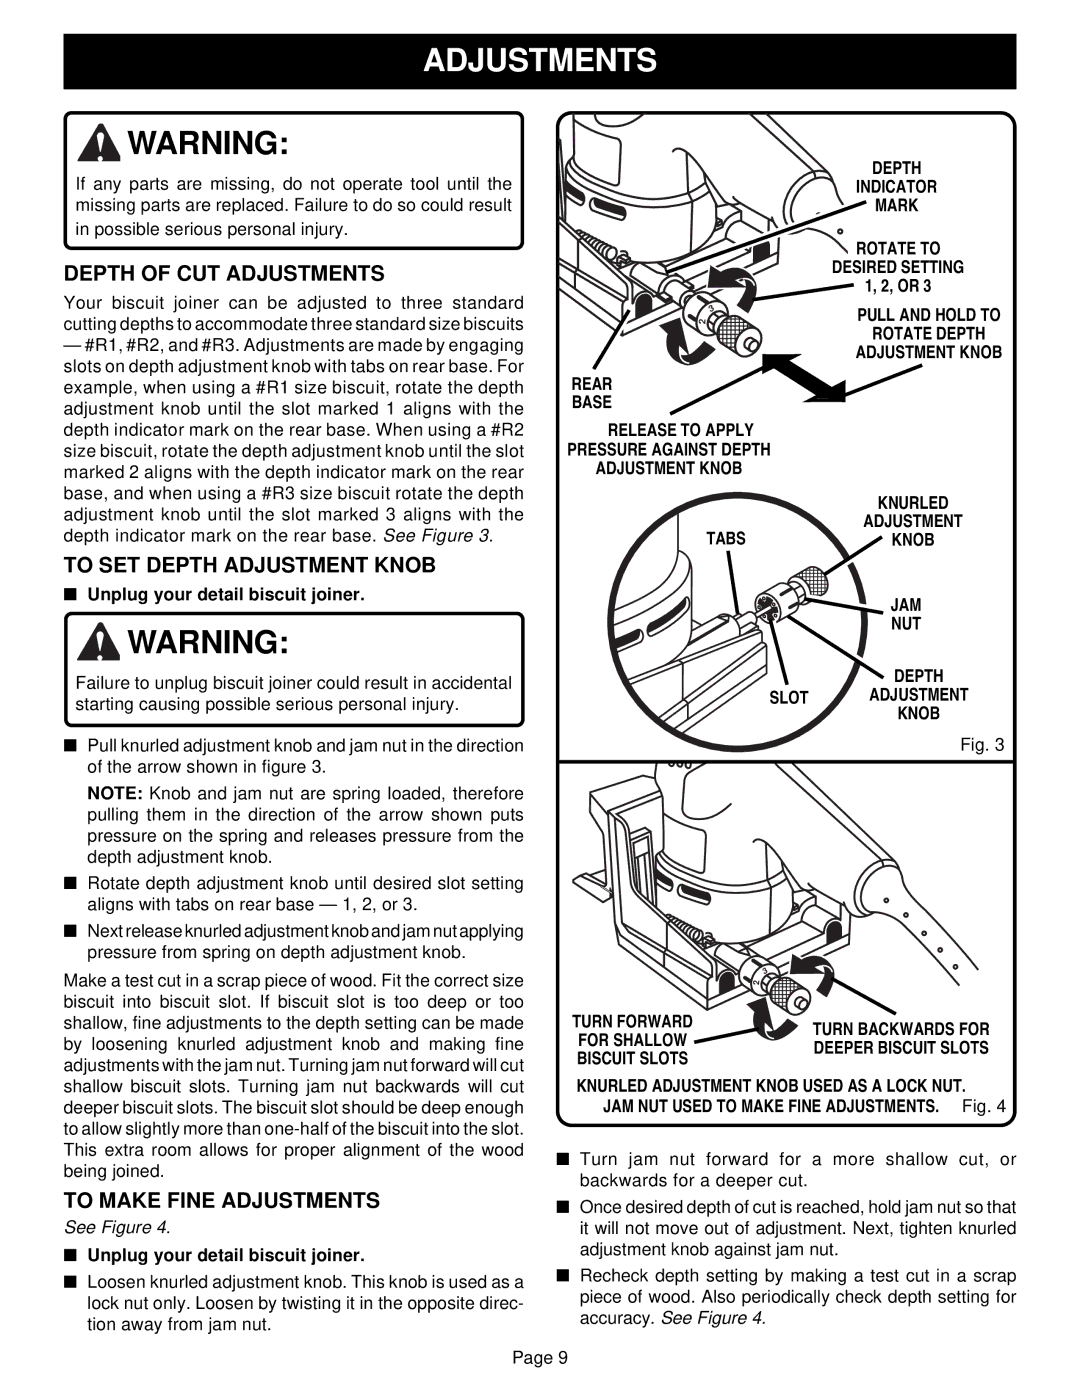
DEPTH OF CUT ADJUSTMENTS
Your biscuit joiner can be adjusted to three standard cutting depths to accommodate three standard size biscuits
—#R1, #R2, and #R3. Adjustments are made by engaging slots on depth adjustment knob with tabs on rear base. For example, when using a #R1 size biscuit, rotate the depth adjustment knob until the slot marked 1 aligns with the depth indicator mark on the rear base. When using a #R2 size biscuit, rotate the depth adjustment knob until the slot marked 2 aligns with the depth indicator mark on the rear base, and when using a #R3 size biscuit rotate the depth adjustment knob until the slot marked 3 aligns with the depth indicator mark on the rear base. See Figure 3.
TO SET DEPTH ADJUSTMENT KNOB
■Unplug your detail biscuit joiner.
![]() WARNING:
WARNING:
Failure to unplug biscuit joiner could result in accidental starting causing possible serious personal injury.
■Pull knurled adjustment knob and jam nut in the direction of the arrow shown in figure 3.
NOTE: Knob and jam nut are spring loaded, therefore pulling them in the direction of the arrow shown puts pressure on the spring and releases pressure from the depth adjustment knob.
■Rotate depth adjustment knob until desired slot setting aligns with tabs on rear base — 1, 2, or 3.
■Next release knurled adjustment knob and jam nut applying pressure from spring on depth adjustment knob.
Make a test cut in a scrap piece of wood. Fit the correct size biscuit into biscuit slot. If biscuit slot is too deep or too shallow, fine adjustments to the depth setting can be made by loosening knurled adjustment knob and making fine adjustments with the jam nut. Turning jam nut forward will cut shallow biscuit slots. Turning jam nut backwards will cut deeper biscuit slots. The biscuit slot should be deep enough to allow slightly more than
|
| DEPTH |
|
| INDICATOR |
|
| MARK |
|
| ROTATE TO |
|
| DESIRED SETTING |
|
| 1, 2, OR 3 |
| 3 | PULL AND HOLD TO |
2 |
|
ROTATE DEPTH
ADJUSTMENT KNOB
REAR
BASE
RELEASE TO APPLY
PRESSURE AGAINST DEPTH
ADJUSTMENT KNOB
| KNURLED |
TABS | ADJUSTMENT |
KNOB | |
| JAM |
| NUT |
DEPTH
SLOT ADJUSTMENT
KNOB
Fig. 3
3 2
TURN FORWARD | TURN BACKWARDS FOR | |
FOR SHALLOW | ||
DEEPER BISCUIT SLOTS | ||
BISCUIT SLOTS | ||
|
KNURLED ADJUSTMENT KNOB USED AS A LOCK NUT.
JAM NUT USED TO MAKE FINE ADJUSTMENTS. Fig. 4
■Turn jam nut forward for a more shallow cut, or
backwards for a deeper cut.
TO MAKE FINE ADJUSTMENTS
See Figure 4.
■Unplug your detail biscuit joiner.
■Loosen knurled adjustment knob. This knob is used as a lock nut only. Loosen by twisting it in the opposite direc- tion away from jam nut.
■Once desired depth of cut is reached, hold jam nut so that it will not move out of adjustment. Next, tighten knurled adjustment knob against jam nut.
■Recheck depth setting by making a test cut in a scrap piece of wood. Also periodically check depth setting for accuracy. See Figure 4.
Page 9