OPERATION
TO INSTALL BLADES
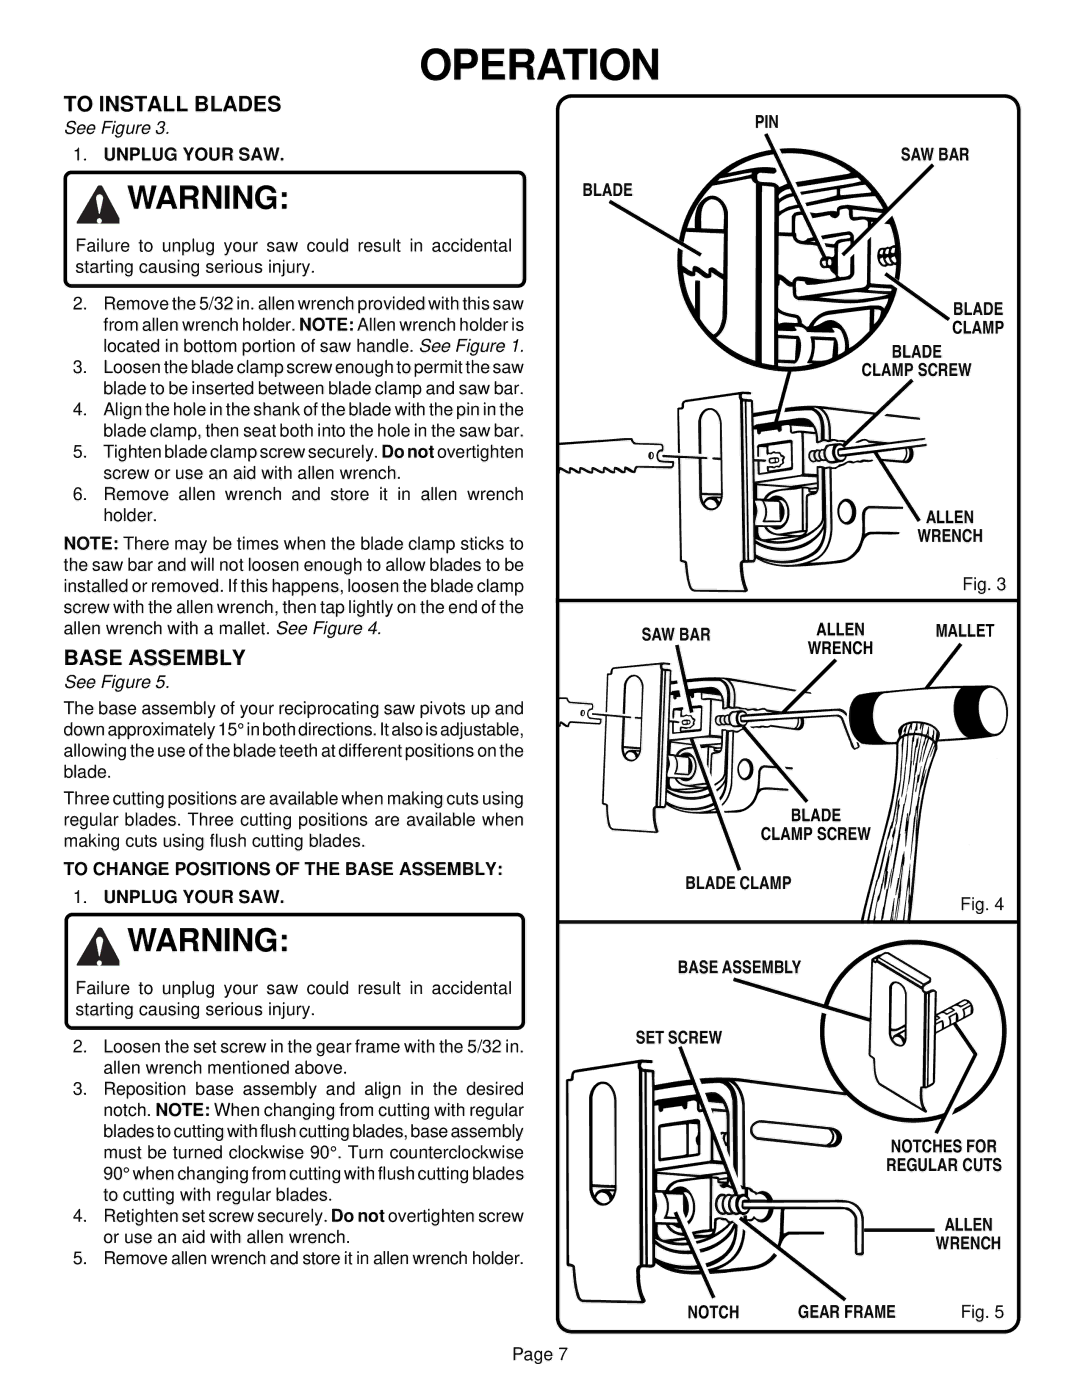
See Figure 3.
1.UNPLUG YOUR SAW.
![]() WARNING:
WARNING:
Failure to unplug your saw could result in accidental starting causing serious injury.
2.Remove the 5/32 in. allen wrench provided with this saw from allen wrench holder. NOTE: Allen wrench holder is located in bottom portion of saw handle. See Figure 1.
3.Loosen the blade clamp screw enough to permit the saw blade to be inserted between blade clamp and saw bar.
4.Align the hole in the shank of the blade with the pin in the blade clamp, then seat both into the hole in the saw bar.
5.Tighten blade clamp screw securely. Do not overtighten screw or use an aid with allen wrench.
6.Remove allen wrench and store it in allen wrench holder.
NOTE: There may be times when the blade clamp sticks to the saw bar and will not loosen enough to allow blades to be installed or removed. If this happens, loosen the blade clamp screw with the allen wrench, then tap lightly on the end of the allen wrench with a mallet. See Figure 4.
BASE ASSEMBLY
See Figure 5.
The base assembly of your reciprocating saw pivots up and down approximately 15° in both directions. It also is adjustable, allowing the use of the blade teeth at different positions on the blade.
Three cutting positions are available when making cuts using regular blades. Three cutting positions are available when making cuts using flush cutting blades.
TO CHANGE POSITIONS OF THE BASE ASSEMBLY:
1.UNPLUG YOUR SAW.
![]() WARNING:
WARNING:
Failure to unplug your saw could result in accidental starting causing serious injury.
2.Loosen the set screw in the gear frame with the 5/32 in. allen wrench mentioned above.
3.Reposition base assembly and align in the desired notch. NOTE: When changing from cutting with regular blades to cutting with flush cutting blades, base assembly must be turned clockwise 90°. Turn counterclockwise 90° when changing from cutting with flush cutting blades to cutting with regular blades.
4.Retighten set screw securely. Do not overtighten screw or use an aid with allen wrench.
5.Remove allen wrench and store it in allen wrench holder.
PIN
SAW BAR
BLADE
BLADE
CLAMP
BLADE
CLAMP SCREW
|
| ALLEN |
|
| WRENCH |
|
| Fig. 3 |
|
|
|
SAW BAR | ALLEN | MALLET |
| WRENCH |
|
BLADE
CLAMP SCREW
BLADE CLAMP
Fig. 4
BASE ASSEMBLY
SET SCREW
NOTCHES FOR
REGULAR CUTS
ALLEN
WRENCH
NOTCH | GEAR FRAME | Fig. 5 |
Page 7