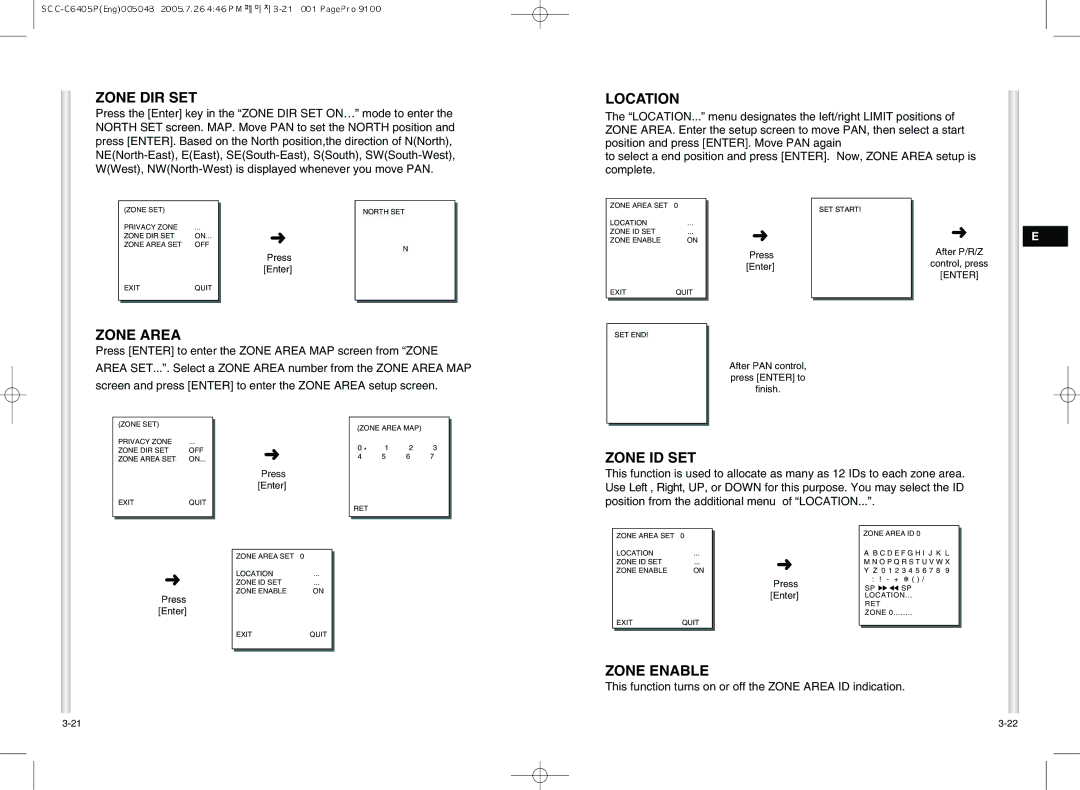
ZONE DIR SET
Press the [Enter] key in the “ZONE DIR SET ON…” mode to enter the NORTH SET screen. MAP. Move PAN to set the NORTH position and press [ENTER]. Based on the North position,the direction of N(North),
LOCATION
The “LOCATION...” menu designates the left/right LIMIT positions of ZONE AREA. Enter the setup screen to move PAN, then select a start position and press [ENTER]. Move PAN again
to select a end position and press [ENTER]. Now, ZONE AREA setup is complete.
(ZONE SET) |
| |
PRIVACY ZONE | ... | |
ZONE DIR SET |
| ON... |
ZONE AREA SET | OFF | |
➜
Press [Enter]
NORTH SET
N
ZONE AREA SET 0
LOCATION |
| ... |
ZONE ID SET | ... | |
ZONE ENABLE | ON | |
➜
Press [Enter]
SET START!
➜
After P/R/Z
control, press
[ENTER]
E
EXITQUIT
ZONE AREA
Press [ENTER] to enter the ZONE AREA MAP screen from “ZONE
AREA SET...”. Select a ZONE AREA number from the ZONE AREA MAP
screen and press [ENTER] to enter the ZONE AREA setup screen.
EXIT | QUIT | |
|
|
|
|
|
|
| SET END! |
|
After PAN control, press [ENTER] to finish.
| (ZONE SET) |
|
|
|
|
| |
| PRIVACY ZONE | ... |
|
| ZONE DIR SET | OFF |
|
| ZONE AREA SET | ON... |
|
| EXIT | QUIT |
|
|
|
|
|
|
|
|
|
➜
Press [Enter]
(ZONE AREA MAP)
0 | * | 1 | 2 | 3 | |
4 | 5 | 6 | 7 | ||
|
RET
ZONE ID SET
This function is used to allocate as many as 12 IDs to each zone area. Use Left , Right, UP, or DOWN for this purpose. You may select the ID position from the additional menu of “LOCATION...”.
➜
Press [Enter]
ZONE AREA SET | 0 | ||
|
|
| ... |
LOCATION | |||
ZONE ID SET | ... | ||
ZONE ENABLE | ON | ||
ZONE AREA SET 0
LOCATION | ... | |
ZONE ID SET |
| ... |
ZONE ENABLE | ON | |
EXIT | QUIT | |
➜
Press [Enter]
ZONE AREA ID 0
AB C D E F G H I J K L M N O P Q R S T U V W X Y Z 0 1 2 3 4 5 6 7 8 9
:! - + ✽ ( ) /
SP ï î SP
LOCATION...
RET
ZONE 0........
EXITQUIT
ZONE ENABLE
This function turns on or off the ZONE AREA ID indication.