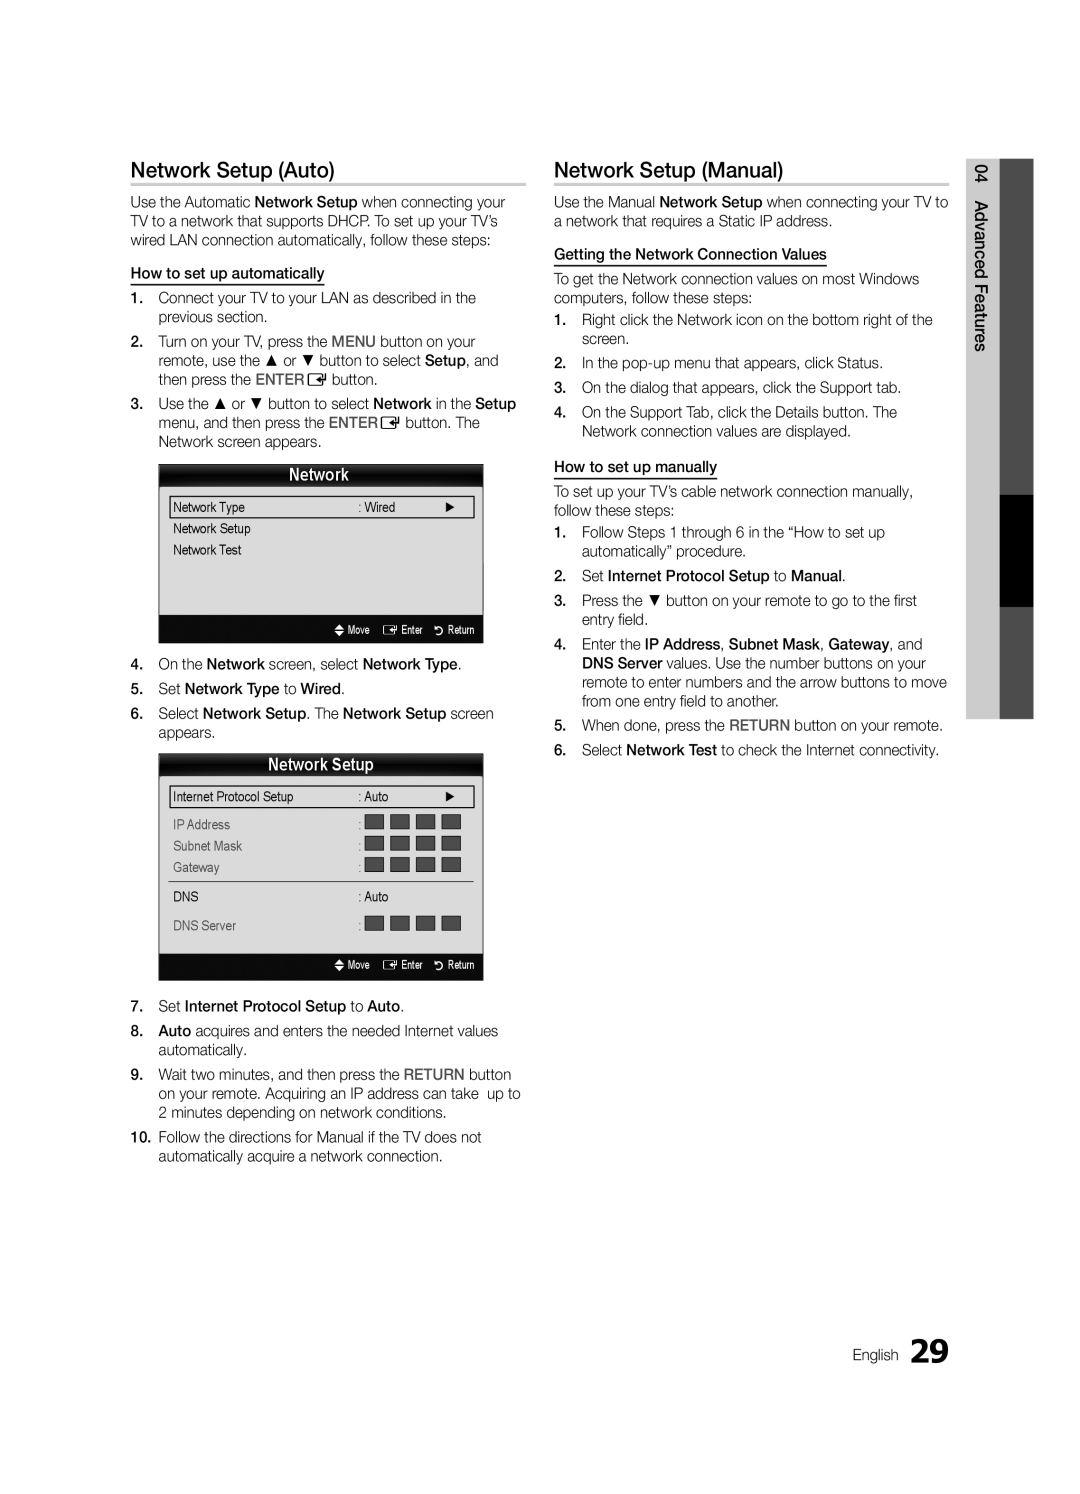
Network Setup (Auto)

Use the Automatic Network Setup when connecting your TV to a network that supports DHCP. To set up your TV’s wired LAN connection automatically, follow these steps:

How to set up automatically

1.Connect your TV to your LAN as described in the previous section.

2.Turn on your TV, press the MENU button on your remote, use the ▲ or ▼ button to select Setup, and then press the ENTERE button.

3.Use the ▲ or ▼ button to select Network in the Setup menu, and then press the ENTERE button. The Network screen appears.

Network

Network Type

: Wired

Network Setup


Network Test


U Move E Enter

R Return

4.On the Network screen, select Network Type.

5.Set Network Type to Wired.

6.Select Network Setup. The Network Setup screen appears.

Network Setup

Internet Protocol Setup

: Auto


IP Address

:


Subnet Mask

:


Gateway

:


DNS

: Auto


DNS Server

:


U Move E Enter

R Return

7.Set Internet Protocol Setup to Auto.

8.Auto acquires and enters the needed Internet values automatically.

9.Wait two minutes, and then press the RETURN button on your remote. Acquiring an IP address can take up to 2 minutes depending on network conditions.

10.Follow the directions for Manual if the TV does not automatically acquire a network connection.

Network Setup (Manual)

Use the Manual Network Setup when connecting your TV to a network that requires a Static IP address.

Getting the Network Connection Values

To get the Network connection values on most Windows computers, follow these steps:

1.Right click the Network icon on the bottom right of the screen.

2.In the pop-up menu that appears, click Status.

3.On the dialog that appears, click the Support tab.

4.On the Support Tab, click the Details button. The Network connection values are displayed.

How to set up manually

To set up your TV’s cable network connection manually, follow these steps:

1.Follow Steps 1 through 6 in the “How to set up automatically” procedure.

2.Set Internet Protocol Setup to Manual.

3.Press the ▼ button on your remote to go to the first entry field.

4.Enter the IP Address, Subnet Mask, Gateway, and DNS Server values. Use the number buttons on your remote to enter numbers and the arrow buttons to move from one entry field to another.

5.When done, press the RETURN button on your remote.

6.Select Network Test to check the Internet connectivity.

04 Advanced Features

English 29

Page 29
Image 29
Samsung Series P6+ 680, PC680-ZA Network Setup Auto, Network Setup Manual, Network Type Wired Network Setup Network Test

BN68-03116A-01, PC680-ZA, Series P6+ 680 specifications

The Samsung Series P6+ 680, also known as the PC680-ZA, is a highly regarded model in Samsung's lineup of display products. This innovative display solution is designed to meet the demands of professional users, offering exceptional visuals and advanced technologies.

One of the standout features of the P6+ 680 is its high resolution. With a detailed 1920 x 1080 Full HD display, this model delivers crisp and vibrant images. The screen's color accuracy is impressive, making it ideal for applications that require precise color representation, such as graphic design, photography, and video editing.

The P6+ 680 utilizes advanced LED technology, ensuring not only rich colors but also energy efficiency. Its brightness rating is commendable, allowing for clear visibility even in well-lit environments. This makes it an excellent choice for public displays, conference rooms, and retail environments where lighting conditions can vary significantly.

Another significant characteristic of the P6+ 680 is its connectivity options. The display features multiple input ports, including HDMI and DisplayPort, allowing for seamless connection with a wide range of devices, from computers to multimedia players. This versatility enables users to switch between different content sources quickly and efficiently.

The Samsung Series P6+ 680 is also equipped with advanced display technologies such as HDR (High Dynamic Range) support, which enhances the dynamic range of colors and contrast. This feature ensures that even the subtlest details in shadows and highlights are visible, providing a more immersive viewing experience.

The design of the P6+ 680 is sleek and modern, with thin bezels that maximize the screen area. This aesthetic appeal, combined with its robust build quality, makes it suitable for any professional setting.

In terms of usability, the P6+ 680 includes user-friendly features such as an intuitive on-screen display menu, allowing users to easily adjust settings to suit their preferences. The display also supports various mounting options, enabling it to be installed in different configurations based on user needs.

Overall, the Samsung Series P6+ 680 (PC680-ZA) is a versatile and powerful display solution that combines excellent visual performance with advanced features, making it a top choice for professionals seeking reliable and high-quality display technology. Whether for corporate use or creative applications, the P6+ 680 stands out as an exceptional choice in the competitive landscape of display technology.