Tour of the Remote Control

Connections

1

12


215

3 14

4 13

5

16

6

7


17

8 18

9

10 19

11 20

1.DVD POWER Button Turns the power on or off.

2.REPEAT Button

Allows you to repeat play a title, chapter, track, or disc.

3.DISC MENU Button Brings up the Disc menu.

4.REPEAT A-B Button

Allows you to repeat a chosen section (A-B) on a disc.

5.SEARCH Buttons ( / ) Allows you to search forward/backward through a disc.

6.STOP Button ( ) To stop the disc

7.SKIP Buttons ( / )

Use to skip the title, chapter or track.

8.MENU Button

Brings up the DVD player’s menu.

9.ENTER/π/†,√/® Buttons This button functions as a toggle switch.

10.AUDIO Button (√)

Use this button to access various audio functions on a disc. Use this button to select an available TV source (mode TV).

11.TOOLS Button

Displays the current disc mode. It also lets you access the Display function.

12.OPEN/CLOSE ( ) Button To open and close the disc tray.

13.MARKER

Quickly find bookmark sections of a DVD.

14.USB Button

To change device which access to USB device.

15.VIDEO SEL. Button

Changes video output mode.

16.PLAY Button ( ) Begins disc play.

17.SUBTITLE/(π) Button

18.RETURN Button Returns to a previous menu.

19.TITLE MENU Button (®) Brings up the Title menu.

20.INFO Button

Displays the current playback information.

Install Batteries in the Remote Control

1.Open the battery cover on the back of the remote control.

2.Insert two AAA batteries. Make sure that the polarities (+ and -) are aligned correctly.

3.Replace the battery cover.

Choosing a Connection

The following text explains how to make connections commonly used to connect the DVD player with a TV and other components. A diagram showing these connections is to the right.

Before Connecting the DVD Player

-Always turn off the DVD player, TV, and other components before you connect or disconnect any cables.

-Refer to the user’s manual of the components (such as a TV) you are connecting for more information on those particular components.

Notes

-The first time you turn on your DVD player, the Language Selection screen appears. See Selecting a Language on page 6 for details.

A. Connecting to a TV Using the Video Jack (Video)

1.Using Video/Audio cables, connect the VIDEO (yellow)/AUDIO (red and white) OUT jacks on the rear of the DVD player to the VIDEO (yellow)/AUDIO (red and white) IN jacks of your TV.

2.Turn on your DVD player and TV.

3.Press the input selector button on your TV remote control until the Video signal from the DVD player appears on the TV screen.

B. Connecting to a TV Using the Component Jacks (Progressive/ Interlace)

-Connecting through the Component jacks lets you view video at the 480p (Progressive Scan) resolution.

-What is "Progressive Scan"?

Progressive scan has twice as many scanning lines per frame as interlaced (480i) output and provides better and clearer picture quality.

1.Using Component video cables (not included), connect the COMPONENT VIDEO OUT (PR, PB and Y) jacks on the rear of the DVD player to the COMPONENT IN (PR, PB and Y) jacks of your TV.

2.Using the audio cables, connect the AUDIO (red and white) OUT jacks on the rear of the DVD player to the AUDIO (red and white) IN jacks of your TV. Turn on the DVD player and TV.

3.Set the Video Output to P-SCAN/I-SCANin the Display Setup menu. You can also use the VIDEO SEL. button to change the Video Output mode.

4.Press the input selector button on your TV remote control until the Component signal from the DVD player appears on the TV screen.

Notes

-Noise may be generated if the audio cable is placed too close to the power cable.

-If you want to connect to an Amplifier, please refer to the Amplifier connection section below.

-The number and position of the jacks on your TV may vary depending on your TV set. Please refer to the user's manual of your TV.

-If there is one audio input terminal on the TV, connect it to the [AUDIO OUT] [left] (white) jack of the DVD player.

-If you press the VIDEO SEL. button when the DVD Player is in stop mode or no disc is inserted, the Video Output mode changes in the following sequence : I-SCAN P-SCAN (Interlaced Progressive).

5

Page 5
Image 5
Samsung DVD-E360 user manual Connections, Tour of the Remote Control, Choosing a Connection, Marker

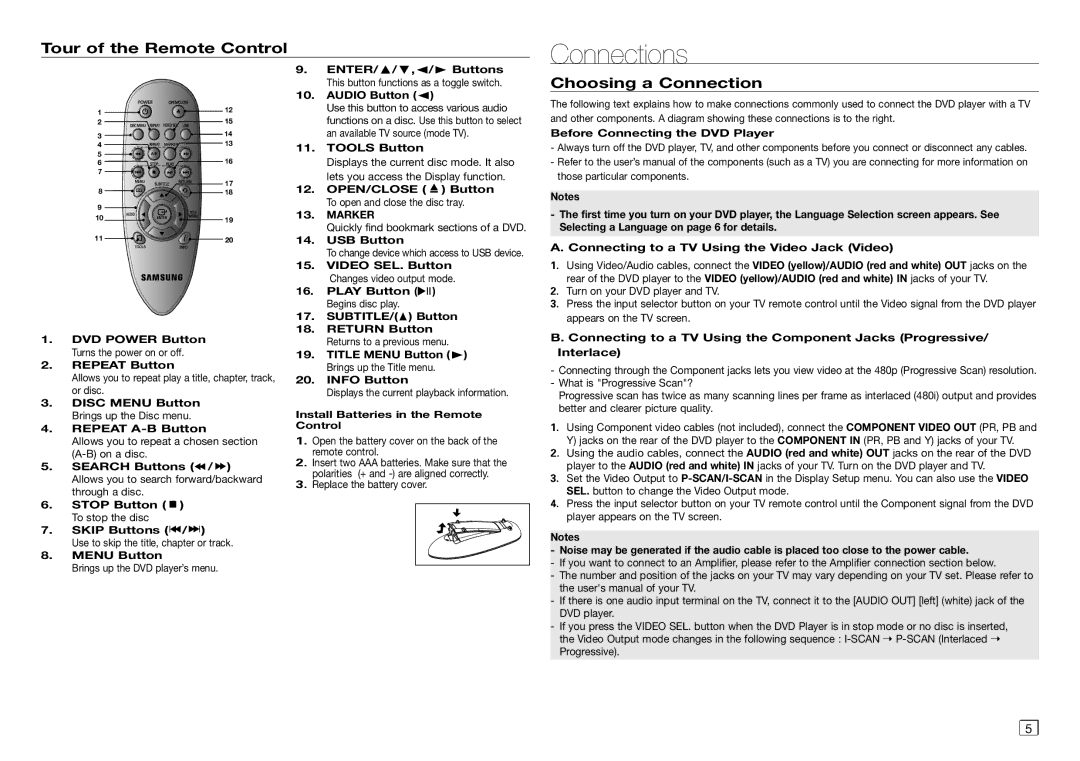
DVD-E360 specifications

The Samsung DVD-E360 player is a compact and versatile device that caters to a wide range of multimedia needs. Designed for those seeking to enjoy their favorite DVDs and music CDs with enhanced quality and features, the DVD-E360 stands out with its blend of portability and performance.

One of the most notable features of the Samsung DVD-E360 is its compatibility with various disc formats. This player can handle DVDs, CDs, and even CD-R/RW formats, allowing users to enjoy not only their commercial movie collections but also homemade recordings. This flexibility makes it a great addition to any home entertainment setup.

The internal video processing technology of the DVD-E360 is impressive, providing viewers with sharp and clear images. The player supports multiple output formats, including 480p, which enhances the clarity of DVDs when connected to televisions that support higher quality video output. This feature is particularly important for those with modern HDTVs, ensuring that DVD viewing is as enjoyable as possible.

Furthermore, the Samsung DVD-E360 is equipped with a user-friendly interface that simplifies navigation. The remote control is intuitive, enabling users to access menus and features with ease. One of the standout characteristics of this model is its fast playback and quick resume functionality. Users can pick up right where they left off, minimizing waiting time when switching discs or resuming playback.

The design of the DVD-E360 reflects Samsung's commitment to both style and functionality. Its sleek and compact profile allows for easy placement in any media setup, whether it’s a home theater or a small living space. The player also includes a range of connectivity options, including composite video output, making it compatible with various display setups.

In addition to its primary functions, the Samsung DVD-E360 also features a range of audio capabilities. It supports Dolby Digital audio, which enhances the listening experience by delivering immersive sound quality. This is particularly beneficial for movie enthusiasts who appreciate high-quality audio to complement their viewing experience.

Overall, the Samsung DVD-E360 is a reliable choice for anyone looking to enjoy DVD content and audio CDs. Its combination of versatile format compatibility, video enhancement technology, user-friendly design, and audio quality make it a worthy addition to any entertainment system. Whether for movie nights or music playback, this DVD player provides a simple and effective solution for multimedia enjoyment.