DVD-HR735 DVD-HR737
Getting Started
No rights are granted for commercial use
Maintenance of Cabinet
Precaution
Important Safety Instructions
Handling Cautions
Disc Specifications
Disc Handling
Disc Storage
Copy Once Title
Contents Copy Specifications
Disc Copy
JPEGphoto
Copy Protection
Disc Format
Do not use the following discs
Disc compatibility
Contents
Selecting Record Mode of Each Title from
Changing Record Mode of All Titles from
General Features
HDD Recording
How to use
Before Reading User’s Manual
You can change the DVD-RW to format to
Be lost when changing formats
Another format by reinitializing
It should be noted that the discs data will
Setting the Remote Control
Accessories
Preparing the Remote Control
Unpacking
Controllable TV Codes
Description
Front Panel
Antenna connection does not pass
Rear Panel
Front Panel Display
Connects to equipment having Component video Input
Tour of the Remote Control
Connecting the HDD & DVD Recorder Additional connections
Quick Overview
Antenna + HDD & DVD Recorder +
Connecting
Set Input mode on AV2 TV mode
Connect RF antenna cables as shown
Refer to pages 30~32
Case 2 Connecting to an S-Video output jack
Case 1 Connecting to a Video Composite output jack
See pages 22~23
Jacks on your TV
Case 1 Connecting to your TV
Case 3 Component Video output jacks
DVD Recorder must be connected to
Case 2 Connecting to a stereo amplifier with AV output jacks
Connecting Hdmi DVI to a TV
Case 1 Connecting to a TV with Hdmi Jack
Case 2 Connecting to a TV with DVI Jack
Why does Samsung use HDMI?
Hdmi High Definition Multimedia
Hdmi connection description
This allows you to connect your HDD & DVD
Case 2 Connecting a Camcorder to the DV in jack
To the AV3 in jacks
Record their outputs
System Setup
On-Screen Menu Navigation
Plug & Auto Setup
Select Country using the …† œ √ buttons to
Select your country
With the unit in Stop mode, press the Menu
Auto setup function can be performed by
Now, HDD & DVD Recorder is ready
Button
Press the …† buttons to select System
Press the …† buttons to select On for the Auto
Clock
Press the …† buttons to select Channel Set
Manual Setup function
Refer to following table when selecting your country
Press the …† buttons to select a PRprogramme
Press the …† buttons to select Manual Setup
Before setting on, refer to connecting external decoder box
Anykey button Select Edit , Delete or Swap
Auto Power Off Setting
Press the Return or œ button to return
Press the …† buttons to select Language
Press the …† buttons to select System, then
Setting up
Will be increased when the unit power off
Press the OK or √ button
Automatic Chapter Creator
Mode
Press the OK or √ button System menu will be displayed
CM Skip Time Setting
DivXR Registration
EP Mode Time Setting
CM Skip may not operate with some DVD-Video discs
Press the OK or √ button PVR Option menu will be displayed
Options
Setting up the Audio
Ystem Setup
Digital Output
Mode Compatibility
DTS
TV Aspect
Setup
Ystem
3D Noise Reduction motion adaptive noise reduction
Setting up Progressive scan
When the Hdmi cable is connected, other
Available Video Output Jack
Canceling Progressive scan
YstemS
Setting up the Parental Lock
Changing the Password
If you forgot your password
Setting the Rating Level
System
Disc types that can be played
Before Playing
Region code DVD-Video only
Or minute
Playing a Disc
Playback
Discs that cannot be played
For DVD-VIDEO Disc
Title Menu
Functions
For HDD/DVD-RAM/-RW/-R Disc
Slow Motion Play
Skipping Chapters, Tracks or
Markers
Step motion operates only in the forward
Press the …† buttons to select Search, then
Moving to a scene directly using
About Anykey
Press the OK button or √ button
Using the Title List button
Playing the Title List
VR mode
Navigation Menu
Scene Navigation
Time Navigation
Using the Anykey button
Layback
Scene Navigation will not operate if a
Search time
Device
An edited title may not display the exact
OK or Play
LaybackP
Using Markers
Using the Marker button
Playing back a marker
Clearing a marker
Press the œ √ buttons to select a marked scene
When the disc tray is opened and then
Playing back a bookmark
Closed, bookmarks will disappear
Clearing a bookmark
Using the Subtitle button
Press the Cancel button to delete the selected bookmark
Press the Subtitle button during playback
Press the …† buttons to select Subtitle
Using the Audio button
Selecting the Audio
Press the Audio button during playback
Different because they are disc-specific
Changing the Camera Angle
Soundtracks or Audio channel may be
Press the …† buttons to select Audio
Repeat Play
Playing RepeatedlyRepeat Playback Using the Repeat button
Using the Repeat A-B button
Repeat A-B
Zooming-In
Playing an Audio CDCD-DA
Playing an Audio CD/ MP3
Select Media
Audio CDCD-DA Screen Elements
Insert an MP3 disc into the disc tray
OK button, Play button Plays the selected track song
Press the Search buttons Fast Play X2, X4
Menu is displayed
OK button, Play button Plays the selected
Buttons on the Remote Control used for MP3 playback
Repeat CD CD-DA & MP3
Track song
New Playlist
Press the Anykey button during the Music List
Playback
Go To Playlist
Want to delete Press the Anykey button
Delete the Playlist
Press the …† buttons to select the Playlist you
Press the …† buttons to select the Delete
Press the Anykey button in playlist mode
Go To Edit Playlist
Press the …† buttons to select Edit Playlist
Press the Anykey button
Viewing a Picture
Select Media
Insert a Jpeg disc into the disc tray
Press the …† œ √ buttons to select a picture
Slide Show
Press the …† buttons to select Slideshow, then
To see the next 8 pictures, press the Skip
Zoom
To setup, follow steps 1 to 4 in page 69~70
Rotate
Press the …† buttons to select Rotate, then
Go To Photo List
Each time the OK button is pressed, the picture
1Press the OK button to select the picture you
This unit can play the following video
Using the Menu button
Playing an MPEG4
Compression formats
Broken fonts, change DivX Subtitle to
DivX Subtitle Encoding
If the subtitle language is displayed
Format is not supported
Finalise This closes the DVD-RW/-R so no
Before Recording
Recordable Discs
Unfinalise
Recording Mode
Recording Formats
Concerning Copy Control Signals
Unrecordable pictures
Recording
PR Number AV1 AV2 AV3 DV
SP LP EP XP
To display playback related icons on
030 100 .. Off
Timer counter decreases by
About Info button
To stop recording
While Recording
EcordingR Using the Title List button
Simultaneous
Press the …†/ Skip Buttons to select Recording title list
Making a Timer Recording
Using the Timer button
If the timer settings overlap
Timer recording time may differ from
Mode Recording Mode
More disc memory
Editing the Scheduled List
Deleting a Scheduled List
Go To Recorded List
Information about Recorded List
Recorded List screen will disappear
Delete Recorded List
Clear Recorded List
Go to Scheduled List
Editing
Title List
Play List
Buttons, press the OK button
RenamingLabeling a Title
Rename from the Title List, then press the Anykey
Press the OK button
Locking Protecting a Title
Deleting a Title
Press the œ√buttons to select Yes, then press the OK button
Off in the Title Protection menu
Splitting a Section of a Title Split
Want to delete a protected entry, select
See
Splitting and press the OK button
Message This title cannot be recovered after
Deleting a Section of a Title Partial Delete
Splitting. Do you want to split? is displayed
Image and end point time is displayed
Press the OK button at the starting point
Press the OK button at the end point
Section deletion ending point window
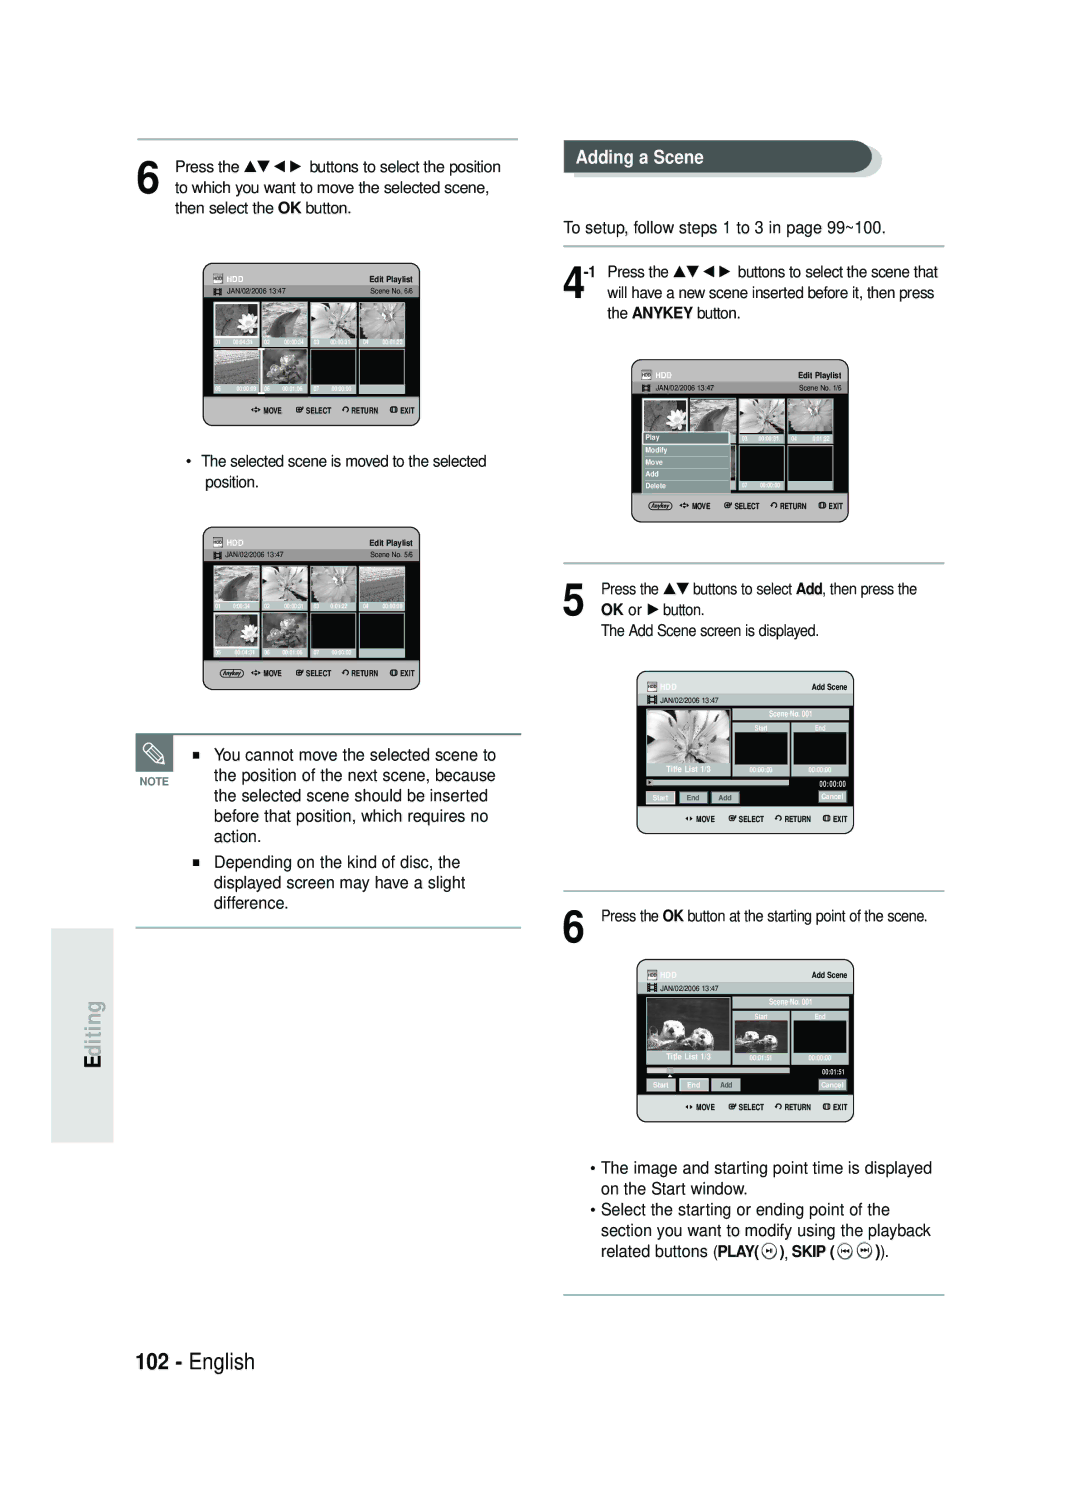
Creating a Playlist
Press the …† buttons to select Playlist, then
Displayed screen may have a slight
You can create up to 99 playlist entries
Depending on the kind of disc,
Difference
Using the Play List button
Playing Entries in the Playlist
Renaming a Playlist Entry
Editing a Scene for the Playlist
OK button
Selected playlist entry
To setup, follow steps 1 to 3 in page 99~100
OK or √ button Modify Scene screen is displayed
Buttons Play , Search
Moving a Scene Changing the Position of a Scene
Press the OK button at the end point of the scene
Selected scene should be inserted
You cannot move the selected scene to
Position of the next scene, because
Before that position, which requires no
Deleting a Scene
Deleting a Playlist Entry from the Playlist
HDDPlaylist
About the Copy Screen
Copying a Title that has been edited once before
Copying an Unedited title
Changing the Record Mode
Previous page of title list
Copying Multiple Titles at One Time
Copy To move to other pages, press the Skip Buttons
Next page of title list
Press the …† buttons to select an additional title
Deleting an Undesired Title from the Copy List
If copy list contains at least one title that
Press the Anykey button. Press the …† buttons to
Selecting Record Mode of Each Title from the Copy List
Previewing a Selected Title from the Copy List
Window located at the centre of the screen
Changing Record Mode of All Titles from the Copy List
Screen using the …†œ √ buttons, then press
Copying from DVD to
Record mode cannot be changed when
DVD-R and DVD-RWV mode mode
Mode is available
HDD operationSee
Copying MP3, Jpeg or DivX
File Copy
Press the …† buttons to select Copy, then press
Pressing the Cancel button during folder
Folder Copy
Subfolders and files in the selected folder are copied
Beginning editing
Disc Manager
Editing the Disc Name
Press the …† œ √ buttons to select Save
Disc Protection
Formatting a Disc
Delete All Title Lists/DivX Lists /Music Lists/Photo Lists
DVD-RW
Delete All Title Lists
Disc is finalised
Finalising a Disc
Finalise disc?
Finalising time may be different depending
Unfinalising a Disc V/VR mode
DVD-RW can be finalised or unfinalised Video mode
DVD-RW can be finalised or unfinalised in VR mode
Troubleshooting
Power
Recording
Playback
Timer Recording
Video
Sound
Remote Control Unit
Reference
Other
Specifications
Audio Output
Ellas Greece
Page
AK68-01179A
DVD-HR735 DVD-HR737
Ελληνικά
Προειδοποίηση
Ναρξη
Δεν παρέχονται δικαιώματα επαγγελματικής χρήσης
Προφυλάξεις
Έναρξη
Χειρισμός των δίσκων
Αποθήκευση δίσκων
Προδιαγραφές δίσκων
Αντιγραφή δίσκου
Συσκευή αναπαράγει δίσκους CD-R και CD-RW μορφής CD-DA
Περιεχόμενα
Διαμόρφωση δίσκου
Προστασία
Μη χρησιμοποιείτε τους παρακάτω δίσκους
Περιεχόμενα
Εγγραφή του τρέχοντος προγράμματος
Χρήση των λειτουργιών αναζήτησης
Aναπαραγωγή σε αργή κίνηση
Εγγραφή από εξωτερικές συσκευές
Γενικά χαρακτηριστικά
10 Ελληνικά
DVD-HR735/737
Χρήση του σκληρού δίσκου
Χρήση ενός DVD-RW
Χρήση ενός DVD-R
Ότι τα δεδομένα του δίσκου θα χαθούν όταν
12 Ελληνικά
Όχι και τους δύο ταυτόχρονα
Αλλάζετε μορφή
Προετοιμασία του τηλεχειριστήριου
Αποσυσκευασία
Εξαρτήματα
Τοποθέτηση των μπαταριών στο τηλεχειριστήριο
14 Ελληνικά
Περιγραφή
Πρόσοψη
DVD-HR735 DVD-HR737 Κουμπί STANDBY/ON
Πίσω όψη
Οθόνη πρόσοψης
16 Ελληνικά
Τηλεχειριστήριο
18 Ελληνικά
Γρήγορη επισκόπηση
Πρόσθετες συνδέσεις
Κεραία + συσκευή εγγραφής DVD +
Πρόσθετες συνδέσεις
Μπορείτε να παρακολουθήσετε προγράμματα
Εγγραφής DVD δέκτη
20 Ελληνικά
Εγγραφής DVD, μπορείτε να κάνετε εγγραφές από
Συνδέστε τα καλώδια της κεραίας RF όπως φαίνεται
Περίπτωση 2 Σύνδεση σε υποδοχή εξόδου S-Video
Περίπτωση 1 Σύνδεση σε υποδοχή εξόδου βίντεο Composite
22 Ελληνικά
Περίπτωση 1 Σύνδεση με την τηλεόραση
Κόκκινο λευκό
24 Ελληνικά
Περίπτωση 2 Σύνδεση σε τηλεόραση με υποδοχή DVI
Υποδοχή Hdmi
Hdmi High Definition Multimedia Σημειωση Interface
Εισόδου AV3 IN, DV
26 Ελληνικά
Κουμπί OK
Ρύθμιση συστήματος
Κουμπί Menu
Κουμπί Return
Ρύθμιση
28 Ελληνικά
Ρύθμιση της ώρας
Ρύθμιση της ώρας, πατήστε το κουμπί Menu
Ελέγξτε την ημερομηνία και την ώρα
30 Ελληνικά
Διαβάστε τη σελίδα
Κουμπί
Πατήστε το κουμπί OK. Για έξοδο, πατήστε το κουμπί Menu
Προσθήκη/ Διαγραφή
32 Ελληνικά
Κουμπί
Με τη συσκευή σε τρόπο λειτουργίας διακοπής
Εμφανιστεί το μενού ρύθμισης γλώσσας
Αυτή η λειτουργία θέτει αυτόματα τη συσκευή εγγραφής
Ήχος Για τη γλώσσα διαλόγων του δίσκου
34 Ελληνικά
Χρησιμοποιήσετε τη λειτουργία αυτόματης
Και μετά πατήστε το κουμπί OK ή το κουμπί
Oφφ Επιλέξτε το αν δεν θέλετε να
Δημιουργίας κεφαλαίων
Καταχώριση DivXR
Ρύθμιση χρόνου παράλειψης CM
36 Ελληνικά
Ρύθμιση χρόνου τρόπου λειτουργίας ΕΡ
Ψηφιακή Έξοδος
Ήχου
Ύθμιση συστήματος
38 Ελληνικά
Mode Compatibility
DTS
Λόγος πλευρών εικόνας στην τηλεόραση
40 Ελληνικά
Επιστρέψετε στο προηγούμενο μενού
Interlace δείτε τις σελίδες 41 ως
Διαθέσιμη υποδοχή εξόδου βίντεο
Σε τρόπο λειτουργίας συνιστωσών, μπορείτε να
Όταν το καλώδιο Hdmi δεν είναι συνδεδεμένο, οι
42 Ελληνικά
Συστήματος
ΎθμισηΡ
Θα εμφανιστεί το μήνυμα Σταδιακή σάρωση, θέση Εξόδου Βίντεο
Ρύθμιση του γονικού ελέγχου
Τον κωδικό πρόσβασης
Πρόσβασης
44 Ελληνικά
Αν ξεχάσετε τον κωδικό πρόσβασης
Αλλαγή του κωδικού πρόσβασης
Χρησιμοποιώντας τα αριθμητικά κουμπιά στο τηλεχειριστήριο
Τύποι δίσκων που μπορούν να αναπαραχθούν
46 Ελληνικά
Αναπαραγωγή ενός δίσκου
Αναπαραγωγή
Play
Για τους δίσκους DVD-Video
Για δίσκους HDD/DVD-RAM/-RW/-R
Αναζήτηση σε κεφάλαιο ή κομμάτι
48 Ελληνικά
Παράλειψη κεφαλαίων, κομματιών ή
Δεικτών
Αναπαραγωγή καρέ-καρέ
Τίτλος ή Κεφάλαιο
Σχετικά με το κουμπί
Πατήστε το κουμπί Anykey κατά την αναπαραγωγή
Πατήστε τα κουμπιά ή τα αριθμητικά
50 Ελληνικά
Σχετικά με το κουμπί Info
Μενού πλοήγησης
Πλοήγηση σε σκηνές
Αν πατήσετε το κουμπί Info δύο φορές, θα εμφανιστεί
Πατήστε το κουμπί OK
Πλοήγηση στο χρόνο
52 Ελληνικά
Βιβλιοθήκη
Anykey
Χρήση δεικτών
Αναπαραγωγή από ένα δείκτη
54 Ελληνικά
Διαγραφεί μετά την καταχώριση δέκα δεικτών
Διαγραφή ενός δείκτη
Τρόπος λειτουργίας VR
Όταν διαγράφεται ένας δείκτης κατά την
56 Ελληνικά
Χρήση σελιδοδεικτών
Αναπαραγωγή από ένα σελιδοδείκτη
Χρήση του κουμπιού Anykey
Διαγραφή σελιδοδείκτη
Πατήστε το κουμπί Subtitle κατά την αναπαραγωγή
Διαφέρει ανάλογα με τον τύπο του δίσκου
Επιλογή της γλώσσας διαλόγων
58 Ελληνικά
Πατήστε το κουμπί Audio κατά την αναπαραγωγή
Πατήστε τα κουμπιά για να επιλέξετε την επιθυμητή γωνία
Αυτή η λειτουργία εξαρτάται από το δίσκο και
Μπορεί να μην εκτελείται σε όλα τα DVD
Επαναλαμβανόμενη αναπαραγωγή
Επαναλαμβανόμενη Αναπαραγωγή
ΝαπαραγωγήΑ
Επανάληψη αποσπάσματος
Για επιστροφή στην κανονική
Πατήστε το κουμπί Cancel για να επιστρέψετε
Μεγέθυνση
Αναπαραγωγή
Στοιχεία οθόνης CDCD-DA ήχου
Αναπαραγωγή ενός CD ήχου/MP3
Αναπαραγωγή ενός CD CD-DA ήχου
62 Ελληνικά
Κουμπί Skip Αναπαράγει το επόμενο κομμάτι
Αναπαραγωγή ενός δίσκου MP3
Επιλέγει ένα κομμάτι τραγούδι
Κουμπιά Step Μετακινήστε τη σελίδα επάνω/ κάτω
Για επιστροφή στην κανονική αναπαραγωγή
64 Ελληνικά
Επανάληψη CD CD-DA και MP3
Λειτουργίας επανάληψης που θέλετε
Νέα λίστα αναπαραγωγής
Κομματιών ενός δίσκου με τυχαία σειρά
Μετάβαση στη λίστα αναπαραγωγή
66 Ελληνικά
Φάκελο της επιθυμητής λίστας αναπαραγωγής
Διαγραφή της λίστας
Αναπαραγωγής
Μετάβαση στην επεξεργασία λίστας αναπαραγωγής
68 Ελληνικά
Μετάβαση στη λίστα μουσικής
Επιλογή μέσων
Διαδοχική προβολή φωτογραφιών
70 Ελληνικά
Για να διακόψετε τη διαδοχική προβολή των φωτογραφιών
Για να διακόψετε την περιστροφή
Περιστροφή
Ζουμ
Φωτογραφία που θέλετε να δείτε και μετά πατήστε το
Μετάβαση στη λίστα φωτογραφιών
72 Ελληνικά
X2 X4 X2 Κανονικό Για να διακόψετε το ζουμ
Αναπαραγωγή MPEG4
Περιγραφή λειτουργίας MPEG4
Κωδικοποίηση υπότιτλων DivX
74 Ελληνικά
Πατήστε το κουμπί Anykey στον κατάλογο αρχείων
Πριν από την εγγραφή
Εγγράψιμοι δίσκοι
Τρόπος λειτουργίας εγγραφής
Μορφές εγγραφής
76 Ελληνικά
DVD-RW τρόπος λειτουργίας V/-R
Copy-Free
Μη εγγράψιμες εικόνες
Σχετικά με σήματα ελέγχου αντιγραφής
Μέσο
Για παύση της εγγραφής
Εγγραφή
78 Ελληνικά
Για να διακόψετε την εγγραφή
PR Number AV1 AV2 AV3 DV
Προτού ξεκινήσετε
Για παύση της εγγραφής
SP LP EP XP
80 Ελληνικά
Συνδέστε την υποδοχή της εξόδου DV της
Καλώδιο DV Πατήστε το κουμπί HDD ή το κουμπί DVD
Για το κουμπί Info
030 100 .. Off
Αν πατήσετε το κουμπί Info τρεις φορές Θα εμφανιστεί μια
Διακοπή αναπαραγωγής / Εγγραφής
Ενώ γίνεται εγγραφή
82 Ελληνικά
Πατήστε το κουμπί OK ή το κουμπί Play Στιγμή, από την αρχή
Πηγή Η πηγή εισόδου βίντεο AV1, AV2
Χρήση του κουμπιού Μενu
Πατήστε το κουμπί OK για να επιλέξετε Προσθήκη στη λίστα
IAN Κάθε ΚΥΡ
84 Ελληνικά
Για έξοδο χωρίς την αποθήκευση της τρέχουσας ρύθμισης
Επεξεργασία της λίστας προγραμματισμού
Διαγραφή της λίστας προγραμματισμού
86 Ελληνικά
Εμφανίζεται η οθόνη Αποθηκευμένη λίστα
Μετάβαση στη λίστα εγγραφών
Πληροφορίες για τη Recorded List Λίστα εγγραφών
Πληροφορίες και μετά πατήστε το κουμπί OK ή το
Διαγραφή Λίστας εγγραφών
88 Ελληνικά
Eπεξεργασία
Λίστα τίτλων
Λίστα αναπαραγωγής
OK ή το κουμπί Εμφανίζεται η οθόνη Μετονομασία
Μετονομασία ενός τίτλου
90 Ελληνικά
Συνέχεια, πατήστε το κουμπί OK
Κλείδωμα Προστασία ενός τίτλου
Και, στη συνέχεια, πατήστε το κουμπί Anykey
Διαγραφή ενός τίτλου
92 Ελληνικά
Χωρισμός τμήματος τίτλου Χωρισμός
Στη συνέχεια, πατήστε το κουμπί Anykey
OK ή το κουμπί Εμφανίζεται το μενού Επεξεργάζομαι
94 Ελληνικά
Μετά τον διαχωρισμό. Θέλετε να διαχωρίσετε τον τίτλο
Πατήστε το κουμπί OK στο σημείο έναρξης
Στοιχεία οθόνης τμηματικής διαγραφής της λίστας τίτλων
Δημιουργία λίστας αναπαραγωγής
96 Ελληνικά
Κίτρινη γραμμή επιλογής μετακινείται προς το κουμπί End
Πατήστε το κουμπί OK στο σημείο διακοπής
Της λειτουργίας
Μετονομασία μιας εγγραφής της λίστας αναπαραγωγής
Αναπαραγωγή εγγραφών από τη λίστα αναπαραγωγής
98 Ελληνικά
Τίτλος
Επεξεργασία μιας σκηνής για τη λίστα αναπαραγωγής
100 Ελληνικά
ΕπξργσΛίστΠξμ
Μετακίνηση μιας σκηνής αλλαγή της θέσης μιας σκηνής
Πατήστε το κουμπί OK στο σημείο διακοπής της σκηνής
102 Ελληνικά
Το κουμπί Εμφανίζεται η οθόνη Προσθήκη Σκηνής
Και, στη συνέχεια, πατήστε το κουμπί OK για να
Διαγράψετε την επιλεγμένη σκηνή
104 Ελληνικά
HDDΛίστΠαιζ
Πληροφορίες σχετικά με την οθόνη αντιγραφής
Επόμενη σελίδα λίστας τίτλων
Προηγούμενη σελίδα λίστας τίτλων
Πληροφορίες σχετικά με τη χρήση του κουμπιού Copy
Αντιγραφή ενός μη επεξεργασμένου τίτλου
106 Ελληνικά
Για να αντιγράψετε κάποιο τίτλο ενόσω φαίνεται στην
Αλλαγή του τρόπου λειτουργίας εγγραφής
108 Ελληνικά
Και, στη συνέχεια, πατήστε το κουμπί OK ή το κουμπί
Πατήστε το κουμπί OK Εμφανίζεται η οθόνη +ΛίστΑντγρφής
Αντιγραφής
Διαγραφή ανεπιθύμητου τίτλου από τη λίστα αντιγραφής
Για ρύθμιση, ακολουθήστε τα βήματα 1 έως 7 στη σελίδα
Για να επιλέξετε Διαγράφω και, στη συνέχεια, πατήστε
Προεπισκόπηση επιλεγμένου τίτλου από τη λίστα αντιγραφής
110 Ελληνικά
Στη συνέχεια, πατήστε το κουμπί OK
Τίτλος ΘέσηΕγφή
112 Ελληνικά
Κουμπιού Copy
Αντιγραφή αρχείου
Προδιαγραφές αντιγραφής περιεχομένου
Ξεκινά η αντιγραφή αρχείων
Πατήστε τα κουμπιά για να επιλέξετε Αντιγραφή
Αντιγραφή φακέλου
114 Ελληνικά
Ξεκινά η αντιγραφή του φακέλου
Επεξεργασία του ονόματος του δίσκου
Μετονομασία Προστασία Διαγραφή Όλα
Δίνεται ένα όνομα στο δίσκο
Προστασία δίσκου
Διαμόρφωση ενός δίσκου
116 Ελληνικά
Διαμόρφωση στο δίσκο
Δίσκου
Διαγραφή όλων των λιστών τίτλων
118 Ελληνικά
Κουμπί OK
Ολοκλήρωση δίσκου
Θα εμφανιστεί το μήνυμα Θέλετε να οριστικοποιήσετε τον δίσκο
Θα εμφανιστεί το μήνυμα Θέλετε την μη
120 Ελληνικά
Πατήστε τα κουμπιά για να επιλέξετε Μη
Οριστικοποίηση του δίσκου
Λειτουργία
Αντιμετώπιση Προβλημάτων
Παραπομπές
Εγγραφή
Δε γίνεται αναπαραγωγή του δίσκου
Αναπαραγωγή
122 Ελληνικά
Δεν μπορείτε να αλλάξετε το λόγο πλευρών
Εγγραφή με χρονοδιακόπτη
Αραπομπές
Σήμα βίντεο
Ήχος
Άλλα
124 Ελληνικά
Τεχνικές προδιαγραφές
Έξοδος ήχου
Thl
Kruonerivou 112 145 68 Kruonevri, Apikhvı
Επικοινωνήστε με τη Samsung World Wide
AK68-01179A