DVD-R125
Avertissement
Français
Précautions
Entretien du boîtier
Manipulation du disque
Instructions importantes relatives à la sécurité
Stockage du disque
Spécifications du disque
Utilisation d’un CD-R/RW
Utilisation du disque MPEG4
DVD-RW mode VR
DVD-RW mode Vidéo
Lecture et enregistrement de disques DVD-RAM
Configuration des options d’affichage
Table des matières
Antenne + enregistreur DVD + boîtier du
Raccordement dun câble HDMI/DVI à un
Enregistrement à partir d’une source
Vérification de l’espace disque
Enregistrement du programme télévisé que
Enregistrement flexible pour l’enregistrement par
Caractéristiques générales
Comment utiliser le graveur DVD?
Icônes utilisées dans le manuel
Propos de l’utilisation du manuel de lutilisateur
Copyright
Utilisation dun disque DVD-RW en mode VR
Utilisation dun disque DVD-RW en mode Vidéo
Création dune liste de lecture DVD-RAM/-RW en mode VR
Étape 6 Finalisation & lecture sur dautres composants DVD
Accessoires
Préparation de la télécommande
Réglage de la télécommande
Insérez les piles dans la télécommande
Codes TV contrôlables
13. Récepteur de la télécommande
Description
Affichage en façade
Prog
Panneau arrière
Ventilateur
Connecteur AV1TV Output Scart Connecteur AV2EXT Input Scart
Le branchement de lantenne ne permet
Aperçu de la télécommande
Présentation rapide
Connexion de lenregistreur DVD à dautres
Cette section contient les différentes méthodes de
Requis
Mode DVD
Mode TV
Connexion de Connexions Lenregistreur DVD
Frontal à diodes ou éteignez lenregistreur DVD
Autre type de connexion du câble de sortie vidéo
Modes S-Vidéo, Vidéo composant et Sortie progressive
Sortie de balayage progressif 576p
Cas 2 Connexion à une prise de sortie S-Vidéo
Vous obtiendrez régulièrement des images de qualité
Voir p.20 à
Autre type de connexion du câble de sortie audio
Cas 3 Prises de sortie Vidé o composant
Cas 1 Connexion à votre té lé viseur
Rouge blanc
Raccordement dun câble HDMI/DVI à un téléviseur
Cas 1 Raccordement à un Té lé viseur prise Hdmi
Cas 2 Raccordement à un
Té lé viseur prise DVI
Cas 2 Connexion dun camé scope à la prise dentré e DV
Navigation dans le menu à l’écran
Bouton Menu
Boutons …†, œ√
Bouton OK
Branchement et réglage automatique
Connectez le câble RF comme indiqué en
Raccordez l’enregistreur DVD au secteur
Le balayage automatique des canaux peut démarrer
Réglage de l’horloge
Automatique de l’horloge
Appuyez sur les boutons …† pour sélectionner
’horloge automatique
Le balayage des canaux démarre
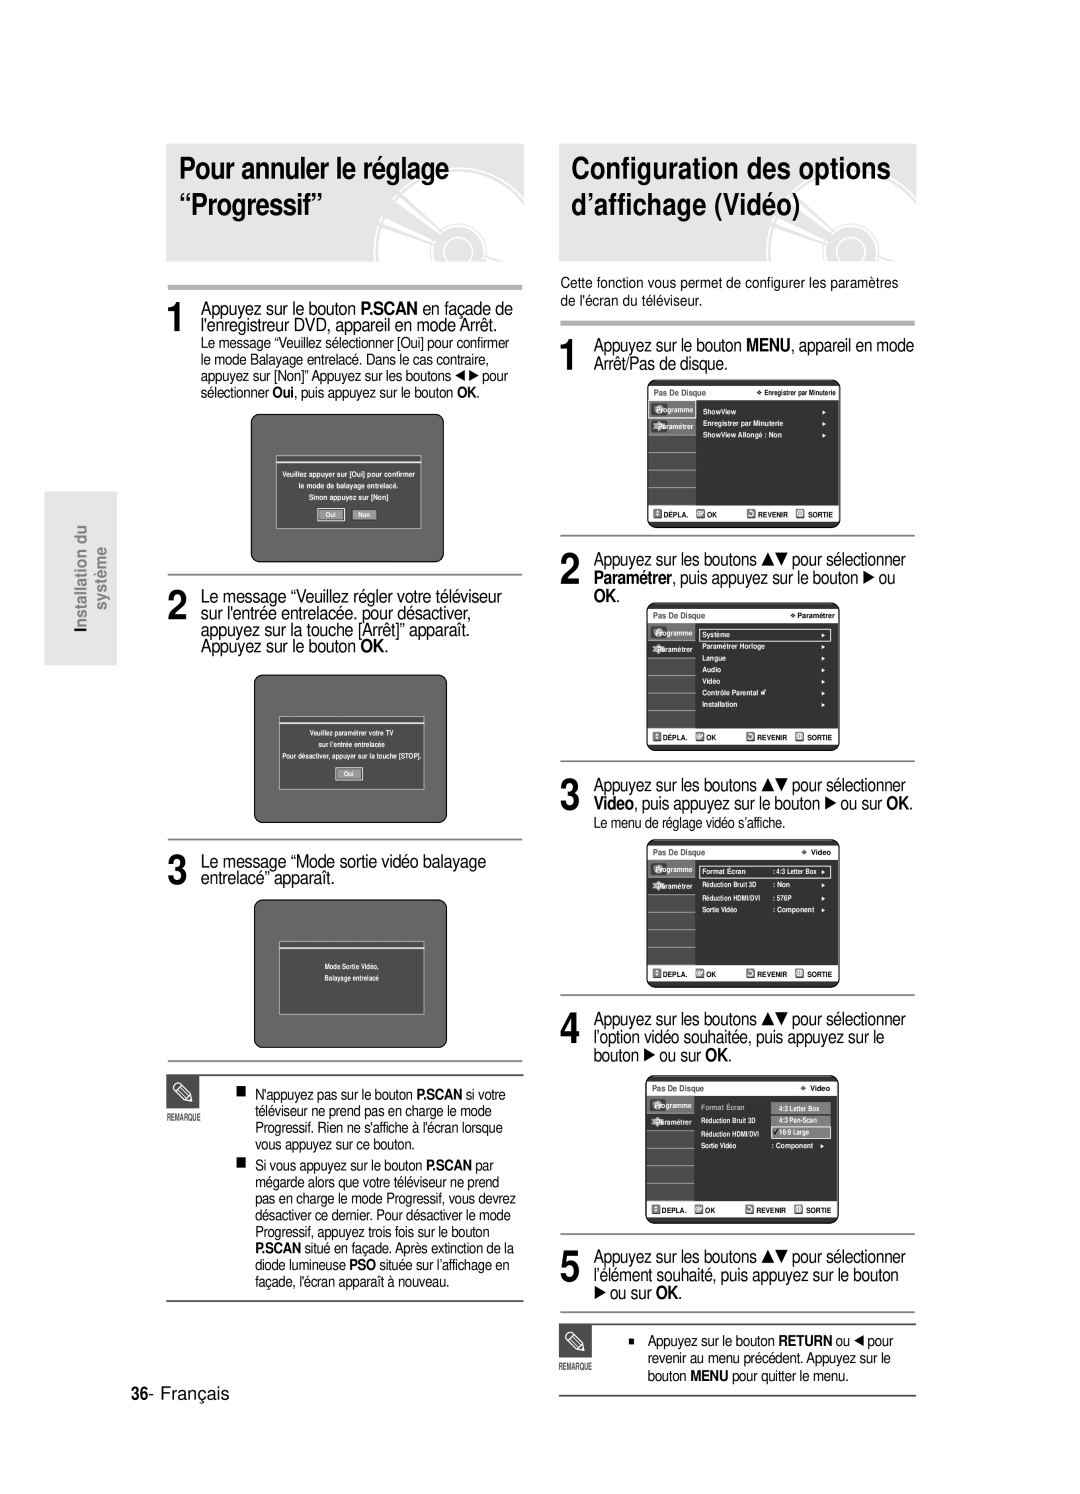
Appuyez sur le bouton MENU, appareil en
FFrance DDeutschland ESpain
Mode Arrêt/Pas de disque
Installation Manuelle, puis appuyez sur le
Pré -réglage des canaux avec la fonction de réglage manuel
Bouton √ ou OK
Configuration des options de langue
Le menu de réglage de la langue s’affiche
Bouton Menu pour quitter le menu
Appuyez sur le bouton Return ou œ pour
Mode EP Chapitre
Réglage de l’heure en
Bouton √ ou OK
’affichage en façade
Oui ou Non, puis appuyez sur le bouton √ ou
Oui, puis appuyez sur le bouton OK
Configuration des options
Nicam
Configuration des options audio
Enregistrement DivXR
Appuyez sur les boutons …† pour
Bouton √ ou sur OK
Options audio
Sortie Numé rique
Compression Dynamique
Le message Mode sortie vidéo balayage progressif apparaît
Prise Sortie vidéo disponible
Sélectionner Sortie vidéo, puis appuyez sur le
Le message Mode sortie vidéo balayage entrelacé apparaît
Pour annuler le réglage
Progressif ’affichage Vidéo
Arrêt/Pas de disque
Ré solution HDMI/DVI
Options daffichage Vidéo
Choix de la sortie
Configuration du contrô le parental
Si vous avez oublié votre code secret
Sélectionner Code secret
Appuyez sur le bouton √ ou sur OK pour
Propos du niveau dé valuation
Propos du Changement de mot de passe
Sélectionner Niveau de Contrô le
Reportez-vous à la page 38 si vous avez
Avant l’enregistrement
Disques enregistrables
Mode enregistrement
Formats d’enregistrement
Films non enregistrables
Enregistrement du
Vous regardez
Propos de la touche Info
Avant de commencer
SP LP EP XP
Appuyez sur la touche REC
Arrêter l’enregistrement
Vous ne pouvez pas changer de mode
PR Numéro AV1 AV2 AV3 DV
Appuyez sur la touche REC
Pour mettre l’enregistrement en pause
Copie à partir dun caméscope
Enregistrement avec une seule touche OTR
Appuyez sur le bouton REC pour démarrer lenregistrement
Istrement souhaitée
030 100 .. Off
Mode Arrêt
Réalisation dun enreg- istrement programmé
Utilisation du bouton Menu
Appuyez sur OK ou sur le bouton √
Editer une Minuterie Standard
Appuyez sur la touche OK
Appuyez sur OK ou sur le bouton √
Appuyez sur le bouton TIMER, appareil en mode Arrêt
Appuyez sur le bouton MENU, appareil en mode Arrêt
Supprimer une minuterie standard
’écran de saisie des enregistrements programmés s’affiche
Utilisation de la fonction ShowView
Utilisation de la touche Menu
Appuyez sur la touche Menu en mode Stop
Lorsqu’il est l’heure de démarrer l’enregistrement
Et l’enregistrement commence automatiquement
Reçu en cours d’enregistrement
Avant la lecture
Type de disques pouvant être lus avec cet appareil
Disques ne pouvant être lus avec cet appareil
Lecture d’un disque
Appuyez sur la touche OPEN/CLOSE
De la télécommande
Utilisation des fonctions de recherche
Cas des disques DVD-VIDEO
Cas des disques DVD-RAM/RW/R
Propos de la fonction Anykey
Ralenti
Lecture image par image
Sauter des chapitres ou des pistes
Utilisation de la fonction Repeat
Lecture de manière répétée Repeat Playback
Appuyez sur les touches …† pour sélectionner le Temps
Appuyez sur la touche Repeat en cours de lecture
Lecture
Répétition d’un chapitre
Appuyez sur la touche Anykey en cours de
Cancel ou Return
Sélection des sous-titres
Appuyez sur la touche Subtitle en cours de lecture
Pour que l’écran disparaisse, appuyez sur le bouton
Sélection de la langue audio
Changer l’angle de la caméra
Utilisation de la touche Anykey
Zoom avant
Utilisation des signets
Taille normale 2X 4X
Appuyez sur la touche Marker en cours de lecture
Lire un signet Utilisation des marqueurs
Effacer un signet
Sélectionnée
Le chiffre 01 s’affiche et la scène est mémorisée
Lecture d’un CD audio/MP3
Lecture d’un CD audio CD-DA/MP3
Insérez un disque MP3 dans le plateau
Touche permet de lire la piste chanson sélectionnée
Appuyez sur la touche / lecture rapide X2, X4
Touche OK permet de lire la piste chanson sélectionnée
Léments de l’écran MP3
Touche permet de lire la piste suivante
Mode Options de lecture
Programmer des pistes
Appuyez sur les boutons œ √ pour
Sélectionner Option de lecture
Lecture dune image
Insérez le disque au format Jpeg dans le tiroir disque
Sélectionner une image
Permet de revenir à l’écran Album
Lecture dun fichier
Insérez le disque au format MPEG4 dans le tiroir disque
Description de la fonction MPEG4
Compression vidéo suivants
Lecture de la liste de titres
Appuyez sur la touche Menu
Touche Title List
Léments de l’écran Liste de Titres
’édition limitées
Vous pouvez également lire un programme
Liste de titres
Liste de lecture
Renommer Étiqueter un titre
Utilisation de la touche Menu
Verrouiller Protéger un titre
Supprimer un titre
Supprimer une section d’un titre
Appuyez sur la touche Title List
’écran Liste de titres s’affiche
LI est impossible de supprimer une entrée
Appuyez sur la touche OK au point de
Démarrage
De la section
Touches liées à la lecture
Édition avancée Liste de lecture
Créer une Liste de lecture
Appuyez sur la touche OK au point de fin
Faire
Appuyez sur le bouton Play LIST, appareil en mode Arrêt
Appuyez sur la touche Stop pour arrêter la lecture
’écran É diter une liste de lecture s’affiche
Vous revenez à l’écran É diter une liste de lecture
Renommer une entrée dans une liste de lecture
Entrez les caractères désirés à l’aide des touches …† œ √
De la section Renommer la liste de titres
Affichés en appuyant sur la touche Info
Lire une scène sélectionnée
Éditer une scène pour une liste de lecture
’entrée de liste de lecture à lire est sélectionnée
’écran É diter une scène s’affiche
Pour la configuration, suivez les étapes 1 à 3 de la
Modifier une scène Remplacer une scène
Appuyez sur la touche OK au point de démarrage de la scène
Appuyez sur la touche OK au point de fin de la scène
Ajouter une scène
Appuyez sur les touches …† œ √ pour
Sur la touche OK
Déplacer une scène Changer une scène de position
Supprimer une scène
Touche OK
’écran É diter une liste de lecture s’affiche
La liste de lecture sélectionnée sera copiée
Sélectionner Suppirmer, puis appuyez sur la touche OK
Vous pouvez créer jusqu’à 999 scènes sur un
De lecture une fois l’opération terminée
Appuyez sur le bouton MENU, appareil en mode Arrêt
Gestionnaire de disque
Éditer le nom d’un disque
’écran É diter le nom s’affiche
Protection du disque
Formater un disque
Supprimer toutes les listes de titres
Sur la touche OK ou √
Le disque est formaté
Finaliser un disque
Le disque est finalisé
Ne pas finaliser un dique mode V/VR
En mode Vidéo
Un DVD-RW peut être finalisé ou non finalisé en mode VR
Le disque n’est pas finalisé
Dépannage
Alimentation
Enregistrement
Lecture
Vidéo
DVD. Voir page 36 à
Son
Enregitrement par minuterie
De fin de lenregistrement
Similaire durant lenregistrement
Télécommande
Autres
Appuyez sur le bouton
Caractéristiques techniques
France
Cet appareil est distribué par