Automaattinen asetusten määrittäminen

Jos kello on asetettu väärän aikavyöhykkeen tai kesäajan mukaan, voit säätää näitä ase-


Huomautus


tuksia poistamatta automaattista kellonajan


asetustoimintoa käytöstä.


Kanavia ei tarvitse virittää, jos ne on jo asetettu


automaattisesti (katso Automaattinen asetusten määrit


täminen kytkettäessä -toiminnon kuvausta sivulla 22).


DVD-tallentimessa/videonauhurissa on sisäänrakennet


tu viritin televisiolähetysten vastaanottoa varten.


Virittimen vastaanottamat kanavat täytyy virittää.

ärjestelmäasetuksetJ


Se voidaan tehdä seuraavilla tavoilla:


• Automaattinen asetusten määrittäminen kytkettäessä


(katso sivua 22)


• Automaattinen asetusten määrittäminen


• Manuaalinen asetusten määrittäminen (katso sivuja


25~26)


Paina MENU-painiketta laitteen ollessa pysäytys/ei


1 levyä-tilassa.


Valitse Setup …† -painikkeilla ja paina sen


2 jälkeen OK- tai -painiketta.


Valitse Install …† -painikkeilla ja paina sen


3 jälkeen OK- tai -painiketta.


No Disc


Install


Programme Auto Setup


Manual Setup


Setup


MOVE

OK

RETURN

EXIT

4 Valitse Auto Setup …† -painikkeilla ja paina sen jälkeen OK- tai -painiketta.

DVD tallennin etsii asemat valitsemasi maa tiedon perusteella.


Auto Setup


Country Selection


A

NL

S

PL


B

I

CH

CZ


DK

N

TR

Others


FIN

P

GR


D

E

HU


MOVE

OK


RETURN


Katso oheisesta taulukosta eri maista käytettävät lyhenteet.

A(Austria)

NL(Netherlands)

S(Sweden)

PL(Poland)

B(Belgium)

I(Italy)

CH(Swiss)

CZ(Czech)

DK(Denmark)

N(Norway)

TR(Turkey)

Others

FIN(Finland)

P(Portugal)

GR(Greece)


D(Deutschland) E(Spain) HU(Hungary)

5

Paina …† œ √ painikkeita valitaksesi “Country”.

Näyttöön tulee ilmoitus "Your data will be lost.


Press [OK] to continue, [MENU] to exit".


No Disc


Auto Setup


Programme

Auto Setup


Your data will be lost.


Press [OK] to continue, [MENU] to exit.


MOVE

OK


RETURN


EXIT


6

Keskeytä automaattinen kanavahaku painamalla

OK-painiketta.


No Disc


Auto Setup


Programme


Setup

Please wait


Scanning...

Stop

50%


MOVE


OK


RETURN


EXIT


Ensimmäinen taajuusalue selataan, ja ensimmäi- nen löytynyt asema näytetään ja tallennetaan. Sen jälkeen laite etsii seuraavan aseman ja niin edelleen.

Kun automaattinen kanavahaku on päättynyt, laite siirtyy automaattisesti ohjelmapaikkaan 1.

DVD-tallentimen/videonauhurin automaattisesti tallentamien kanavien määrä riippuu löydettyjen kanavien määrästä.

7 Jos haluat keskeyttää automaattisen kanavahaun ennen sen päättymistä, paina OK-painiketta.

Kellonaika ja päivämäärä asetetaan automaattises- ti lähetyssignaalista. Jos signaali on heikko tai jos haamukuvia esiintyy, kellonaikaa ja päivämäärää ei välttämättä aseteta automaattisesti.

Kun automaattinen kanavahaku on päättynyt, jotkin kanavat on voitu tallentaa useampaan kertaan; valitse ne kanavat, joilla on paras vastaanotto, ja poista tarpeettomat kanavat.

24 - Suomi

Page 24
Image 24
Samsung DVD-VR320/XEE manual Automaattinen asetusten määrittäminen

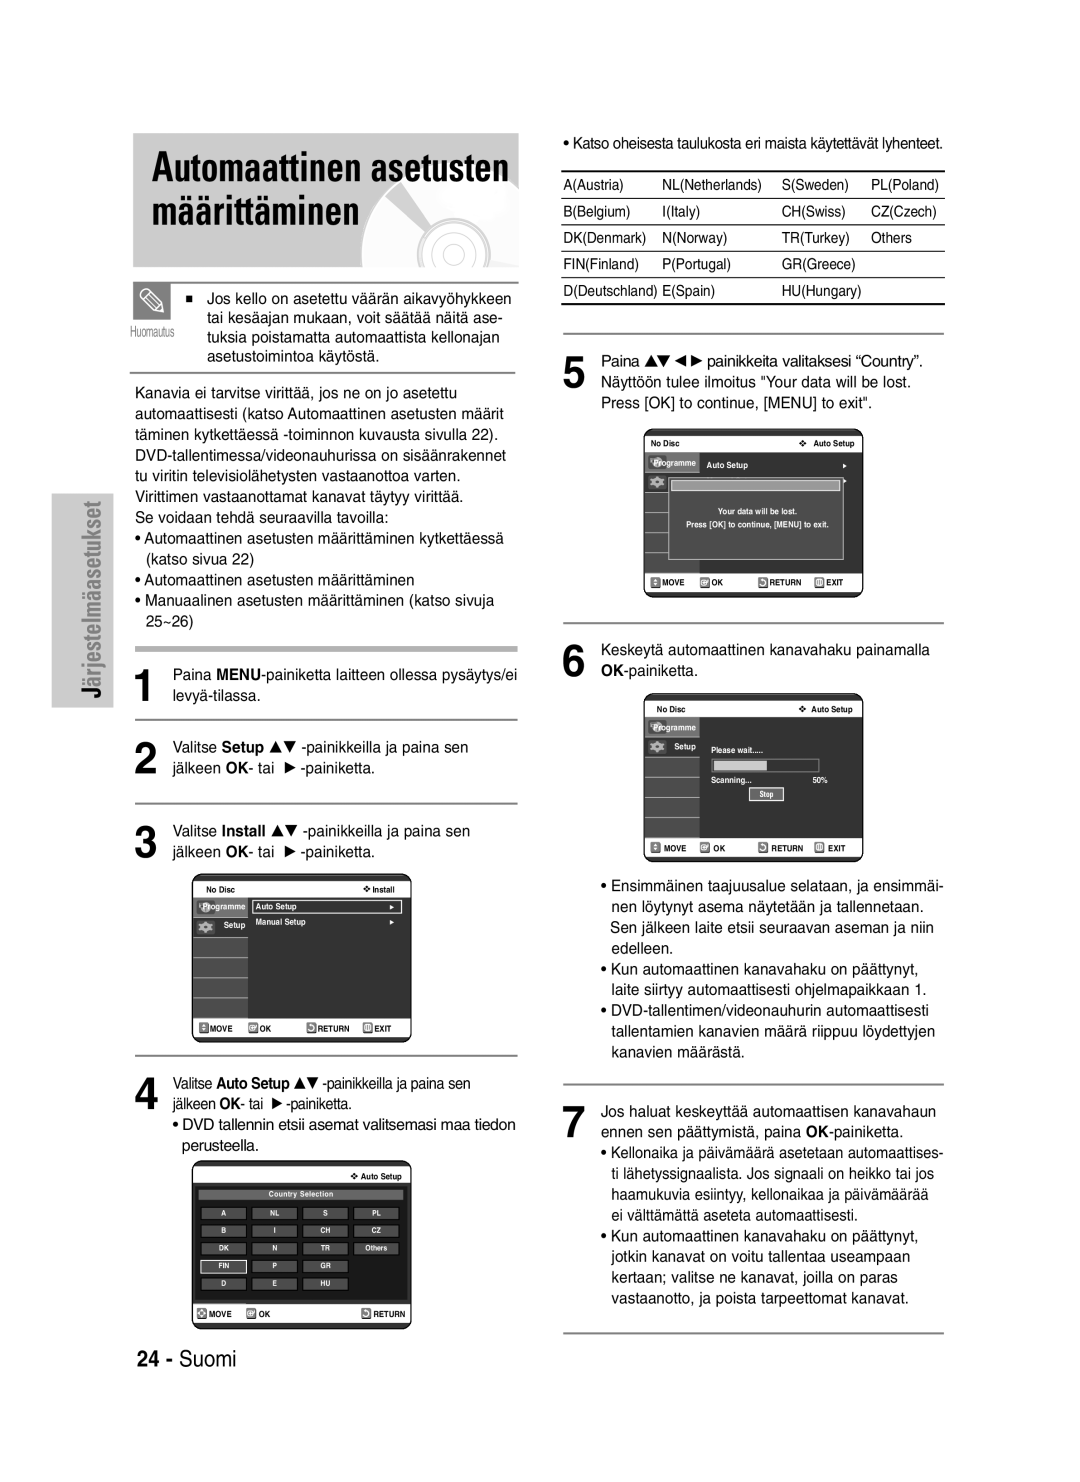
DVD-VR320/XEE specifications

The Samsung DVD-VR320/XEE is a versatile and user-friendly DVD recorder that combines innovative technology with a range of features designed to enhance the home entertainment experience. This model stands out for its capability to record TV programs directly onto DVDs, making it an excellent choice for users looking to preserve their favorite shows and movies.

At the heart of the DVD-VR320/XEE is its built-in DVD recorder, which supports a variety of disc formats, including DVD-RAM, DVD-R, and DVD-RW. This flexibility allows users to choose the format that best suits their needs, whether they are looking to create permanent copies or rewritable options. The device features a user-friendly interface, simplifying the recording process and ensuring that even those new to technology can operate it with ease.

One of the standout features of the DVD-VR320/XEE is its built-in digital tuner, which allows for the recording of digital broadcasts. This capability is essential in today's broadcasting environment, where digital content continues to dominate. Users can program recordings directly from the on-screen guide, making it easy to capture their preferred programs without the need for external devices.

The Samsung DVD-VR320/XEE also boasts high-quality video playback, supporting formats such as MPEG-2. This ensures that recorded content is displayed with clarity and detail. The DVD player portion of the device supports various playback modes, including progressive scan, which enhances image quality when viewing movies on compatible televisions.

Connectivity is another highlight of this model. The DVD-VR320/XEE includes multiple inputs and outputs, including composite, S-video, and digital audio outputs, ensuring compatibility with various home entertainment systems. The inclusion of a front-panel USB port also allows for easy connection of external storage devices, enabling users to play back media files directly from USB drives.

In terms of ease of use, the Samsung DVD-VR320/XEE features a straightforward remote control and clear on-screen menus. This design philosophy is evident in its timer record function, which allows users to schedule recordings easily, ensuring they never miss their favorite shows.

Overall, the Samsung DVD-VR320/XEE stands out due to its combination of advanced recording features, high-quality playback, and user-friendly design, making it a reliable choice for anyone looking to expand their home entertainment options. Whether recording television programs or enjoying DVDs, this versatile device offers a practical solution for modern media consumption.