DVD-VR320
Komme i gang
Holde plater
Forholdsregler
DVD-Video, Audio-CD
Forsiktighet ved håndtering av plater
Lyd-CD
DVD-Video
Avspilling og innspilling av DVD-R-plate
Avspilling og innspilling av DVD-RW-plate
Ikke bruk følgende plater
Avspilling og innspilling med DVD-RAM-plate
Beskyttelse
Innhold
Til fjernsynet ved hjelp av SCART-kabelen
Tilfelle 2 Koble en DV-enhet til DV IN-kontakten
Spesielle innspillingsfunksjoner
Grunnleggende VHS-innspilling
Før du leser brukerhåndboken
Mange forskjellige funksjoner med bruker
Vennlige brukergrensesnitt
En DVD-RW, men ikke begge samtidig
Du kan bruke enten VR eller V modus på
Gang, daglig eller ukentlig
Innspillingsmodus XP høy kvalitet-modus, SP
Norsk
Utpakking
Tilbehør
Hvis fjernkontrollen ikke fungerer som den skal
Knapp Funksjon
Stille inn fjernkontrollen
Beskrivelse
Component Video OUT-kontakter
Vifte
STANDBY/ON-knapp NUMMER-knapp IPC-knapp VCR-knapp
Timer REC-knapp
DVD-knapp
Kontrollknapper for TV
Rask oversikt
Tilkobling og forberedelser
Len hvis fjernsynet har den typen tilkobling
Videospilleren til fjernsynet via SCART-kabe
AV1TV Med en 21-pinners Scart-kabel
Med en RF-kabel AV2 in EXT Med en 21-pinners Scart-kabel
Med en RF-kabel
Koble én ende av videokabelen til Video
Videospilleren
Utgangen på baksiden av DVD-opptakeren eller
Koble den andre enden av videokabelen til den
Hvis apparatet støtter progressiv skanning
Video-kabelen
For hvordan Progressive Scan angis
Fjernsynets menysystem
Tilkoblinger for
AV-mottaker
Koble til en ekstern enhet
Knappene … / †,œ /√
Bruke skjermmenyen
OK-knapp
Trykk denne knappen på fjernkontrollen for å åpne
Velg Country ved hjelp av …† œ √ for å velge et
Tilkobling og automatisk oppsett
Land
Vent til gjeldende dato og klokkeslett vises
Mens enheten er i stoppmodus/uten plate, trykker
Stille klokken automatisk
Du på MENU-knappen
Trykk på œ √ knappene for å velge Auto Clock
Press OK to continue, Menu to exit
Automatisk oppsett
Trykk på OK-knappen for å starte den automa
Tiske skanningen
Manuelt oppsett
Gjør du følgende Lagre den viste
Setup, og trykk deretter på OK- eller √-knappen
Stasjonen Velge MFT
14Trykk på MENU-knappen for å gå ut av menyen
Og trykk deretter på OK-knappen igjen for å bytte
Velg Swap med …†-knappene
Video ut-kanal
D/K
DivX Subtitle Velger et DivX-undertekstspråk etter område
Angi språkalternativer
Dynamic Compression
Digitale signaler
Trykk på …†-knappene for å velge Audio, og
Menyen for lydoppsett vil vises
DivXR-registrering
TV Aspect
3D Noise Reduction
OK- eller √-knappen
Om klassifiseringsnivået
Om endringsnivået
VCR-innstilling
Trykk på …†-knappene for å velge Change
Bare bånd hvor sikkerhetstappen for innspilling er
Auto Play
Tape Length
Auto Repeat
Norsk IPC Intelligent Picture Control
Mens enheten er i stoppmodus/uten plate trykker
DVD EP Mode Time
Trykk på …†-knappene for å velge System, og
Trykk på …†-knappene for å velge Chapter
Frontdisplay
NICAMVideo-utdata
Trykk på …†-knappene for å velge NICAM, og
RGB, og trykk deretter på OK- eller √-knappen
Oppsett av Progressive
Scan
Ikke trykk på P.SCAN-knappen hvis du bruk
Du ser meldingen Video Output Mode Interlace Scan
Progressiv modus. Hvis du trykker på denne
Hvis du trykker på P.SCAN-knappen ved en
Områdekode bare DVD-Video
Før du spiller av
Platetyper som kan spilles av
Plater som ikke kan spilles av
Spille en plate
Søke gjennom et kapittel eller spor
For DVD-VIDEO-plate
For DVD-RAM/-RW/-R -plate
Hoppe over kapitler eller spor
Sakte avspilling / trinnvis avspilling
Om Anykey
Slow Motion Play Sakte film
Step Motion Play Trinnvis avspilling
Spille av flere ganger Gjentatt avspilling
Gjentatt avspilling
Gå tilbake til normal avspilling
Spille en spesiell del flere ganger
Velge språk for Undertekster
Velge språk for undertekst og lyd
Bruke SUBTITLE-knappen
Velge lydspråk
Bruke ANGLE-knappen
Bytte kameravinkel
Bruke bokmerker
Spille av et bokmerke
Slette et bokmerke
Slette et merke
Spille av et merke
Skjermelementer for lyd-CD CD-DA
Spille av en lyd-CD CD-DA
Knapper på fjernkontrollen som brukes til CD-avspilling
Trykk på œœ /√√ -knappen Hurtigspoling √√2, √√4, √√8
Skjermelementer for MP3
Spille av en MP3-plate
Knapper på fjernkontrollen som brukes til MP3-avspilling
@ Current track en sang Viser navnet til sporet som spilles
Modus for Play Option Spillealternativ
Repeat mode markeres
Går tilbake til Album-skjermen Aktiverer lysbildemodus
Spille av en bildeplate
Spille av en MPEG4- plate
Tracking
Funksjoner
Spille av et VHS-bånd
Pause
Mens en kassett er stoppet, trykker du på
Variabel søk
ANYKEY-knappen
Scan ved å trykke på …†-knappene, og trykk
Innspillbare plater
Før innspillingen
Denne opptakeren kan spille inn på følgende plater
Innspilling ikke kan gjøres
Innspillingsmodus
Innspillingsformater
Ikke-innspillbar video
DVD-RWV modus/-R
Sette på pause / Fortsette
Spille inn kanalen du ser på
Velge innspillingshastighet kvalitet
Trykk på REC SPEED-knappen flere ganger for å
Videospilleren når bildet du vil ta opp vises
Trykk på STOP-knappen på DVD-opptakeren eller
Gjøre et One Touch
Gjøre en timer
Opptak OTR Inspilling
Stoppe en innspilling
Recording Speed Innspillingshastighet DVD
Velg nummeret til den oppsatte innspillingslisten
Redigere den planlagte innspillingslisten
Du vil endre ved å trykke på …†-knappen, og
Velg Edit ved å trykke på …†-knappen, og trykk
Trykk på MENU-knappen mens apparatet er
Velg Standard Timer med …†-knappen, og trykk
Du vil slette ved å trykke på …†-knappen, og trykk
Deretter på OK-knappen Alternativene Edit og Delete vises
Sjekke om timer-innspillingen er stilt inn riktig
Knappen for å aktivere innstillingene for timer-inn
Skru på strømmen ved å trykke på STANDBY/ON
Spilling
Grunnleggende VHS-innspilling
ShowView Extended
Før du begynner
Og trykk deretter på OK- eller √-knappen
Maksimal innspillingstid SP vs LP
Spesielle inn- spillingsfunksjoner
Se på en annen kanal
Legge til innspillingstid
Kopiere fra DVD til videobånd VCR
Kopiere til DVD eller
Direkte kopiering fra DVD til videobånd VCR
Velg DVD -- VCR med …†-knappene, og trykk
Direkte kopiering fra videobånd VCR til DVD
Kopiere fra videobånd VCR til DVD
Spille av tittellisten
Bruke Title LIST-knappen
Bruke MENU-knappen
Skjermelementer i tittellisten
Velg tittelen du vil gi nytt navn fra tittellisten ved å
Gi en tittel nytt navn
Trykke på …†-knappene, og trykk deretter på OK
Knappen eller √-knappen
Slette en tittel
Låse beskytte en tittel
Slette en del av en tittel
Skjermelementer på tittelredigeringsskjermen
Opprette en spilleliste
Avansert redigering spilleliste
Slik lager du en ny spilleliste
Slik kommer du tilbake til menyen Edit Playlist
OK- eller √-knappen
Spille titler i spillelisten
Titlene i spillelisten spilles av
Skjermen Edit Playlist vises
Stoppet.Skjermen Edit Playlist vises
Renaming a Playlist Title
Skjermen Edit Playlist ises
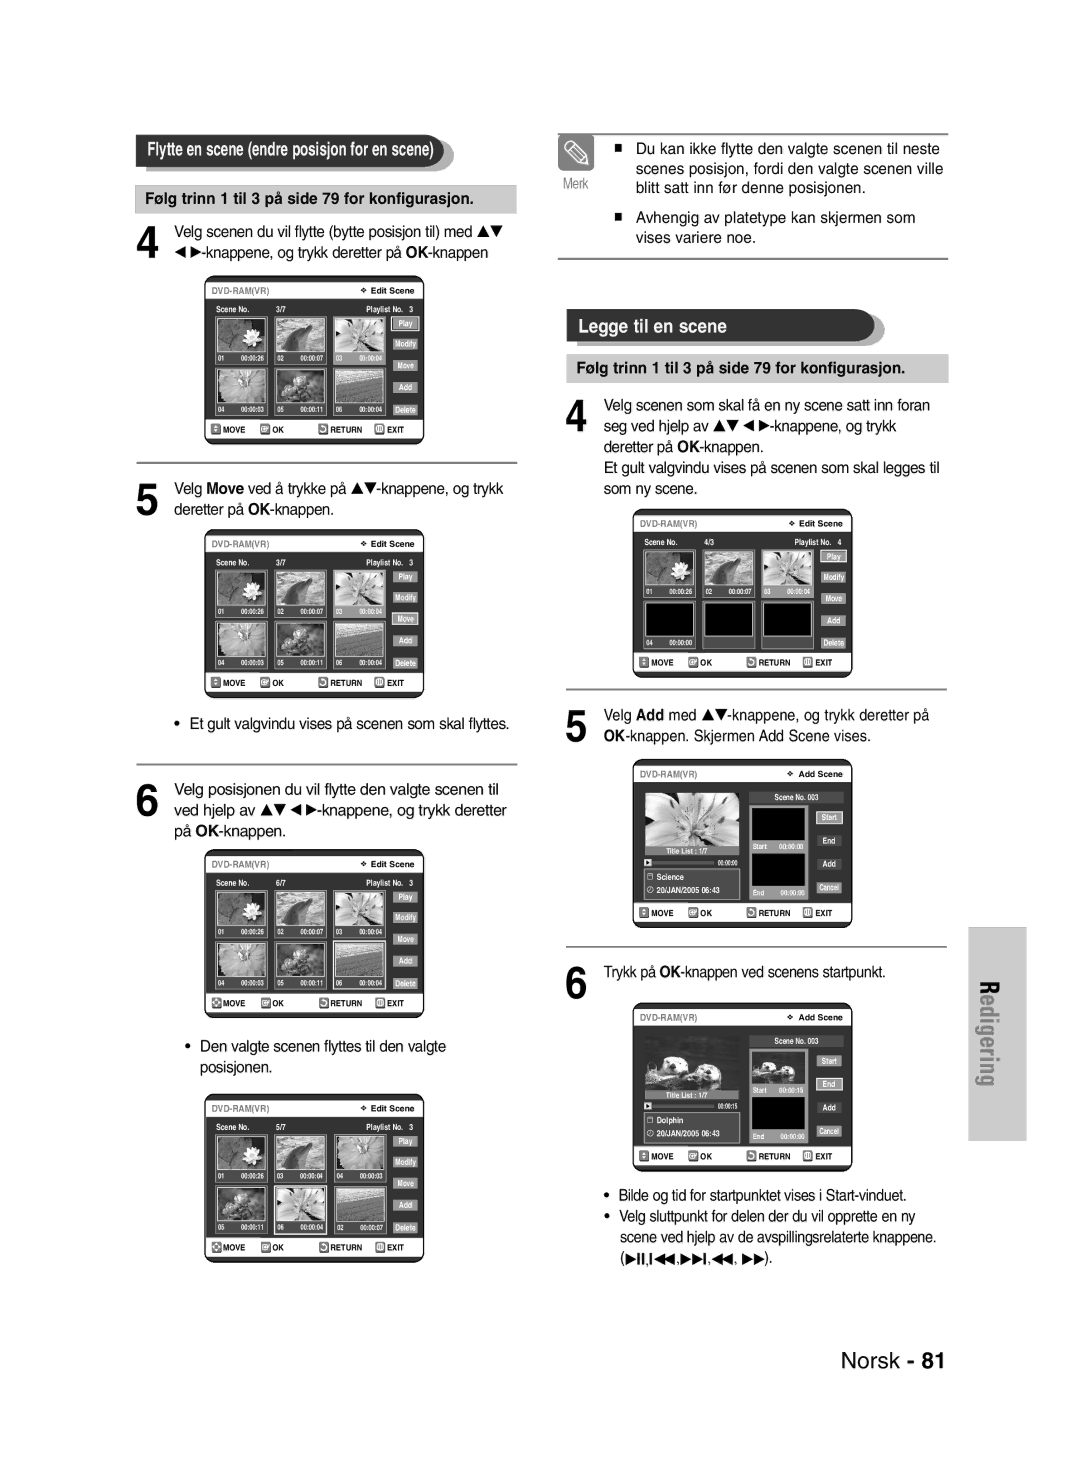
Redigere en scene for spillelisten
Følg trinn 1 til 3 på side 79 for konfigurasjon
Og trykk deretter på OK-knappen
Bilde og tid for startpunktet vises i Start-vinduet
Trykk på OK-knappen ved scenens startpunkt
På OK-knappen
Trykk på OK-knappen ved scenens sluttpunkt
Kopiere en spilleliste til videospilleren
Bilde og tid for sluttpunktet vises i End-vinduet
Spillelisten kan inneholde inntil 99 spillelis
Tilbake til skjermen Edit Playlist når slettingen er
Slette en spilleliste fra spillelisten
Fullført
Trykke på …†-knap- pene, og trykk deretter på OK-knap- pen
Redigere platenavnet
Diskbehandling
Formatere en plate
Disc Protection Platebeskyttelse
Stoppmodus
Sluttbehandle en plate
Velg Disc Unfinalise med …†-knappen, og trykk
DVD-RW can be finalised or unfinalised in VR mode
Du vil få meldingen ‘Do you want to unfinalise
Disc?’
Eller √-knappen
Slette alle tittellister
Referanse
Timer-innspilling fun
Inn-signalet vises en
Stund mens strøm
Men skrus på Kan ikke spille inn
Feilsøking DVD
Feilsøking VCR
Lydsignaler
Spesifikasjoner
Generelt
Norway
Page
AK68-00671G-00