Click a topic
Do not handle your camera with wet hands
Health and safety information
Do not disassemble or attempt to repair your camera
Prevent damage to subjects’ eyesight
Posted warnings, and directions from medical personnel
Avoid interference with other electronic devices
Directed by airline personnel
Avoid interference with pacemakers
Disconnect the charger from the wall socket when not in use
Use the battery only for its intended purpose
Do not touch the flash while it fires
Data transference and your responsibilities
137
111
131
Copyright information
Icons used in this manual
Indicators used in this manual
Mode Indicator
For example
Subject, background, and composition
Expressions used in this manual
Pressing the shutter
Exposure Brightness
Special features of your camera
Setting a Direct Link button option
App on the smart phone Turn on the AutoShare feature
Capture a photo
App on the smart phone Access the MobileLink mode
If a pop-up message appears, select an option
App on the smart phone Access the Remote Viewfinder mode
Touch the thumbnail to view the photo
Shooting samples Macro
Select the macro option Capture a photo
Basic troubleshooting
Red-eye or Red-eye Fix. p
Quick reference
Capturing photos of people
Contents
Contents
101
Contents
Inserting the battery and memory card ………
Basic functions
Optional accessories
Unpacking
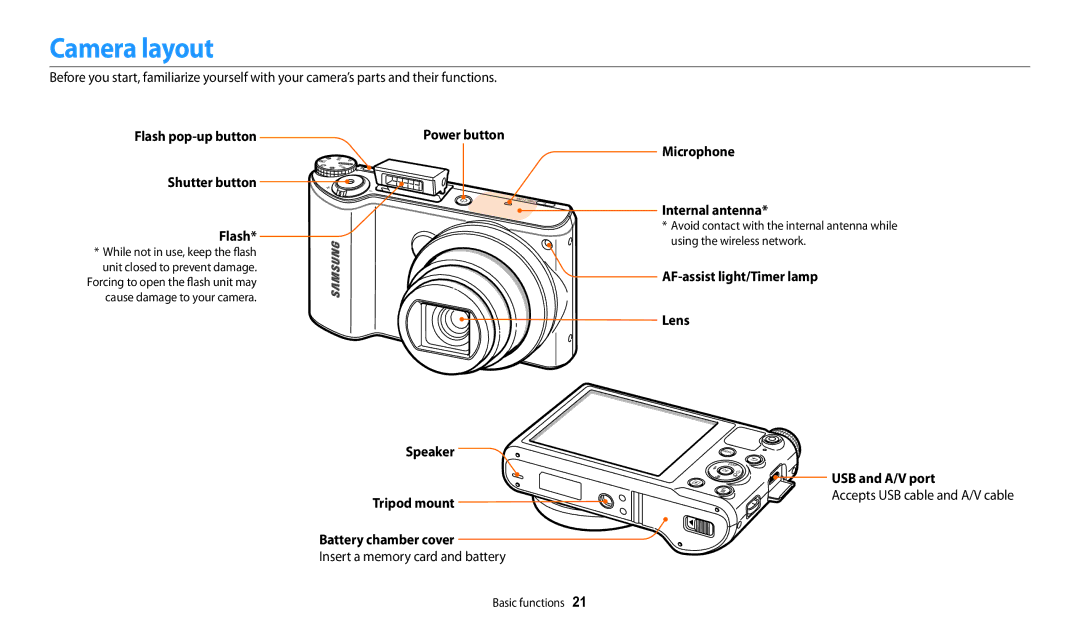
Flash pop-up button Shutter button
Power button Microphone Internal antenna
Camera layout
USB and A/V port
Mode dial Attaching the strap Display Buttons
Start a preset Wi-Fi function
Zoom button Shooting mode Zoom in or out
Direct Link button
Select General “ Direct Link Wi-Fi Button
Using the Direct Link button
Rotate the mode dial to n
Select a Wi-Fi feature. p
Insert the battery with the Samsung logo facing up
Inserting the battery and memory card
Slide the lock down to release the battery
Removing the battery and memory card
Turning on your camera in Playback mode
Charging the battery and turning on your camera
Charging the battery
Turning on your camera
Press D/c to select a time zone, and then press o
Performing the initial setup
Press c to select Date/Time Set, and then press t or o
Press b
Performing the initial setup
Icon Description
Learning icons
Icon
Shooting option
Icons on the Mode screen
Selecting modes
Area. p
Preset layouts. p
Settings Adjust settings to match your preferences. p
Photo Filter Capture a photo with various filter effects
Selecting with buttons
Rotate the mode dial to p Press m
Selecting options or menus
Press o to confirm the highlighted option or menu
Press D/c to select White Balance, and then press t or o
Press o to save your settings
Selecting by touch
Press F/t to select a White Balance option
Learning touch gestures
About histograms
Setting the display and sound
Setting the display type
Mode
Press o repeatedly
Setting the sound
Setting the option display view
Select Sound “ Beep Sound
Capturing photos
Press P to return to Shooting mode
To delete the photo, press , and then select Yes
Zooming
Optical range Zoom indicator Digital range
Digital zoom p a h M
Select Intelli Zoom
Setting Intelli zoom
Intelli zoom T p a h M
Shooting mode, press m Select OIS Select an option
Reducing camera shake OIS p a h M
Icon Description Off OIS is deactivated On OIS is activated
Half-pressing the shutter button
When is displayed
Holding your camera correctly
Reducing camera shake
Using the focus lock
Preventing your subject from being out of focus
Using the Best Face mode ………………………
Extended functions
Using the Smart Auto mode
Rotate the mode dial to T Align your subject in the frame
Using the Smart Auto mode
Rotate the mode dial to p Set the desired options
Using the Program mode
For a list of options, refer to Shooting options. p
Shutter speed
Aperture value
Slow shutter speed
Press o “ F/t to adjust the aperture value
Using the Aperture Priority mode
Rotate the mode dial to G Select
Press o to save the setting Set options
Using the Shutter Priority mode
Press o “ F/t to adjust the shutter speed
Press F/t to adjust the aperture value or shutter speed
Using the Manual mode
Press o “ D/c to select the aperture value or shutter speed
Rotate the mode dial to s Select a scene
Using the Smart mode
Option Description
When you are finished, release Shutter
Using the Panorama mode
Shooting example
Using the Smart mode
Using the Best Face mode
Touch to save the photo
Drag the corner of the box to adjust the size
Using the Magic Plus mode
Using the My Magic Frame mode
Touch Use
To recapture a background photo, touch
Press Shutter to capture a photo
Press b to return to the previous screen
Using the Split Shot mode
Select a split style
Using the Motion Photo mode
On the screen, draw an area to be animated
Using the Photo Filter mode
Select an effect
Vignette effect of Lomo cameras
Using the Movie Filter mode
Miniature
Sketch Apply a pen sketch effect Fish-eye
Set desired options
Rotate the mode dial to p, G, s, i, g or T
Recording a video
Pause recording
Rotate the mode dial to T Set the desired options
Capturing still images while recording a video
Landscapes Sunsets Blue skies Forested areas
Selecting a resolution and quality ……………
Changing the camera’s focus ……………………
Shooting mode, press m
Selecting a resolution and quality
Selecting a resolution T p a h M s i g
Select Photo Size
Super Fine Capture photos in super high quality
Selecting a photo quality p a h M i g
Shooting mode, press m Select Quality Select an option
Fine Capture photos in high quality
Shooting in the dark
Using the flash
Preventing red-eye p s
Red-eye
Setting a flash option T p a h M s g
Off
Fill
Slow Sync
Adjusting the flash intensity
Red-eye Fix
Adjusting the ISO sensitivity p a h M
Shooting mode, press m Select ISO Select an option
Changing the camera’s focus
Using macro p a h M g
Using auto focus T p a h M s g
Shooting mode, press c
Select Manual Focus
Press F/t to adjust the focus distance
Adjusting the focus distance manually p a h M
Auto Macro
Select Focus Area
Adjusting the focus area p a h M
Adjusting the focus by touch T p a h M s
Shooting mode, press m Select Touch AF Select an option
Select Touch AF “ Tracking AF
Using tracking auto focus
Touch the subject you want to track in the touch area
Select Touch AF “ One touch shot
Using One Touch Shot
Touch the subject to capture a photo
Capturing a self portrait shot
Using Face Detection p a h M s
Detecting faces
Select Face Detection “ Normal
Select Face Detection “ Smile Shot
Capturing a smile shot
Detecting eye blinking
Compose your shot
Tips for detecting faces
Press F/t to adjust the exposure
Adjusting brightness and color
Adjusting the exposure manually EV p a h
Shooting mode, press m Select EV
Shooting mode, press m Select ACB Select an option
Compensating for backlighting ACB p a h M
Changing the metering option p a h M
Shooting mode, press m Select Metering Select an option
Selecting a White Balance setting p a h M
Select White Balance
Adjusting color temperature
Customizing preset White Balance options
Select White Balance “ Color Temp
Select White Balance “ Custom Set
Defining your own White Balance
Shooting mode, press t Select an option
Using burst modes p a h M s i g
Capturing continuous photos
You can capture up to 6 photos in one burst
Shooting mode, press t
Using the timer
Capturing bracketed photos
Select AE Bracket
Select Image Adjust
Adjusting images p a h M
Press F/t to adjust each value
Zoom noise
Reducing the sound of the zoom T p a h M s i g
Shooting mode, press m Select Voice Select an option
Record the zoom noise
Playback/Editing
Press P
Viewing photos or videos in Playback mode
Starting Playback mode
Press F/t to scroll through files
Video file information
Press o or rotate Zoom to the right to open the folder
Viewing files as a folder
View files by category, such as date or file type
Viewing files as thumbnails
Viewing files by category
You can also touch Filter to select a category
Deleting files
Protecting a file
Deleting a single file
Select Delete “ Delete All
Select Delete “ Multiple Delete
Select Copy to Card
Enlarge part of a photo or view photos as a slide show
Viewing photos
Enlarging a photo
Press D/c/F/t
Press o or touch
Press b to return to Playback mode
Playback mode, scroll to a panoramic photo
Select Slide Show Options
Select Start Slide Show
Playing a video
View the slide show
Select Trim Movie
Adjust the volume or mute the sound
Playback mode, select a video, and then press m
Trimming a video
Resizing photos
Rotate the mode dial to g, and then select
Editing a photo
Touch to save
Apply special effects to your photos
Cropping a photo
Applying Smart Filter effects
No effect
Ink Painting
Adjusting your photos
Rotate Zoom to the left or touch to select a photo
Sketch
Touch o Touch to save
Touch , and then select an adjusting option
Press F/t to adjust the option
Press o Touch to save
Viewing files on a TV
View photos or play videos using the camera buttons
Select Connectivity “ Video Out
Select Connectivity “ i-Launcher “ Off
Transferring files to the computer
Transferring files to your Windows OS computer
Turn on the camera
Transferring files to your Mac OS computer
Disconnecting the camera for Windows XP
Turn off the camera
Open the removable disk Drag or save files to your computer
Select Connectivity “ i-Launcher “ On
Using programs on a computer
Installing i-Launcher
An i-Launcher shortcut will appear on the computer
Windows OS Requirements
Using i-Launcher
Available programs when using i-Launcher
Requirements
Opening i-Launcher
Mac OS 10.5 or higher except PowerPC
Mac OS requirements
Minimum 256 MB RAM 512 MB or more recommended
Viewing photos
Using Multimedia Viewer
File name
Viewing videos
From the Samsung i-Launcher screen, click Firmware Upgrade
Downloading the PC Auto Backup program
Updating the firmware
Wireless network
Connecting to a Wlan
Connecting to a Wlan and configuring network settings
Select an AP
Or touch
Using the login browser
Select IP Setting “ Manual
Select each option, and then enter the required information
Network connection tips
Entering text
On the camera, capture a photo
Saving files to a smart phone automatically
On the smart phone, turn on Samsung Smart Camera App
Smart phone can connect to only one camera at a time
On the camera, select a sending option
Sending photos or videos to a smart phone
Camera will send the files
Using a smart phone as a remote shutter release
On the smart phone, set the following shooting options
Release to capture the photo
On the smart phone, touch and hold to focus
Focus is automatically set to Multi AF
Rotate the mode dial to w Select
Using Auto Backup to send photos or videos
Installing the program for Auto Backup on your PC
Sending photos or videos to a PC
If you have performed a backup before, skip to step
Select a backup PC
Select OK
Sending photos or videos via email
Changing email settings
Select Sender Setting
Select the Name box, enter your name, and then select Done
Select Change Password
Select Setting Password “ On
When the pop-up appears, select OK
Setting an email password
Select Next Select files to send
Sending photos or videos via email
Camera will send the email
Accessing a website
Using photo or video sharing websites
Uploading photos or videos
Using photo or video sharing websites
Uploading photos to online storage
Using AllShare Play to send files
Select “ Web storage
Select “ Nearby devices
Device
On the device, allow the camera to connect to the device
Sending photos using Wi-Fi Direct
Photo will be sent to the device
Settings
Rotate the mode dial to n Select a menu
Settings menu
Accessing the settings menu
Select an item
Sound
Display
Connectivity
General
Reset
Auto Power Off
Button Auto Backup , Email , SNS & Cloud , AllShare Play
Video output settings will not be reset. Yes, No
Appendixes
Error messages
Error message Suggested remedies
No Image File
Memory Full
Transfer failed
Camera lens and display
Camera maintenance
Cleaning your camera
Camera body
Using or storing the camera
About memory cards
Supported memory cards
Size Super Fine Normal
Memory card capacity
Size 30 fps
Camera maintenance
Battery specifications
About the battery
Battery life
Test conditions When the battery is fully charged
Low battery message
Protect batteries, chargers, and memory cards from damage
Handle and dispose of batteries and chargers with care
Guidelines for charging the battery
Disposal guidelines
Before contacting a service center
Situation Suggested remedies
Work
Date and time are
Incorrect
Poorly
Situation
Image sensor
Camera specifications
Focusing
Exposure
Date Imprinting
Flash
White Balance
Shooting
Storage
Dimensions W X H X D
Wireless network
Power source
Weight
Glossary
Exif Exchangeable Image File Format
EV Compensation
EV Exposure Value
Focal length
LCD Liquid Crystal Display
ISO sensitivity
Jpeg Joint Photographic Experts Group
Metering
Quality
Resolution
Optical zoom
White balance color balance
Applicable in countries with separate collection systems
Index
Red-eye Saturation
Center-weighted Multi Spot
Center AF Multi AF
Sharpness
Auto Backup Mac Windows
Dragging Flicking Touching
Accessing Uploading photos or videos
Using the zoom Zoom button Zoom sound settings
Please refer to the warranty that came with your product or


 USB and A/V port