Digital Home Cinema System
Safety Warnings
Class 1 Laser Product
Precautions
Preparation
Features
Contents
Disc Type Mark Logo
Copy Protection
Max. Playing Time
Disc Recording Format
Power Button Stop
Disc Tray Tuning Up & Skip
RDS indicator
Indicator
External Digital in Optical Input Connector
FM Antenna Connector AM Antenna Connector
Antenna Connector Scart Connector
Video Out Select Switch
TV indicator
Description
Range of Operation of the Remote Control
Insert Remote Batteries
Connecting the Speakers
Connect the connecting jacks to the back of the DVD player
Back of the Speakers
Method 1 Composite Video ............... Good Quality
For using the Scart cable
Method 2 Scart ............... Better Quality
What is Progressive or Non-Interlaced Scanning?
Selecting the Video Format
Press Stop button
Progressive Scan Full Frame
Connecting External Components
Cooling Fan
Connecting an External Analog Component
FM antenna connection
Connecting the Antennas
AM antenna connection
Power supply
Power
Press DVD button to select DVD/CD mode
Press TV/VIDEO
Disc Playback
Press OPEN/CLOSE button to open the disc tray
Load a discs
To stop playback Press Stop during playback
Disc terminology
Groups and tracks DVD-AUDIO
Titles and chapters DVD-VIDEO
Tracks Video and music CDs
Press the Remain button
Each time the Remain button is pressed
Press
MP3 -CD Playback
To change the album
Jpeg File Playback Jpeg
Press Slide Mode button
To skip to the next slide
Press Digest
Press Cursor , , , buttons
Press Cursor , , , buttons during playback
To select the desired image and then press Enter button
DivX Playback
Button
Playback, press
Button
During playback, press the , button
Press the Subtitle button
Stop mode, press the , , , button, select the desired
Subtitle
Displaying Disc Information
Press Info button
Press and hold
Fast/Slow Playback
Press Slow button
Briefly press
Skipping Scenes/Songs
Playing Frame by Frame DVD
Repeat Playback
Press Repeat button
Press Info button twice
Press Enter
Desired
Segment
Angle Function
Press Info button Press Cursor button
Press Zoom
Zoom Function
Press EZ View button
Bonus Group / Navigating Pages
1Press Info button twice
Buttons to select the desired subtitle
1Press Info button
Time display
Chapter display
Press the numeric
Using Disc Menu
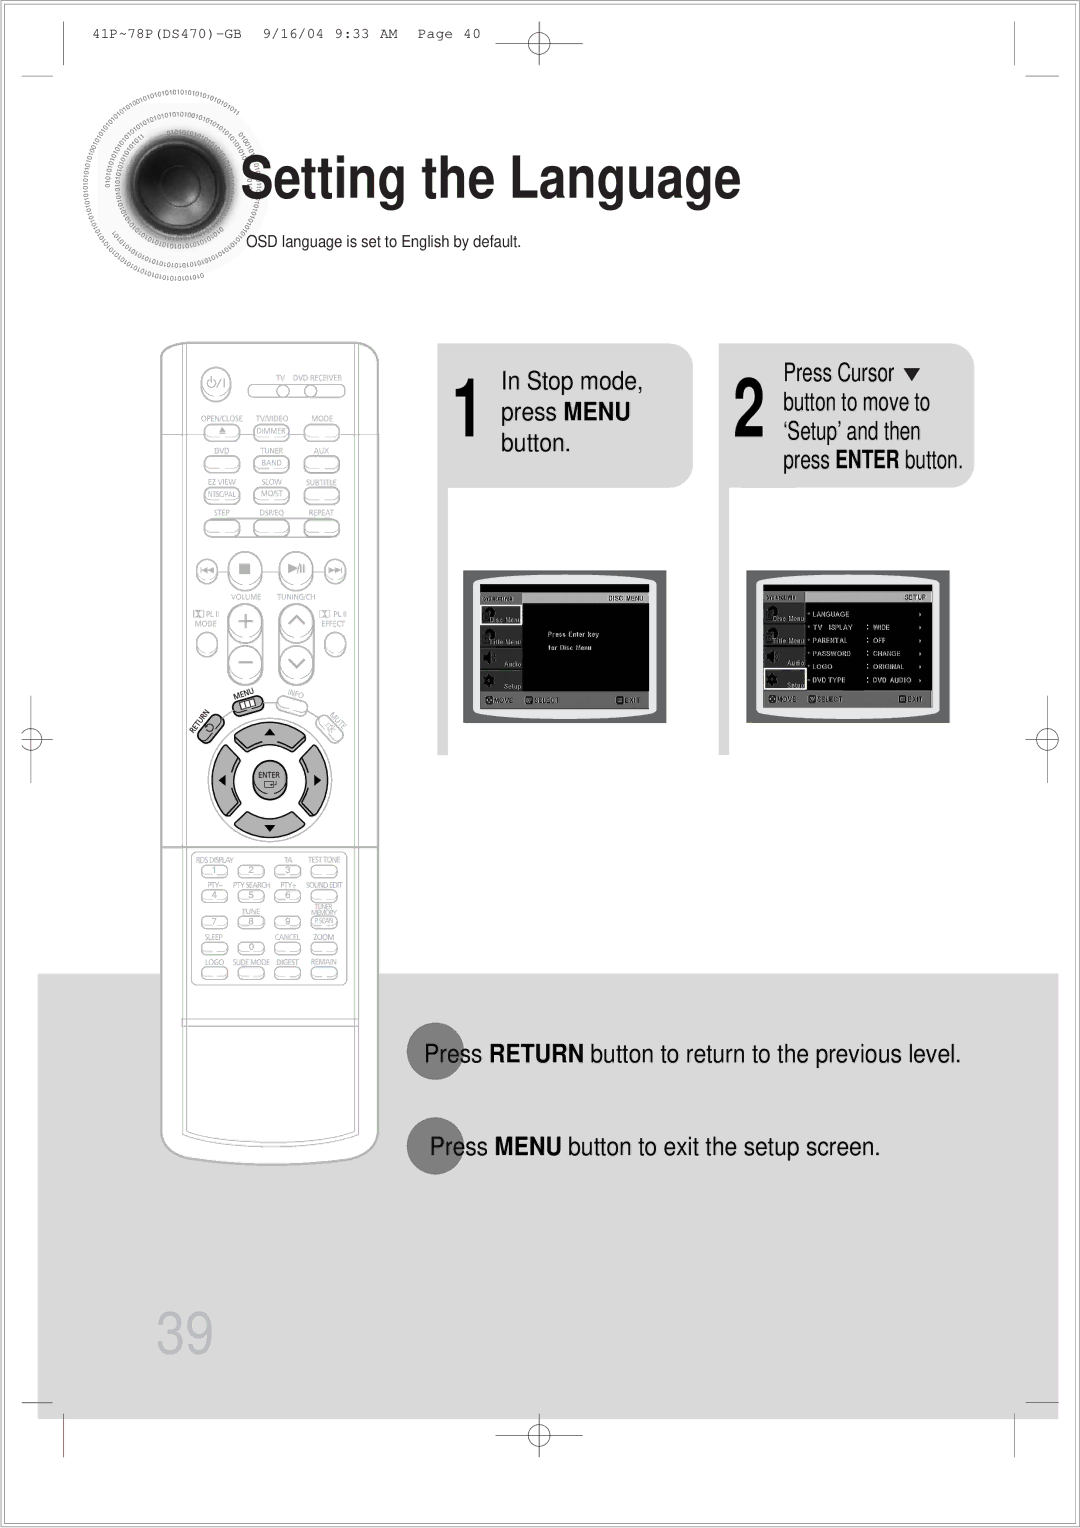
Stop mode
Press Cursor
Buttons to
Using the Title Menu
Press Menu button to exit the setup screen
Button to move to ‘Title Menu’
Button.press Menu
Stop mode Press Cursor
‘Setup’ and then
Press Menu
Button to move to
Press Enter Press Cursor
Button to select
Press Enter button
Setting TV Screen type
Button to move to ‘TV DISPLAY’ and then press Enter button
Adjusting the TV Aspect Ratio Screen Size
43LB
43PS
Letterbox
Setting Parental Controls Rating Level
Press Cursor , button
Enter the password
Press Cursor 3 button to move to
Setting the Password
‘Setup’ and then
Press Menu Button Press Cursor
Button to move to
AV Sync Setup
Press the Menu button Press Cursor , buttons
To move to ‘Audio’ and then
3to move to ‘AV-SYNC’ and then press Enter button
Setting the Wallpaper Jpeg DVD VCD
1PLAY/PAUSE button when the image you like comes up
During playback, press
Press Open
Stop mode Press Cursor Button to move to
Press Menu ‘Setup’ and then
Press to select Press Menu
Then press
DVD Playback Mode
Press the Menu
Then press Enter button
When Selecting DVD Play Mode
Press Cursor , 4 button to move to
Setting the Speaker Mode
Stop mode Press Menu Button Speaker
Press Enter button Press Cursor
Buttons to move 4 to the desired
Setting the Test Tone
Press Menu ‘Audio’ and then
Enter button
Press Test Tone button
Stop mode Press Menu Button
Setting the Delay Time
Press Cursor button
Setting Center Speaker
Press Cursor , 5 totime.set the Delay
Setting Rear Surround Speakers
You can adjust the balance and level for each speaker
Setting the Audio Quality
Button Enter button Press Cursor button
Method 2 When manually adjusting with the Sound Edit button
Press Sound
Press Cursor , to adjust the ‘DRC’
Stop mode, press
Menu button
Press Cursor button to
Sound Field DSP/EQ Function
Press DSP/EQ button
Press PL II Mode button
Dolby Pro Logic II Mode
You can select the desired Dolby Pro Logic II audio mode
Press PL II Mode
Button to select ‘MUSIC’ mode
Then press Cursor , buttons to select the mode
Dolby Pro Logic II Effect
Remote Control Unit Press Tuner
Listening to Radio
Band button
Main Unit
Presetting Stations
Memory button
What information can RDS signals provide?
Using the RDS Radio Data System to receive FM stations
About RDS broadcasting
PTY Program Type indication and PTY-SEARCH function
PTY Search is only applicable to preset stations
Before you start, remember
Listening to DAB Stations
Press TUNER/BAND to select DAB
Press and hold Tune for longer than 6 seconds
Press Tune
Remote Control Unit
About Ensemble and Service
Band to select DAB
Main Unit Press Function
Tuning in to a Stored DAB Station
Storing DAB Stations
DAB Related Functions
Press Info
To Initialize DAB
DLS Dynamic Label Segment
Convenient Functions
To confirm the sleep timer setting, press Sleep button
Press Sleep button
Press Dimmer button
Press Mute button
When operating a TV with the remote control
Press the Mode button to make the TV
Indicator on the remote control flash
Point the remote control toward the TV
TV Brand Code List
Brand Code
Before Calling for Service
Playback does not start
Sound is not produced
Surround Sound is not
Password for rating
Symptom Check/Remedy
Level has been forgotten
Picture quality is poor
Disc Storage
Handling discs
Handling and Storing Discs
Power Consumption 90W Weight 4Kg
Specifications
Impedance
Be chosen from the menu displayed on the TV monitor
DVD player, the player cannot play the disc
Subtitle languages
Movies, these movies are numbered as Title 1, Title 2, etc
Memo
This Appliance is Manufactured by


 Setting
 the Language