Wireless Audio Soundbar
Licenses
Features
Safety Warnings
Safety Information
Precautions
Contents
WHAT’S Included
Getting Started
Before Reading the USER’S Manual
Descriptions
Controls the volume level
Turns the power on and off Standby indicator Red
Displays the current mode
AUX
Rear Panel
Installing the Batteries in the Remote Control
Remote Control
Remote Control Buttons and Functions
USB
Auto Power
Mute
Woofer Level
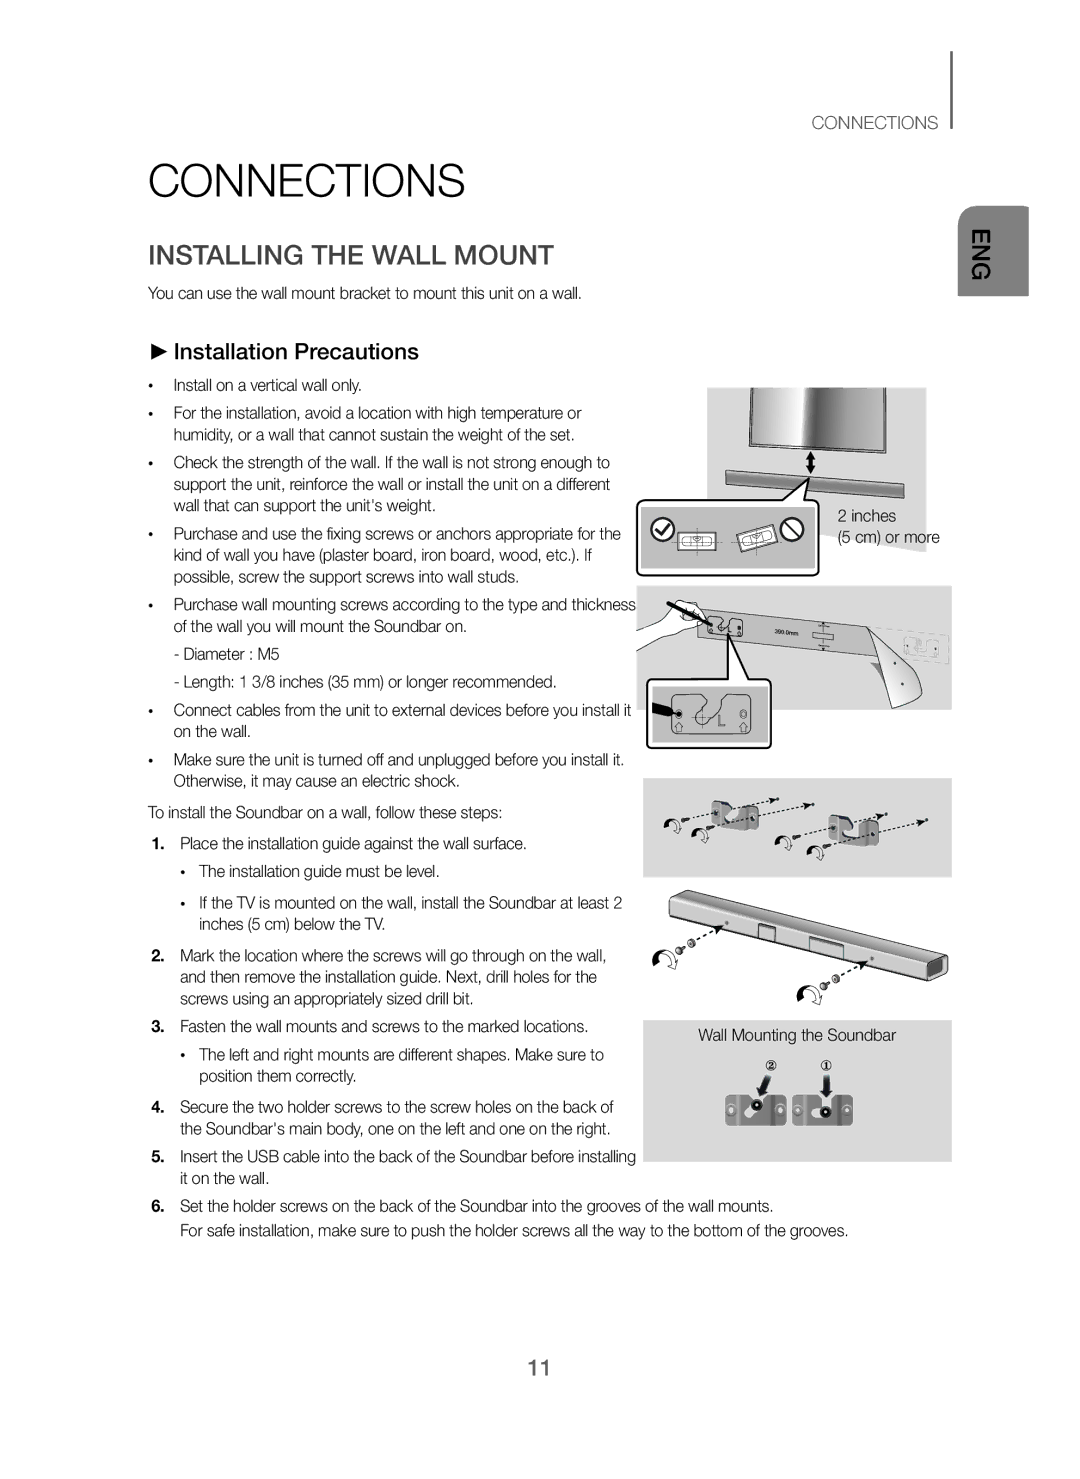
Connections
Installing the Wall Mount
Installation Precautions
Install on a vertical wall only
Detaching the Wall Mount
17.5 cm Minimum 12.9 ~ 13.2 inches 32.8 ~ 33.5cm
Inches
To use, change the function to D.IN
AUX
LED
Input Mode
Functions
To connect the Soundbar to a Bluetooth device
Bluetooth
More About Bluetooth
Bluetooth Power on Bluetooth Power
To disconnect the Bluetooth device from the Soundbar
To disconnect the Soundbar from the Bluetooth device
Starting the Samsung Audio Remote App
Using the Samsung Audio Remote APP
Installing the Samsung Audio Remote App
TV Soundconnect
Connecting a TV to the Soundbar
Using the Bluetooth Power On function
Before you connect a USB device
USB mode
Stop/pause mode or the USB is in no data mode
USB
Software Update
Supports TV SoundConnect
Troubleshooting
Sound is not produced Is the Mute function on?
Move closer to the unit
+5C~+35C
Specifications
Control when BT mode
Appendix
France
Imaginez les possibilités
Licence
Caractéristiques
Avertissements
Informations Relatives À LA Sécurité
Nexposez pas lensemble aux rayons directs du soleil ou
Précautions
Sommaire
Contenu
Démarrage
Avant DE Lire LE Manuel Dutilisation
Bouton Source
Panneau SUPÉRIEUR/FAÇADE
VOL -/+
Bouton Alimentation
Entrée de lalimentation
Panneau Arrière
Port USB
Entrée NUM
Télécommande
Boutons ET Fonctions DE LA Télécommande
+ Installation des piles dans la télécommande
Repeat Répéter
Auto Power Mise Sous Tension Automatique
Silence
Niveau DES Basses
Fixation murale de la Soundbar
Installation DE LA Fixation Murale
+ Précautions d’installation
Branchements
Démontage DE LA Fixation Murale
Minimum 32,8 à 33,5 cm
Cm minimum 16 cm
Câble Audio non fourni
AUX
DEL
Mode D’ENTRÉE
Fonctions
Un seul périphérique Bluetooth peut être associé à la fois
Bluetooth
Connexion Périphérique Bluetooth
Verte et licône
+ Bluetooth Power on Bluetooth Power
Propos du Bluetooth
Le témoin
Accéder à lapplication Samsung Audio Remote
Installation de lapplication Samsung Audio Remote
Utilisation DE Lapplication Samsung Audio Remote
Connexion
+ Utiliser la fonction Bluetooth Power On
TV Soundconnect
+ Connecter un téléviseur au Soundbar
Port USB
USB
+ Avant de connecter un périphérique USB
Mise À Jour Logicielle
Aucun son nest émis
La télécommande ne fonctionne pas
Tépannage
Lensemble ne sallume pas
Spécifications
Annexe
Elimination des batteries de ce produit
Comment contacter Samsung dans le monde
Erleben Sie die Möglichkeiten
Lizenz
Merkmale
Hinweise ZUR Sicherheit
Sicherheitsinformationen
WARNUNG, DIE Batterie Nicht VERSCHLUCKEN, Verätzungsgefahr
Hinweise
Inhalt
Lieferumfang
+ Symbole in dieser Bedienungsanleitung
Erste Schritte
Wichtige Informationen ZUM Gebrauch DER Bedienungsanleitung
Quelle Taste
Beschreibungen
OBERES/VORDERES Bedienfeld
Ein-/Aus Schalter
Geräten wiederzugeben. DC
Rückseite DES Geräts
USB Port
Lautstärke
Fernbedienung
Tasten UND Funktionen DER Fernbedienung
+ Batterien in die Fernbedienung einsetzen
Wiederholen
Stummschalten
+ Montagehinweise
Legen Sie die Installationsschablone an die Wand
Anschlüsse
Montageder Wandhalterung
Die Soundbar aus der Wandhalterung entfernen
Entfernen DER Wandhalterung
Mindestens 32,8 ~ 33,5 cm
Cm oder mehr 16 cm
Audio Kabel Nicht enthalten
Die rote Und rote Leuchte blinken
Funktionen
Eingangsmodus
Die grüne Und rote Leuchte blinken
Der Soundbar unterstützt SBC data 44.1kHz, 48kHz
+ Anschließen von Soundbar an ein Bluetooth-Gerät
Verbinden Bluetooth-Gerät
Wurde
Grüne Und weiße
+ Abtrennen des Bluetooth-Geräts vom Soundbar
+ Abtrennen des Soundbar vom Bluetooth-Gerät
Mehr über Bluetooth
Starten der Samsung Audio Remote App
Installieren der Samsung Audio Remote App
Verwenden DER Samsung Audio Remote APP
TV SoundConnect Reichweite
+ Verwenden der Bluetooth Power On Funktion
+ Ein Fernsehgerät an den Soundbar anschließen
Verbinden
Beachten Sie das Folgende
+ Bevor Sie ein USB-Gerät anschließen
USB port
Hergestellt wurde, hört die LED auf zu Blinken
Software Aktualisierung
Es wird kein Ton wiedergegeben
Fehlersuche
Das Gerät lässt sich nicht einschalten
Das Gerät reagiert nicht auf das Drücken von Tasten
Der Fernbedienung im „BT -Modus
Anhang
Technische Daten
Samsung-Kundenbetreuung
Kontakt zu Samsung World Wide
Immagina le possibilità
Licenza
Caratteristiche
Norme PER LA Sicurezza
Informazioni Sulla Sicurezza
Precauzioni
Sommario
Prima DI Leggere IL Manuale Utente
Accessori Forniti
+ Istruzioni di sicurezza e risoluzione dei problemi
PER Cominciare
Tasto sorgente
Descrizioni
Pannello SUPERIORE/ANTERIORE
Tasto alimentazione
Dellalimentazione
Laso Posteriore
Porta USB
DC 14V Ingresso
Si accendono i LED
Telecomando
Pulsanti E Funzioni DEL Telecomando
+ Inserimento delle batterie nel telecomando
Rosso e verde lampeggiano alternatamente
Permette di controllare il volume del woofer
Woofer USB
Premere il tasto USB per selezionare il modo USB
Montaggio a parete della soundbar
+ Precauzioni per linstallazione
Collegamenti
Instalazione DEL Suporto PER Montaggio a Parete
Smontaggio DEL Supporto PER Montaggio a Parete
Minimo 32,8 ~ 33,5 cm
Inserire le viti nei restanti fori, quindi serrarle
Cm o più 16 cm
Set-top box
Cavo Audio non fornito
Modo DI Ingresso
Funzioni
Collegare Dispositivo Bluetooth
+ Per collegare lSoundbar a un dispositivo Bluetooth
Ulteriori informazioni sul Bluetooth
+ Per scollegare il dispositivo Bluetooth dal lSoundbar
+ Per scollegare lSoundbar dal dispositivo Bluetooth
USO Della APP Samsung Audio Remote
Installazione della app Samsung Audio Remote
Accesso alla app Samsung Audio Remote
Soundbar vengono visualizzati i LED verde o Rosso, e verde
+ Utilizzo della funzione Bluetooth Power On
+ Collegamento di una TV al Soundbar
Collegare
Per selezionare il modo USB
+ Prima di collegare un dispositivo
Porta USB
Collegare il dispositivo USB alla porta USB del prodotto
Aggiornamento DEL Software
’audio non viene riprodotto
Risoluzione DEI Problemi
Lunità non si accende
Una funzione non si attiva quando viene premuto il tasto
Avviso di licenza Open Source
Appendice
Specifiche
Nome del modello
Applicabile nei Paesi con sistemi di raccolta differenziata
Contatta Samsung World Wide
Wyobraź sobie możliwości
Licencji
Charakterystyka
Ostrzeżenia Dotyczące Bezpieczeństwa
Informacje Dotyczące Bezpieczeństwa
Środki Ostrożności
Spis Treści
Przed Przeczytaniem TEJ Instrukcji Obsługi
+ Symbole używane w instrukcji
+ Instrukcja bezpieczeństwa i rozwiązywanie problemów
Rozpoczynanie Pracy
Przycisk Źródło
Opisy
Panel GÓRNY/PRZEDNI
Przycisk Zasilanie
DC 14V Źródło zasilania
Panel Tylny
Służy do włączania/wyłączania listwy Soundbar
Pilot
Przyciski I Funkcje Pilota
+ Wkładanie baterii do pilota
Migają czerwona ikona i zielona ikona
Umożliwia regulację głośności subwoofera
Naciśnięcie przycisku USB powoduje wybór trybu USB
Powtarzanie
+ Środki ostrożności przy instalacji
Złącza
Montowanie Wspornika Ściennego
Demontaż Uchwytu Ściennego
Włóż śruby przez pozostałe otwory i je dokręć
Cm lub więcej 16 cm
Minimalnie 32.8 ~ 33.5 cm
DVD/ Odbiornik
Kabel Audio Kupowany oddzielnie
Tryb Wejścia
Funkcje
Zestaw Soundbar obsługuje dane SBC 44,1 kHz, 48 kHz
+ Łączenie systemu Soundbar z urządzeniem Bluetooth
Podłącz Urządzenie Bluetooth
Odtwórz muzykę na podłączonym urządzeniu
Bluetooth Power Diody
+ Odłączanie urządzenia Bluetooth od systemu Soundbar
+ Odłączanie systemu Soundbar od urządzenia Bluetooth
Więcej informacji o połączeniu Bluetooth
Uzyskiwanie dostępu do aplikacji Samsung Audio Remote
Korzystanie Z Aplikacji Samsung Audio Remote
Zainstaluj aplikację Samsung Audio Remote
Dioda przestanie migać
+ Korzystanie z funkcji Bluetooth Power On
+ Podłączanie telewizora do zestawu Soundbar
Podłącz
Urządzenie USB należy podłączyć do portu USB produktu
+ Przed podłączeniem urządzenia
Aktualizacja Oprogramowania
Brak dźwięku
Rozwiązywanie Problemów
Urządzenie się nie włącza
Funkcja nie działa, gdy naciskany jest dany przycisk
Bezprzewodowego
Dodatek
Dane Techniczne
Nazwa modelu
Wyposażony jest niniejszy produkt
Kontakt do Samsung
Képzelje el a lehetőségeket
Szabadalmak
Jellemzők
Biztonsági Előírások
Biztonsági Óvintézkedések
Biztonsági Óvintézkedések
Tartalomjegyzék
Mellékelt Tartozékok
Kezdeti Lépések
Használati Útmutató Elolvasása Előtt
Source gomb
Készülék Bemutatása
FELSŐ/ELSŐ Panel
Bekapcsoló gomb
DC 14V Tápfeszültség be
Hátsó Panel
+ Elemek behelyezése a távirányítóba
Volumehangerő
Távvezérlő
Távirányító Gombjai ÉS Funkciói
Repeatismétlés
Mutenémítás
Funkció LED-ek
Az USB gombbal válassza ki az USB módot
Soundbar falra szerelése
Csatlakozások
Rögzítőbilincs Felszerelése a Falra
+ Felszereléssel kapcsolatos óvintézkedések
Rögzítőbilincs Leszerelése a Falról
Minimum 32,8 ~ 33,5 cm
Konzol Felszerelése a Fali Felszerelési Útmutató Nélkül
Cm vagy több 16 cm
Beltéri egység
Audio Kábel Nem tartozék
Váltsa az üzemmódot AUX-ra
Piros
Készülék Funkciói
Bemeneti MÓD
Zöld
Soundbar támogatja az SBC adatokat 44.1kHz, 48kHz
+ Az Soundbar csatlakoztatása Bluetooth-eszközhöz
Csatlakoztatás Bluetooth-eszköz
Játssza le a kívánt zenét a csatlakoztatott eszközön
És a fehér Villog
+ a Bluetooth-eszköz és az Soundbar csatlakozásának bontása
+ Az Soundbar és a Bluetooth-eszköz csatlakozásának bontása
További információk a Bluetooth-ról
Samsung Audio Remote alkalmazás megnyitása
Samsung Audio Remote Alkalmazás Használata
Samsung Audio Remote alkalmazás telepítése
Csatlakoztatás
+ a Bluetooth Power On funkció használata
+ a TV csatlakoztatása a Soundbar készülékhez
Ne felejtse a következőket
+ USB eszköz csatlakoztatása előtt
Szünet módban van, vagy az USB „adat nélküli módban van
Szoftverfrissítés
Hibaelhárítás
Nyílt forráskódú licenc Megjegyzés
Függelék
Műszaki Adatok
Modell neve
Termék hulladékba helyezésének módszere
Kapcsolatfelvétel Samsung World Wide
Predstavte si možnosti
Licencie
Charakteristika
Bezpečnostné Varovania
Bezpečnostné Informácie
Bezpečnostné Opatrenia
Obsah
ČO JE Súčasťou
Začíname
Pred Prečítaním SI Tohto NÁV ODU NA Použitie
Tlačidlo Zdroj
Tlačidlo Power
Popis
HORNÝ/PREDNÝ Panel
DC 14V Vstup pre napájací zdroj
Zadný Panel
Napájanie
Diaľkový Ovládač
Tlačidlá a Funkcie Diaľkového Ovládania
+ Inštalácia batérií do diaľkového ovládača
Blikať červená a zelená
Tlačidlo Vypnutia Zvuku
Stlačením tlačidla USB vyberte režim USB
Opakovať
Montujte len na vertikálnu stenu
Pripojenia
Inštalác IA Stenovej Montážnej Súpravy
+ Bezpečnostné opatrenia pri inštalácii
Demontáž Držiaka NA Stenu
Minimálne 32.8 ~ 33.5 cm
Cm alebo viac 16 cm
Audio Kábel Nie je súčasťou Dodávky
Režim Vstupu
Funkcie
Avrcp
Pripojiť Zariadenie s rozhraním Bluetooth
Zelená Biela
Viac o rozhraní Bluetooth
Napájanie Bluetooth LED kontrolka
Prístup k aplikácii Samsung Audio Remote
Používanie Aplikácie Samsung Audio Remote
Inštalácia aplikácie Samsung Audio Remote
Pripojiť
+ Používanie funkcie Bluetooth Power On
+ Pripojenie TV k zariadeniu Soundbar
Systém súborov Ntfs nie je podporovaný
+ Skôr, ako pripojíte USB zariadenie
Pripojte USB zariadenie k USB portu výrobku
Aktualizácia Softvéru
Nevychádza zvuk
Riešenie Problémov
Zariadenie sa nezapne
Po stlačení tlačidla funkcia nepracuje
Poznámka k licencii s otvoreným zdrojovým kódom
Dodatok
Technické Údaje
Názov modelu HW-J250
Platí v krajinách so zavedeným separovaným zberom
Kontaktujte Samsung World Wide
Představte si své možnosti
Speciální zvukové efekty
Charakteristiky
Bezpečnostní Varování
Bezpečnostní Informace
VAROVÁNÍ, Nepolykejte BATERII, Nebezpečí Poleptání
Bezpečnostní Opatření
Tlačítka a funkce dálkového ovládání
Bezpečnostní varování Bezpečnostní opatření
Než se pustíte do čtení této příručky Součásti dodávky
Horní/přední panel Zadní Panel
+ Bezpečnostní pokyny a odstraňování potíží
+ Symboly použité v příručce
NEŽ SE Pustíte do Čtení Této Příručky
Součásti Dodávky
Tlačítko Napájení
HORNÍ/PŘEDNÍ Panel
Tlačítko přepínání
Zdroje
DC 14V Vstup napájení
Zadní Panel
Napájení
Dálkové Ovládání
Tlačítka a Funkce Dálkového Ovládání
+ Vložení baterií do dálkového ovládání
Červený indikátor a zelený indikátor
Ztlumení
Tlačítko USB slouží k výběru režimu USB
Opakování
Tento přístroj můžete upevnit na zeď pomocí držáku na zeď
Připojení
Instalace Držáku NA ZEĎ
+ Opatření při instalaci
Sejmutí Z Nástěnného Držáku
Minimálně 32.8 ~ 33.5 cm
Alespoň 5 cm 16 cm
Kabel Audio Není součástí dodávky
Zelený indikátor
Funkce
Přístroje Režim vstupu Zobrazení
Bílý
Přístroj Soundbar podporuje data SBC 44,1 kHz, 48 kHz
+ Připojení přístroje Soundbar k zařízení Bluetooth
Připojení Zařízení Bluetooth
Pokud je v okolí přístroje Soundbar silné elektrické pole
Bluetooth Power Kontrolky
+ Odpojení zařízení Bluetooth od přístroje Soundbar
+ Odpojení přístroje Soundbar od zařízení Bluetooth
Informace o technologii Bluetooth
Přístup k aplikaci Samsung Audio Remote
Použití Aplikace Samsung Audio Remote
Instalace aplikace Samsung Audio Remote
Zapněte televizor a přístroj Soundbar
+ Použití funkce Bluetooth Power On
+ Připojení televizoru k přístroji Soundbar
Připojení
Věnujte pozornost následujícím bodům
+ Před připojením zařízení USB
Zařízení USB některých výrobců nemusí být podporována
Aktualizace Softwaru
Tešení Problémů
Poznámka k licenci otevřeného softwaru
„Bluetooth Power
Model
Maximální výkon vysílače BT MW při 2,4 GHz-2,4835 GHz
GRO
Predstavljajte si možnosti
Licenca
Značilnosti
Varnostna Opozorila
Varnostni Podatki
Opozorilo NE Pogoltnite BATERIJE. Nevarnost Kemičnih Opeklin
Previdnostni Ukrepi
Vsebina
KAJ Vključuje
Začetek
Preden Začnete Z Branjem Uporabniškega Priročnika
Gumb Vir
Opis
ZGORNJA/SPREDNJA Plošča
Za vklop/izklop gumb
Napravah
DC 14V Power Supply
Zadnja Plošča
USB Vrata
Gumbi in Funkcije Daljinskega Upravljalnika
Power VKLOP/IZKLOP
Volume Glasnost
Daljinski Upravljalnik
Repeat Ponavljanje
Auto Power Samodejni Vklop
Mute Utišaj
Pritrditev zvočnika Soundbar na steno
Priključki
Namestitev Stenskega Nosilca
+ Previdnostni ukrepi
Odstranjevanje Stenskega Nosilca
Najmanj 32,8-33,5 cm
Namestitev Nosilca Brez Uporabe Montažne Šablone
Cm ali več 16 cm
Predvajalnik
Funkcijo nastavite na AUX
Utripata
Funkcije
Vhodni Način
Zelena
Če je v bližini naprave Soundbar močno električno polje
+ Povezovanje naprave Soundbar z napravo Bluetooth
Povezovanje Naprave Bluetooth
Predvajajte glasbo na povezani napravi
Bela Lučka utripajo
Več o povezavi Bluetooth
Bela Lučka utripata
Dostop do aplikacije Samsung Audio Remote
Povezovanje
+ Uporaba funkcije Bluetooth Power On
+ Povezovanje televizorja z zvočnikom Soundbar
Upoštevajte naslednje
+ Pred priključitvijo naprave USB
USB Vrata
Posodobitev Programske Opreme
Odpravljanje Težav
Obvestilo o odprtokodnih licencah
Tehnične Lastnosti
Ime modela
Največja oddajna moč vmesnika BT MW pri 2,4-2,4835 GHz
Velja za države z ločenimi sistemi zbiranja
Obrnite se na Samsung World Wide
Σας ευχαριστούμε που αγοράσατε ένα προϊόν Samsung
Φανταστείτε τις δυνατότητες
Αδεια
Δυνατοτητεσ
Προειδοποιησεισ ΓΙΑ ΤΗΝ Ασφαλεια
Πληροφοριεσ ΓΙΑ ΤΗΝ Ασφαλεια
Προφυλαξεισ
Περιεχομενα
+ Οδηγίες για την ασφάλεια και αντιμετώπιση προβλημάτων
Πριν Διαβασετε ΤΟ Εγχειριδιο Χρηστη
ΤΙ Περιλαμβανεται
+ Εικονίδια που χρησιμοποιούνται στο εγχειρίδιο
Κουμπί Λειτουργίας
Περιγραφεσ
ΕΠΑΝΩ/ΕΜΠΡΟΣ ΟΨΗ
Κουμπί πηγής
Για σύνδεση με την αναλογική έξοδο μιας εξωτερικής συσκευής
Πισω ΟΨΗ
Θυρα USB
DC 14V Είσοδος παροχής ρεύματος
Ενταση Ηχου
Τηλεχειριστηριο
Κουμπια ΚΑΙ Λειτουργιεσ Τηλεχειριστηριου
+ Τοποθέτηση των μπαταριών στο τηλεχειριστήριο
Και η Λευκή
Σιγαση
Επιπεδο Γουφερ
Μπορείτε να ελέγξετε την ένταση ήχου του υπογούφερ
Τοποθέτηση του Soundbar στον τοίχο
Συνδεσεισ
Εγκατασταση ΤΗΣ Βασησ Στηριξησ ΣΕ Τοιχο
+ Προφυλάξεις σχετικά με την τοποθέτηση
Αφαιρεση ΑΠΟ ΤΟ Στηριγμα Τοιχου
Περισσότερο
Της συσκευής πηγής. Αλλάξτε τη λειτουργία σε D.IN
Τροποσ Λειτουργιασ Εισοδου
Λειτουργιεσ
To Soundbar υποστηρίζει δεδομένα SBC 44,1 kHz, 48 kHz
+ Σύνδεση του συστήματος Soundbar με συσκευή Bluetooth
Σύνδεση Συσκευή Bluetooth
Αναπαράγετε μουσική στη συνδεδεμένη συσκευή
Περισσότερα σχετικά με το Bluetooth
+ Ενεργοποίηση μέσω Bluetooth Bluetooth Power
+ Αποσύνδεση συσκευής Bluetooth από το σύστημα Soundbar
+ Αποσύνδεση του συστήματος Soundbar από συσκευή Bluetooth
Πρόσβαση στην εφαρμογή Samsung Audio Remote
Χρηση ΤΗΣ Εφαρμογησ Samsung Audio Remote
Εγκατάσταση της εφαρμογής Samsung Audio Remote
Σύνδεση
+ Χρήση της λειτουργίας ενεργοποίησης μέσω Bluetooth
TV Soundconnect Συνδεση Ηχου Τηλεορασησ
+ Σύνδεση τηλεόρασης με το Soundbar
Έχετε υπόψη σας τα εξής
+ Προτού συνδέσετε μια συσκευή
Θυρα USB
Συνδέστε τη συσκευή USB στη θύρα USB του προϊόντος
Ενημερωση Λογισμικου
Το τηλεχειριστήριο δεν λειτουργεί
Αντιμετωπιση Προβληματων
Μονάδα δεν ανάβει
Δεν παράγεται ήχος
Όνομα μοντέλου
Power όταν βρίσκεστε σε λειτουργία BT
Παραρτημα
Προδιαγραφεσ
Samsung
Επικοινωνήστε με τη Samsung World Wide
Imaginaţi-vă posibilităţile
Licenţă
Caracteristici
Avertismente Privind Siguranţa
Informaţii DE Siguranţă
Precauţii
Conţinut
+ Pictogramele utilizate în manual
Iniţiere
Înainte DE a Citi Manualul Utilizatorului
Accesorii Incluse
Butonul Source
Descrieri
Panoul SUPERIOR/FRONTAL
Buton Alimentare
DC 14V Alimentare
Panoul Dorsal
Alimentare
Telecomanda
Butoanele ŞI Funcţiile DE PE Telecomandă
+ Instalarea bateriilor în telecomandă
Pornire Automată
MUT
Nivel Subwoofer
Repetare
Instalaţi numai pe un perete vertical
Conexiuni
Instalarea Suportului DE Perete
+ Precauţii la instalare
Detaşarea Suportului DE Perete
Cm sau mai mult 16 cm
Schimbaţi funcţia la AUX
Cablul Audio Nu sunt furnizate
MOD Intrare
Funcţii
Redaţi muzică pe dispozitivul conectat
+ Conectarea sistemul Soundbar la un dispozitiv Bluetooth
Dispozitiv Bluetooth
Conectare
Butoanele
+ Pornirea prin Bluetooth
Informaţii suplimentare despre conexiunea Bluetooth
Accesarea aplicaţiei Samsung Audio Remote
Utilizarea Aplicaţiei Samsung Audio Remote
Instalarea aplicaţiei Samsung Audio Remote
Succes
+ Conectarea unui televizor la sistemul Soundbar
Acordaţi atenţie următoarelor aspecte
+ Înainte de conectarea unui dispozitiv USB
Conectaţi dispozitivul USB la portul USB al aparatului
Soundbar este în modul oprit/pauză sau în modul fără date
Actualizarea Software
Telecomanda nu funcţionează
Depanare
Unitatea nu poate fi pornită
Nu este emis sunet
Separare 1kHz 65 dB
Anexă
Specificaţii
Nume model
Clienţi
Contactaţi centrele Samsung World Wide
Представете си възможностите
Лиценз
Характеристики
Мерки ЗА Безопасност
Информация ЗА Безопасност
Предпазни Мерки
Съдържание
+ Авторско право
Какво Е Включено
+ Икони, които ще бъдат използвани в ръководството
+ Инструкции за безопасност и отстраняване на неизправности
Включване Бутон
Описания
ГОРЕН/ПРЕДЕН Панел
DC 14V Вход за захранване
Заден Панел
USB Порт
+ Поставяне на батериите в дистанционното управление
Power Включване
Дистанционно Управление
Бутони И Функции НА Дистанционното Управление
Натиснете бутона USB, за да изберете режим USB
Mute ИЗКЛ. Звук
Woofer Level Ниво НА Уфър
Можете да управлявате силата на звука на буфера
Монтирайте само на вертикална стена
Свързвания
Инсталиране НА Стената Конзола
+ Предпазни мерки за инсталацията
Демонтиране НА Стенната Конзола
Поставете винтове в оставащите отвори и ги затегнете
Аудио Кабел Не е включен в Доставката
Входен Режим
Функции
Светодиодът
+ За да свържете Soundbar към Bluetooth устройство
Мига Ако Bluetooth не успява да се сдвои със
Свързване Bluetooth устройство
Зеленият Белият
+ ВКЛ. на Bluetooth Bluetooth Power
Повече за Bluetooth
Достъп до приложението Samsung Audio Remote
Използване НА Приложението Samsung Audio Remote
Инсталиране на приложението Samsung Audio Remote
Свързване
+ Използване на функцията Bluetooth Power On
+ Свързване на телевизор със Soundbar
Свържете USB устройството към USB порта на продукта
+ Преди да свържете USB устройство
USB порт
Актуализиране НА Софтуера
Отстраняване НА Неизправности
Спецификация
Приложение
Продукт
Свържете се със Samsung ПО Целия Свят
Zamislite mogućnosti
Specijalni zvučni efekti
Karakteristike
Sigurnosna Upozorenja
Sigurnosne Informacije
Mere Opreza
Sadržaji
ŠTA Sadrži Pakovanje
+ Sigurnosna uputstva i otklanjanje problema
Početak
PRE Čitanja Korisničkog Uputstva
Izvor taster
Opisi
GORNJA/PREDNJA Ploča
Uključivanje Taster
Uređaju. DC
Zadnja Ploča
USB Priključak
Ulaz za napajanje
Detalje potražite na stranama 17 i
Daljinski Upravljač
Tasteri I Funkcije NA Daljinskom Upravljaču
+ Stavljanje baterija u daljinski upravljač
Crveni Zeleni
Možete kontrolisati jačinu zvuka woofer zvučnika Pritisnite
+6, funkcionalni LED indikator treperi
Taster Woofer
Cm ili više
Povezivanja
Instaliranje Zidne Konzole
+ Mere predostrožnosti za instaliranje
Skidanje Zidnog Nosača
Umetnite zavrtnje kroz preostale rupe i zategnite ih
16 cm 17,5 cm Minimalno 32,8 ~ 33,5 cm
Dekoder
Audio Kabl Nije isporučen
Crveni
Režim Ulaza
Povezati
+ Povezivanje Soundbar sistema na Bluetooth uređaj
Bluetooth uređaj
Više o Bluetooth funkciji
+ Aktiviranje Bluetooth Power Bluetooth Power
+ Odspajanje Bluetooth uređaja sa Soundbar sistema
+ Odspajanje Soundbar sistema sa Bluetooth uređaja
Pristupanje aplikaciji Samsung Audio Remote
Korišćenje Aplikacije Samsung Audio Remote
Instaliranje aplikacije Samsung Audio Remote
+ Povezivanje televizora sa Soundbar uređajem
+ Korišćenje funkcije aktivacije Bluetooth Power
Vodite računa o sledećem
+ Pre povezivanja USB uređaja
USB priključak
Ažuriranje Softvera
Rešavanje Problema
Upravljaču kada je uključen režim „BT
Bluetooth Način deaktivacije porta
Dodatak
Specifikacije
Odlaganje električne i elektronske opreme
Kontaktirajte Samsung World Wide
Korisnički priručnik
Posebni zvučni efekti
Značajke
CRO
Mjere Opreza
Sadržaj
+ Ikone koje se koriste u priručniku
+ Sigurnosne upute i rješavanje problema
Prije Čitanja Korisničkog Priručnika
ŠTO JE Uključeno
Gumb Za uključivanje
DC 14V Power Supply Uključeno Napajanje
Lampice
Powernapajanje
Volume Jačina Zvuka
Gumbi I Funkcije Daljinskog Upravljača
Da biste odabrali USB način rada pritisnite tipku USB
Muteisključivanje Zvuka
Woofer Levelrazina Woofera
#, $ u roku od tri sekunde nakon pritiska na tipku Woofer
Zidni nosač možete koristiti za montažu ove jedinice na zid
Veze
Montaža Zidnog Nosača
+ Mjere predostrožnosti prilikom ugradnje
Demontiranje Zidnog Nosača
Cm ili više 16 cm
Promijenite funkciju na AUX
Audio Kabel Nije isporučeno
Način Ulaza
Spojite Uređaju Bluetooth
+ Spajanje sustava Soundbar na uređaj Bluetooth
Više o funkciji Bluetooth
+ Odvajanje uređaja Bluetooth od sustava Soundbar
+ Odvajanje sustava Soundbar od uređaja Bluetooth
Pristup aplikaciji Samsung Audio Remote
Upotreba Aplikacije Samsung Audio Remote
Instalirajte aplikaciju Samsung Audio Remote
Spojite
+ Korištenje funkcije Bluetooth Power On
+ Povezivanje TV-a s uređajem Soundbar
Prijenosa
+ Prije spajanja USB uređaja
Ažuriranje Softvera
Zvuk se ne proizvodi
Rješavanje Problema
Jedinica se neće uključiti
Kad se pritisne tipka, funkcija ne radi
Obavijest o licenci za uporabu softvera otvorenog koda
Tehnički Podaci
Omjer analogni ulaz 65 dB Odvajanje 1 kHz
Maks. snaga BT odašiljača 100mW pri 2,4GHz 2,4835GHz
AH68-02983L-01
Kontaktirajte Samsung U Cijelome Svijetu