Imagine the possibilities
Safety Warnings
Safety Information
ENG
Precautions
Contents
++Icons used in this manual
WHAT’S Included
Before Reading the USER’S Manual
Turns the power on and off
Setup, press the button for more than 3 seconds again
Displays the current mode
Front / Right Side Panel
Connect to the Analogue output of an external device
Bottom Panel
Remote Control
Volume
Power
Adjusts the volume level of the unit
Turns the Soundbar on and off
++Controlling the Soundbar using Your TV Remote Control
Installing the Battery in the Remote Control
Sound button for 5 seconds
OFF TV Remote appears on the Soundbars display
++Installation Precautions
Installing the Soundbar
Installing the Wall Mount
Centre Line
Wall Mount R
Rear side of Soundbar Right end of Soundbar
Installation
Detaching the Soundbar from the Wall
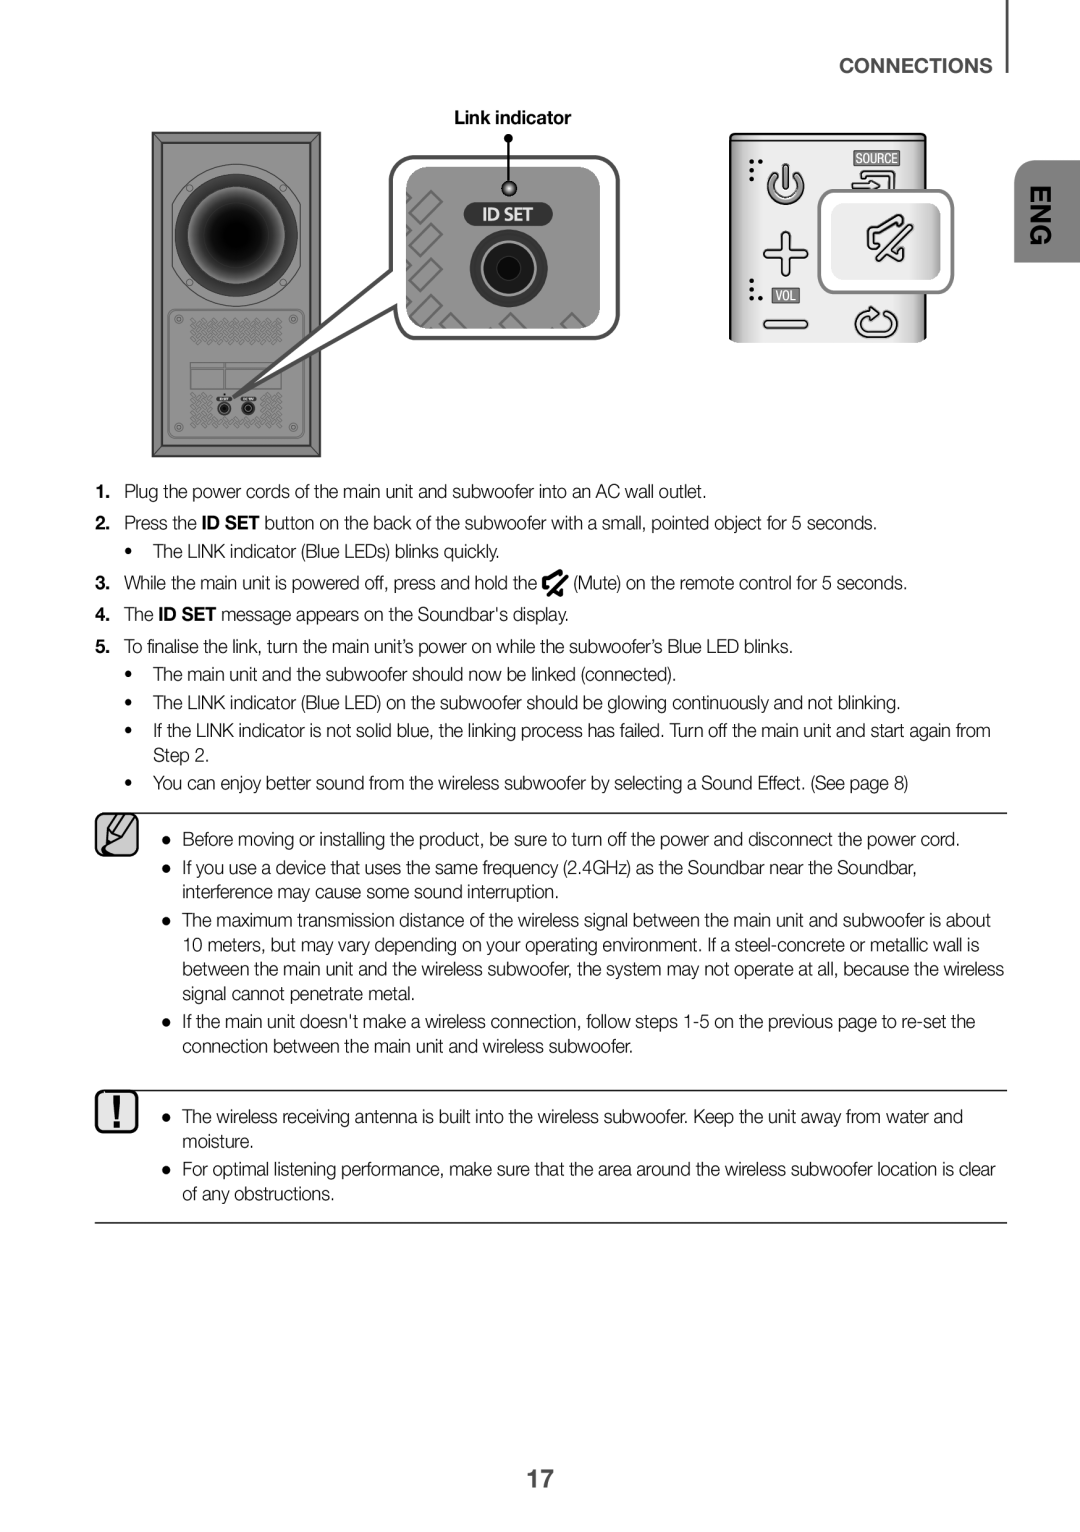
Connecting to the Subwoofer Automatically
Connecting the Subwoofer
Connecting to the Subwoofer Manually
Mode and the blue LED wont be lit
Main unit and the subwoofer should now be linked connected
Link indicator
Connecting the SWA-8000S Sold Separately
Surround Speaker L
Connecting the Surround Speakers Sold Separately
Wireless Receiver Module
Connecting to a TV Using a Digital Optical Cable
Connecting to a TV
++Auto Power Link
Optical Cable
TV Soundconnect
Mode Enable the TV SoundConnect function appears
Connect
Turn on the TV and Soundbar
++Using the Bluetooth Power On function
Connecting to External Devices
Optical or Analogue Audio Cable
++Optical Cable
Micro USB to USB adapter Cable Not supplied
USB
USB port
++Before you connect a USB device
Auto Power Down Function
Input Mode
Input mode Display
You want
To Connect the Soundbar to a Bluetooth Device
Bluetooth
Connect Bluetooth device
Select AV Samsung Soundbar Kxxx K-Series from the list
To Disconnect the Bluetooth Device from a Soundbar
Bluetooth Power on Bluetooth Power
To Disconnect the Soundbar from a Bluetooth Device
Another mode or turn off the Soundbar
++More About Bluetooth
++Installing the Samsung Audio Remote App
Using the Samsung Audio Remote APP
++Launching the Samsung Audio Remote App
Market search Samsung Audio Remote
Updating Procedure
Software Update
If Update is not Displayed
Troubleshooting
Weight Main Unit
Specifications
5V / 0.5A
Aa Open Source Licence Notice
Licences
Wireless Models including the frequency of 5.15GHz-5.35GHz
Wireless Models excluding the frequency of 5.15GHz-5.35GHz
Contact Centre Web Site ` Europe
Contact Samsung World Wide
Manuel dutilisation
Avertissements
Informations Relatives À LA Sécurité
FRA
Précautions
22 Câble audio analogique ou optique 23 USB
Sommaire
Connexion du SWA-8000S Vendu séparément
++Icônes utilisées dans le présent manuel
Contenu
Avant DE Lire LE Manuel Dutilisation
Permet d’allumer et d’éteindre l’alimentation
Affiche le mode actuellement sélectionné
Panneau FRONTAL/DE Droite
Port micro USB
Panneau Inférieur
Muet
Télécommande
Répéter
Saut en avant
Audio SYNC, Rear SPEAKER, ou Rear Level
Marche/Arrêt
Appuyez pour sélectionner TREBLE, BASS, Subwoofer Level
Sound pendant 5 secondes
Installation DES Piles Dans LA Télécommande
Muet
Installation DE LA Soundbar
Ligne centrale
Fixation murale D
Arrière de la Soundbar Extrémité droite de la Soundbar
Installation
Retrait DE LA Soundbar DU MUR
Connexion Automatique AU Caisson DE Graves
Connexion DU Caisson DE Graves
Connexion Manuelle AU Caisson DE Graves
Prise murale
Témoin appariement
Connexion DU SWA-8000S Vendu Séparément
Module de réception sans fil
Connexion DES Enceintes Surround Vendues Séparément
Enceinte surround G
Câble Optique
En mode D.IN
Connexion DE Lappareil À UN Téléviseur
Allumez le téléviseur et le Soundbar Appuyez sur la touche
En mode TV
Connexion
Raccordement À DES Appareils Externes
++Utiliser la fonction Bluetooth Power On
Câble Audio Analogique OU Optique
++Câble AUX
Port USB
Extension Codec Débit déchantillonnage Débit binaire
++Avant de connecter un périphérique USB
Mode dentrée Affichage
Mode D’ENTRÉE
Fonction Auto Power Down
En mode BT
Connexion Périphérique Bluetooth Appuyez sur la touche
Le Soundbar prend en charge les données SBC 44,1 kHz, 48 kHz
BT à un autre mode ou éteignez la Soundbar
++À propos du Bluetooth
Utilisation DE Lapplication Samsung Audio Remote
++Installation de lapplication Samsung Audio Remote
++Lancement de lapplication Samsung Audio Remote
Recherchez Samsung Audio Remote
Procédure DE Mise À Jour
Mise À Jour Logicielle
SI Update N’EST PAS Affiché
Tépannage
La télécommande ne fonctionne pas
Lensemble ne sallume pas
Aucun son nest émis
Spécifications
La déclaration de conformité originale se trouve sur le site
Licence
Elimination des batteries de ce produit
Comment contacter Samsung dans le monde
Manuale utente
Norme PER LA Sicurezza
Informazioni Sulla Sicurezza
ITA
Precauzioni
Cavo audio ottico o analogico 23 USB
Sommario
Collegamento del SWA-8000S venduto separatamente
++Icone utilizzate nel manuale
Accessori Forniti
Prima DI Leggere IL Manuale Utente
Visualizza il modo corrente
Pannello Anteriore / Laterale Destro
Accende e spegne lunità Soundbar
Porta micro USB
Pannello Inferiore
Muto
Telecomando
Ripeti
Avanzamento
Audio SYNC, Rear Speaker o Rear Level
Alimentazione
Premere per selezionare TREBLE, BASS, Subwoofer Level
Inserimento Delle Batterie NEL Telecomando
++Precauzioni per linstallazione
Installazione Della Soundbar
Instalazione DEL Suporto PER Montaggio a Parete
La Guida per il montaggio a parete deve essere livellata
Linea centrale
Supporto a parete S
Installazione
Rimozione Della Soundbar Dalla Parete
Collegamento Manuale AL Subwoofer
Collegamento DEL Subwoofer
Collegamento Automatico AL Subwoofer
Ostruzioni
Indicatore collegamento
Collegamento DEL SWA-8000S Venduto Separatamente
Diffusore surround S
Modulo ricevitore wireless
Collegamento DEI Diffusori Surround Venduti Separatamente
Collegamento a UNA TV Utilizzando UN Cavo Ottico Digitale
Collegamento AD UNA TV
Modo TV
Collegare
Accendere la TV e il Soundbar Premere il tasto
Cavo Audio Ottico O Analogico
++Utilizzo della funzione Bluetooth Power On
++Cavo AUX
++Cavo Ottico
Cavo adattatore
Porta USB
++Prima di collegare un dispositivo USB
Modo DI Ingresso
Funzione Auto Power Down
Modo desiderato
Modo di ingresso Visualizzazione
Collegare Dispositivo Bluetooth Premere il tasto
PER Collegare Lsoundbar a UN Dispositivo Bluetooth
Modo BT
Selezionare AV Samsung Soundbar Kxxx K-Series dallelenco
Modo o spegnere la Soundbar
PER Scollegare IL Dispositivo Bluetooth DAL Lsoundbar
PER Scollegare Lsoundbar DAL Dispositivo Bluetooth
++Ulteriori informazioni sul Bluetooth
USO Della APP Samsung Audio Remote
++Installazione dellapp Samsung Audio Remote
++Avvio dellapp Samsung Audio Remote
Ricerca di mercato Samsung Audio Remote
Procedura PER L’AGGIORNAMENTO
Aggiornamento DEL Software
SE Update NON È Stato Visualizzato
Lunità non si accende
Risoluzione DEI Problemi
Una funzione non si attiva quando viene premuto il tasto
’audio non viene riprodotto
Peso Unità principale Subwoofer PS-WK430
Specifiche
Uscita Subwoofer PS-WK430 60W, 3 OHM, THD≦10% Nominale
Aa Avviso di licenza Open Source
Licenza
Modelli Wireless compresa la frequenza 5,15GHz-5,35GHz
Modelli Wireless esclusa la frequenza 5,15GHz-5,35GHz
Applicabile nei Paesi con sistemi di raccolta differenziata
Contatta Samsung World Wide
Manual do utilizador
Componentes Incluídosavisos DE Segurança
Informações DE Segurança
POR
Precauções
Conteúdos
Poderá ser cobrada uma taxa administrativa se
Instalar a fixação de parede Retirar o Soundbar da parede
Cabo áudio ótico ou analógico 23 USB
++Ícones utilizados no manual
Componentes Incluídos
Antes DE LER O Manual do Utilizador
Selecciona a entrada D.IN, AUX, BT, TV, USB
Painel FRONTAL/DIREITO
Liga ou desliga o produto
Apresenta o modo actual
Ligue à saída analógica de um dispositivo externo
Painel Inferior
Liga à saída digital óptica de um dispositivo externo
Silêncio
Controlo Remoto
Repetir
Avançar
Ligar
Silêncio
Colocar Pilhas no Controlo Remoto
++Controlar o Soundbar com o controlo remoto do televisor
Instalar a Fixação DE Parede
Instalar O Soundbar
++Precauções de instalação
Guia de suporte de parede deve ficar nivelado
Linha central
Suporte de parede D
Parte traseira do Soundbar Extremidade direita do Soundbar
Instalação
Retirar O Soundbar DA Parede
Ligar AO Subwoofer Manualmente
Ligar O Subwoofer
Ligar AO Subwoofer Automaticamente
Indicador Ligação
Ligar O SWA-8000S Vendido EM Separado
Módulo de recetor sem fios
Ligar AS Colunas Surround Vendidas EM Separado
Coluna surround E
Modo D.IN
Ligar a UM Televisor
Ligar a UM Televisor COM UM Cabo Ótico Digital
Ligue o televisor e o Soundbar
Ligar a Dispositivos Externos
++Utilizar a função Bluetooth Power On
Cabo Áudio Ótico OU Analógico
++Cabo AUX
Cabo adaptador
++Antes de ligar um dispositivo USB
Modo de entrada Visor
Seleccione AV Samsung Soundbar Kxxx K-Series da lista
Para Ligar O Soundbar a UM Dispositivo Bluetooth
Ligar Dispositivo Bluetooth
Para Desligar O Soundbar do Dispositivo Bluetooth
Para Desligar O Dispositivo Bluetooth do Soundbar
++Mais sobre Bluetooth
++Instalação da aplicação Samsung Audio Remote
Utilizar a Aplicação Samsung Audio Remote
++Iniciar a aplicação Samsung Audio Remote
Pesquise na loja Samsung Audio Remote
Procedimento DE Atualização
Actualização DE Software
SE Update NÃO FOI Apresentado
Resolução DE Problemas
5V / 0,5 a
Especificações
Peso Unidade principal Subwoofer PS-WK430
Nominal de Subwoofer PS-WK430 60W, 3 OHM, THD≦10% Saída
Modelos sem fios incluindo a frequência de 5,15 GHz 5,35 GHz
Licenças
Country Contact Centre Web Site ` Europe
Contacte a Samsung Internacional
Manual del usuario
Advertencias
Información DE Seguridad
Busque atención médica inmediata
Precauciones
Índice
Podría aplicársele una tarifa de administración si
Conexión de SWA-8000S Se vende por separado
Cable de audio óptico o analógico 23 USB
++Iconos que se utilizarán en el manual
Introducción
Antes DE Leer EL Manual DEL Usuario
Selecciona la entrada D.IN, AUX, BT, TV, USB
Panel Frontal / Derecho
Enciende y apaga la alimentación
Muestra el modo actual
Puerto Micro USB
Panel Inferior
Se pulsa para seleccionar una fuente Soundbar conectada
Mando a Distancia
Silencio
Salto Adelante
Alimentación
Volumen
Ajusta el nivel de volumen de la unidad
Silencio
Instalación DE LAS Pilas EN EL Mando a Distancia
Obtener más información
Fabricante del mando a distancia Sound durante 5 segundos
Instalación DEL Soporte Para Montaje EN Pared
Instalación DE LA Soundbar
++Precauciones en la instalación
Se instala sólo en una pared
Línea central
Para la pared
Lado trasero de la Soundbar Extremo derecho de la Soundbar
Soporte derecho
Instalación
Retirada DE LA Soundbar DE LA Pared
Conexión Automática AL Subwoofer
Conexión DEL Subwoofer
Conexión Manual AL Subwoofer
Apagado
Indicador de vinculación
Esto puede tardar unos minutos
Conexión DE SWA-8000S SE Vende POR Separado
Módulo receptor inalámbrico
Conexión DE LOS Altavoces Surround SE Venden POR Separado
Conexión CON UN TV Mediante UN Cable Óptico Digital
Conexión a UN TV
El modo D.IN
Conecte la Soundbar al TV con un cable óptico digital
Encienda el TV y la Soundbar Pulse el botón
Conectar
Conexión CON Dispositivos Externos
++Utilización de la función Bluetooth Power On
Cable DE Audio Óptico O Analógico
++Cable Óptico
Cable adaptador De Micro USB a USB No suministrado
Puerto USB
Extensión Códec Velocidad de Velocidad en bits Muestreo
++Antes de conectar un dispositivo USB
Modo de entrada Pantalla
Función DE Auto Power Down
Modo DE Entrada
Conectar Dispositivo Bluetooth Pulse el botón
Para Conectar EL Soundbar a UN Dispositivo Bluetooth
El modo BT
Seleccione AV Samsung Soundbar Kxxx K-Series en la lista
De BT a otro modo, o bien apague la Soundbar
Para Desconectar EL Dispositivo Bluetooth DEL Soundbar
Sonido al modo BT
++Información adicional sobre Bluetooth
++Instalación de la app Samsung Audio Remote
Utilización DE LA APP Samsung Audio Remote
++Inicio de la app Samsung Audio Remote
Búsqueda de mercado Samsung Audio Remote
Procedimiento DE Actualización
Actualización DE Software
SI no Aparece Update
Solución DE Problemas
Peso Unidad principal Subwoofer PS-WK430
Especificaciones
Nominal de Subwoofer PS-WK430 60W, 3 OHM, THD≦10% Salida
Aa Aviso sobre licencia de código abierto
Licencia
Contacte con Samsung World Wide