LCD TV
See the warranty card for more information on warranty terms
Contents
General Information List of Features
Accessories
Viewing the Control Panel
Buttons on the Lower-Right Part of the Panel
Side Panel buttons
+ VOL
Viewing the Connection Panel
PC in PC / Audio
Remote Control
Installing Batteries in the Remote Control
Connections Connecting VHF and UHF Antennas
Connecting Cable TV
Connecting to a Cable Box that Descrambles All Channels
Connecting to a Cable Box that Descrambles Some Channels
Cable without a Cable Box
What is HDMI?
Connecting a Camcorder
Y, P B, P R jacks on the TV
Component Y, P B
Or S-Video Cable between
Connecting a VCR
Video Connection
Connecting a Digital Audio System
Connecting an Ampli
Connecting a PC
Using the D-Sub Cable
Using the HDMI/DVI Cable
Each PC has a different back panel configuration
Plug & Play Feature
Auto Air and Cable antenna signals
Operation Turning the TV On and Off
Displayed Press
Using the Channel Buttons
Using the Number Buttons
Changing Channels
Press the Enter button
Viewing the Display
Adjusting the Volume
Viewing the Menus
Using the Tools Button
Selecting the Video Signal-source
Easy Setting
Memorizing the Channels
Storing Channels in Memory Automatic Method
Press the Menu button to display the menu
To Select the Source
To Edit the Input Source Name
Input
Edit Name
Picture Control Changing the Picture Standard
Customizing the Picture Settings
Press the Enter button to select Mode. Press
Setting the Color Tone
Setting the Screen Size
Con
Activating Picture Options
After selecting Zoom1, Zoom2 or Wide Fit
Input Source Picture Size
Wide Fit
To fit the entire screen
Setting the Digital Noise Reduction
Setting the Hdmi Black Level
Setting the Film Mode
Enter
Button Press the Exit button to exit Each mode can be reset
Resetting the Picture Settings to the Factory Defaults
TVPicture
Customizing the Sound
Sound Control Changing the Sound Standard
Sound
Setting the TruSurround XT
Multi-Track Options is available only in TV mode
Choosing a Multi-Channel Sound MTS track Digital
Preferred Language
Choosing a Multi-Channel Sound MTS track Analog
Automatic Volume Control
Multi-Track Sound
Setting the TV Speakers On/Off
Connecting Headphones Sold separately
Channel Control Clearing Scrambled Channels Digital
To stop searching scrambled channels
Press the Enter Button to select Stop
Press the es, then press
Adding and Erasing Channels
Press the Enter button to select All
To delete the channel Mark will disappear
Channel List
Press the Tools button on the remote control
To Set-Up Your Favorite Channels
Current channel is added to or deleted from Favorites
Channel List / Added
Viewing the Channel Lists
Labeling Channels
Press Then press the Enter button
Press Select a second letter or digit by pressing
Name
Fine Tuning Analog Channels
Checking the Digital-Signal Strength
PC Display Using Your TV as a Computer PC Display
Setting Up Your PC Software Based on Windows XP
Display Modes
Sub Input
Setting up the TV with your PC
How to Auto Adjust
Adjusting the Screen Quality
Button
Viewing the Resolution
You can confirm the resolution configured for the PC
Changing the Screen Position
Initializing the Screen Position, Coarse and Fine
Time Setting Setting the Clock
Option 1 Setting the Clock Manually
Time
Clock
Time Zone
Option 2 Setting the Clock Automatically
TVClock
Setting the Sleep Timer
Press the Timer, then press Enter button
Setting the Timer sets the Activation to On automatically
To cancel the set sleep timer
Setting the On/Off Timer
Auto Power Off
Timer
Function Description Selecting a Menu Language
Using the V-Chip
Setting Up Your Personal ID Number PIN
A Only
Chip
How to Enable/Disable the V-Chip
How to Set up Restrictions Using the TV Parental Guidelines
How to set the FV, D, L, S and V sub-ratings
V-Chip screen will appear. Press
Button TV Parental Guidelines screen will appear Press
Process
Mpaa Rating, then press the Enter button
Button to
Select a particular Mpaa category. Pressing
Mpaa Rating
How to Set up Restrictions Using the ‘Canadian English’
Canadian English
How to Set up Restrictions Using the ‘Canadian French’
Canadian French
Downloadable U.S. Rating, then press the Enter button
Using the V-Chip for Digital channels
Rating
Default is CC1
Viewing Closed Captions On-Screen Text Messages Analog
Press the Enter button to select Caption
Caption
Button Press
Viewing Closed Captions On-Screen Text Messages Digital
Caption Options
Adjusting the TV On/Off Melody Sound
Using the Energy Saving Feature
Melody does not play
Press the or
Upgrading the Software
Appendix Troubleshooting
Problem Possible Solution
Adjust the Coarse tuning and then adjust the Fine tuning
Input
How to Adjust the Stand LN19A450C1D, LN19A451C1D
How to Adjust the Angle of the TV LN19A450C1D, LN19A451C1D
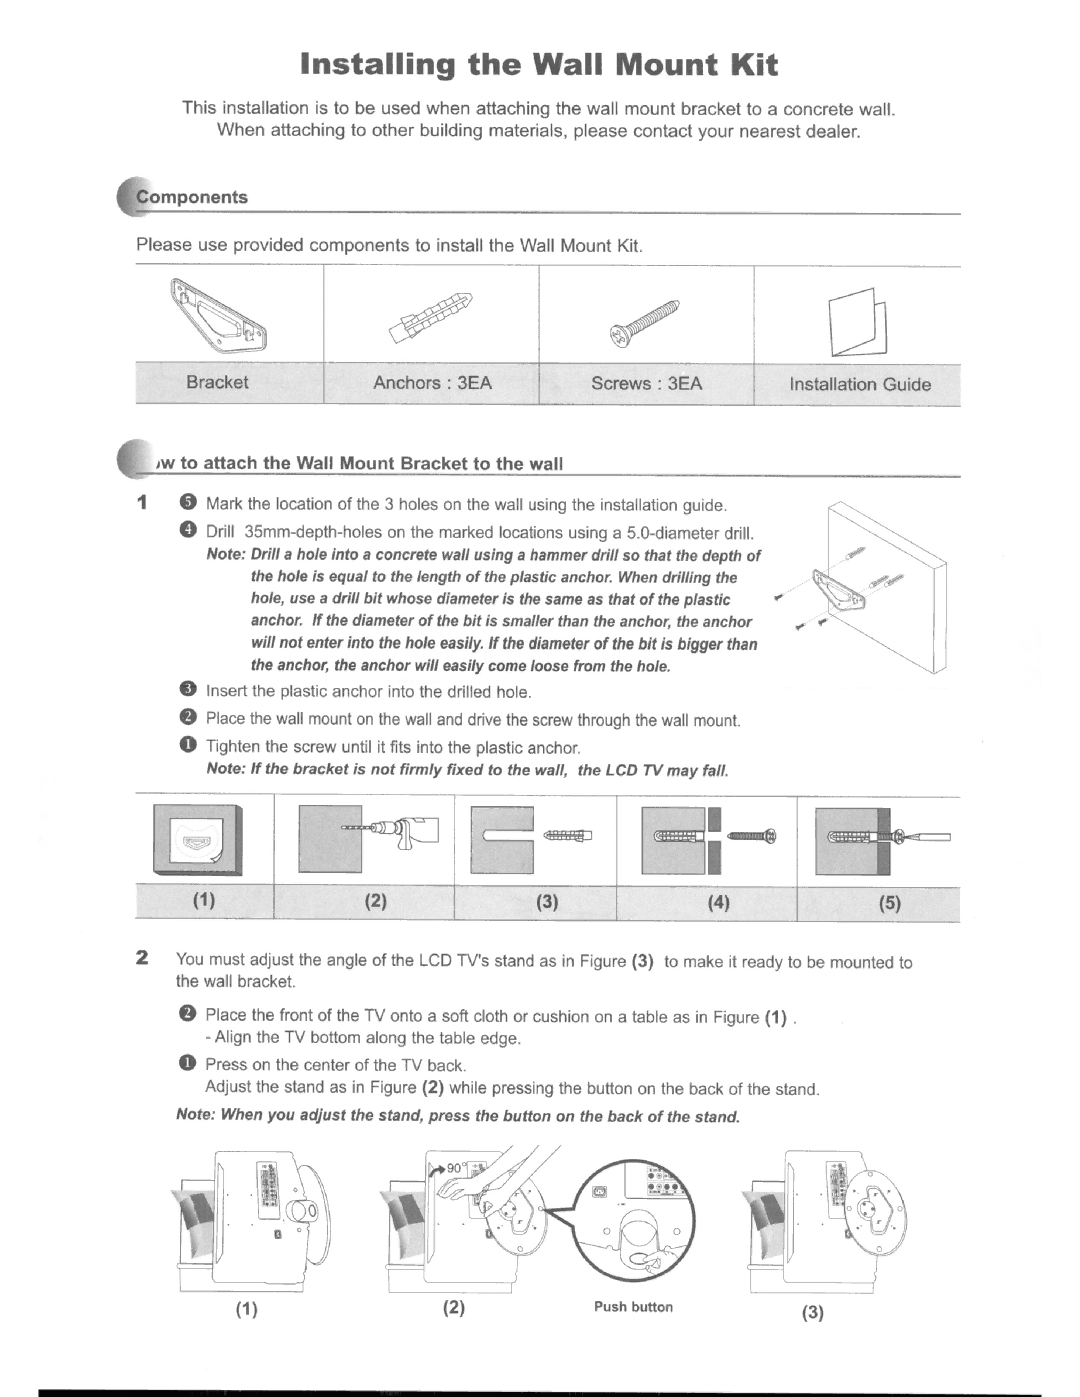
Installing the Wall Mount Kit LN19A450C1D, LN19A451C1D
Using the Decoration Covers LN19A450C1D, LN19A451C1D
Installing the Stand
Disconnecting the Stand
Wall Mount Kit Specifications Vesa
Using the Anti-Theft Kensington Lock
Dimensions WxDxH
Speci
This page is intentionally Left blank
Contact Samsung Worldwide
Contacte con Samsung Worldwide
SAMSUNG726-7864 Challenger Road Ridgefield Park, NJ
BN68-01395B-00
LN19A450C1D/LN19A451C1D LN22A450C1D/LN22A451C1D
Video Good Video Normal
Remote Control
Picture size selection
Connect a DVI to Hdmi Cable or
Connect an Hdmi Cable between
Connect Audio Cables between
Connecting a Camcorder
Connect a Video Cable or S-Video
Connecting a VCR
To begin, follow steps 1-3
Connecting a Digital Audio System
Theater
Connecting a PC
Auto Program in Progress
Cable Start Auto
DTV Cable Cable 24 11 %
Setting the Channel List
To Select the Source
Source List
Check signal cable message Not Supported Mode message
Poor picture
Country Customer Care Center Web Site Address
BN68-01396B-00
Page
TP 5--- 8- ~
~. jJ
Page
\, \
Comcrning 0pl.rationand mainlcllal11.has hl.cl1
~ Avertissement POUl Eviter Tout Risque
Regulatory Compliance Statements
Important Safety InstructionsUL Only
AA68-03242L-01
Page
Page
Samsung Color Television & Projection Television
AA68-00371C-06

