Contacte con Samsung Worldwide
Contact Samsung Worldwide
BN68-01669C-00
A Only
Precautions When Displaying a Still Image
Other countries
Contents
3903-000144
General Information List of Features
Accessories
HDMI/DVI connection of your PC to this TV
VOL +
Power
Viewing the Control Panel
Buttons on the Lower-Right Part of the Panel
TV Rear Panel
Viewing the Connection Panel
PC in PC / Audio
Remote Control
Antennas with 75 Ω Round Leads
Installing Batteries in the Remote Control
Connections Connecting VHF and UHF Antennas
Antennas with 300 Ω Flat Twin Leads
Cable without a Cable Box
Connecting Cable TV
Connecting to a Cable Box that Descrambles All Channels
Connecting to a Cable Box that Descrambles Some Channels
DVD Player or Cable Box/Satellite receiver TV Side Panel
AUDIO-L jacks on TV and the Audio OUT jacks on
Connecting a Camcorder
Connect Audio Cables
Between the AV
Video Connection
Connecting a VCR
Using the D-Sub Cable
Connecting a Digital Audio System
Connecting an Amplifier/DVD Home Theater
Connecting a PC
Operation Turning the TV On and Off
Plug & Play Feature
Using the Number Buttons
Using the Channel Buttons
Changing Channels
Viewing the Display
Adjusting the Volume
Viewing the Menus
Memorizing the Channels
Using the Tools Button
Selecting the Video Signal-source
Easy Setting
TV begins memorizing all available stations
Storing Channels in Memory Automatic Method
Auto Program
Source List
Using the Color buttons on the remote with the Source list
To Select the Source
To Edit the Input Source Name
Backlight
Customizing the Picture Settings
Picture Control Changing the Picture Standard
Backlight
Setting the Dynamic Contrast
Adjusting the Detailed Settings
Activating Detailed Settings
Setting the Black adjust
Customizing the Color Space
Adjusting the Gamma
Setting the Color Space
Color is available when Color Space is set to Custom
White Balance Offset Gain Reset
Adjusting the White Balance
Adjusting the Flesh Tone
Setting the Edge Enhancement
Does not perform a screen reset
Resetting the Picture Settings to the Factory Defaults
Setting the xvYCC
Picture Reset
Activating Picture Options
Configuring Picture Options
Setting the Color Tone
Setting the Screen Size
Zoom2
Input Source Picture Size
169
Zoom1
Film Mode Off
Setting the Digital Noise Reduction
Setting the DNIe Digital Natural Image engine
Setting the Hdmi Black Level
Film Mode Off Blue Only Mode Auto Motion Plus 120Hz Medium
Setting the Film Mode
Setting the Blue Only Mode
Setting the Auto Motion Plus 120Hz
Changing the Size of the PIP Window
PIP Settings Main picture Sub picture
Viewing Picture-in-Picture
Activating Picture-in-Picture
Air/Cable
Changing the PIP Channel
Channel
Customizing the Sound
Press the Enter button to select Mode
Custom sound setting, then press the Enter button
Sound Control Changing the Sound Standard
Off
Setting the TruSurround XT
Multi-Track Sound Stereo
Choosing Preferred Language
Choosing a Multi-Channel Sound MTS track
Preferred Language English
Enter button Press the Exit button to exit
Automatic Volume Control
Auto Volume Off
Selecting the Speaker
Listening to the Sound of the Sub PIP Picture
Resetting the Sound Settings to the Factory Defaults
Connecting Headphones Sold separately
Sound Reset
Channel List
Using the Color buttons on the Remote with the Channel List
Channel Control Managing Channels
Viewing All Channels
Erasing and Adding Channels
Adding multiple channels to Favorites
Setting Your Favorite Channels
Antenna
Reserving a Program Timer Viewing
Timer Viewing
Digital Program Guide and Viewing Reservation
Programmed Option
Canceling a reservation
Confirming a Viewing Reservation
Modifying a viewing reservation
Then press the Tools button
Labeling Channels Analog
Storing Channels in Memory Auto Program
Selecting and Deselecting All Channels
Fine Tune
Fine Tuning Analog Channels
Clearing Scrambled Channels Digital
Clear Scrambled Channel
Signal Strength
Checking the Digital-Signal Strength
Signal Strength
HDMI/DVI Input
PC Display Using Your TV as a Computer PC Display
Setting Up Your PC Software Based on Windows XP
Display Modes
Auto Adjustment
Setting up the TV with your PC
How to Auto Adjust
Adjusting the Screen Quality
Initializing the Screen Position, Coarse and Fine
Screen Coarse Fine PC Position Image Reset
Image Reset is completed
Changing the Screen Position
Option 1 Setting the Clock Manually
Time Setting Setting the Clock
Time
Time Zone
Option 2 Setting the Clock Automatically
To cancel the set sleep timer
Setting the Sleep Timer
Time
Contents
Setting the On/Off Timer
Volume Set the required volume level
Auto Power Off
Press the or button to select English, Español or Français
Using the V-Chip
Setting Up Your Personal ID Number PIN
Function Description Selecting a Menu Language
Change PIN
How to Enable/Disable the V-Chip
V-Chip screen will appear
Chip Chip Lock Off
Chip Lock
How to Set up Restrictions Using the TV Parental Guidelines
How to set the FV, D, L, S and V sub-ratings
Enter PIN
Chip Lock TV Parental Guidelines Mpaa Rating
Chip Lock TV Parental Guidelines
How to Set up Restrictions Using the Canadian English
Canadian English Canadian French
Chip Chip Lock TV Parental Guidelines Mpaa Rating
How to Set up Restrictions Using the Canadian French
Canadian French
Downloadable U.S. Rating
Using the V-Chip for Digital channels
Caption Off
Caption Mode Default
Viewing Closed Captions On-Screen Text Messages Analog
Caption
Viewing Closed Captions On-Screen Text Messages Digital
Melody does not play
Adjusting the TV On/Off Melody Sound
Setting the Entertainment mode
External Settings
Energy Saving
Using the Energy Saving Feature
Software Upgrade
Upgrading the Software
Picture Test
Self diagnosis
Sound Test
Operations
Using the Wiselink Function
Connecting a USB Device
Using the Remote Control Button in Wiselink Menu
This menu shows Photo files saved on an USB memory device
Using the Photo List
Using the Wiselink Menu
Photo Music Setup
Current Sort Standard
Screen Display
Currently selected photo
Photo Information Window
Monthly
Sorting Photo List
Timeline
Composition
Color
Changing the color information
Changing the information of multiple files
Folder
Changing the Favorites setting
Preference
Viewing the Photo Information
Deleting the Photo file
Deleting Multiple Photos
Enter button Delete the selected files? message appear
Playing current group
Viewing a Photo or Slide Show
Viewing a Slide Show
To perform a SlideShow with only the selected files
Icon Current OSD Function
Viewing a photo
Start Slide Show or Stop Slide Show
Rotate
Slide Show Speed
Zoom
Background Music
Sound Mode
Background Music Setting
Background Music setting menu is displayed
Picture Mode
Currently selected music
Using the Music List
Shows the currently selected music
Title
Sorting Music List
Music
Mood
Artist
Changing the Mood information
Genre
Delete Selected Files I Love Y.. Files Delete this file?
Deleting the Music file
Deleting Multiple Music files
Viewing the Information
Playing a music file
Playing a Music File
Playing the music group
Repeating Music Play
Playing the selected music files
Screen Saver Run Time
Using the Setup Menu
Music Repeat Mode
Select to control the slide show speed
Connecting Anynet+ Devices
About Anynet+ What is Anynet+?
Following settings help set the Anynet+ functions
Setting Up Anynet+
Anynet+ HDMI-CEC Device List Setup
Anynet+ Device
Scanning and Switching between Anynet+ Devices
Anynet+ Menu
Anynet+ Menu Description
Listening through a Receiver Home theater
When there is more than one recording device
When the recording device is not displayed
Recording
Troubleshooting for Anynet+
Box, not your TV
Appendix Troubleshooting
Problem Possible Solution
Volume accordingly
Devices, not TV ‘Resets all settings to the default
Digital signal Picture appears distorted
Corner of the screen
Disconnecting the Stand
Installing the Stand
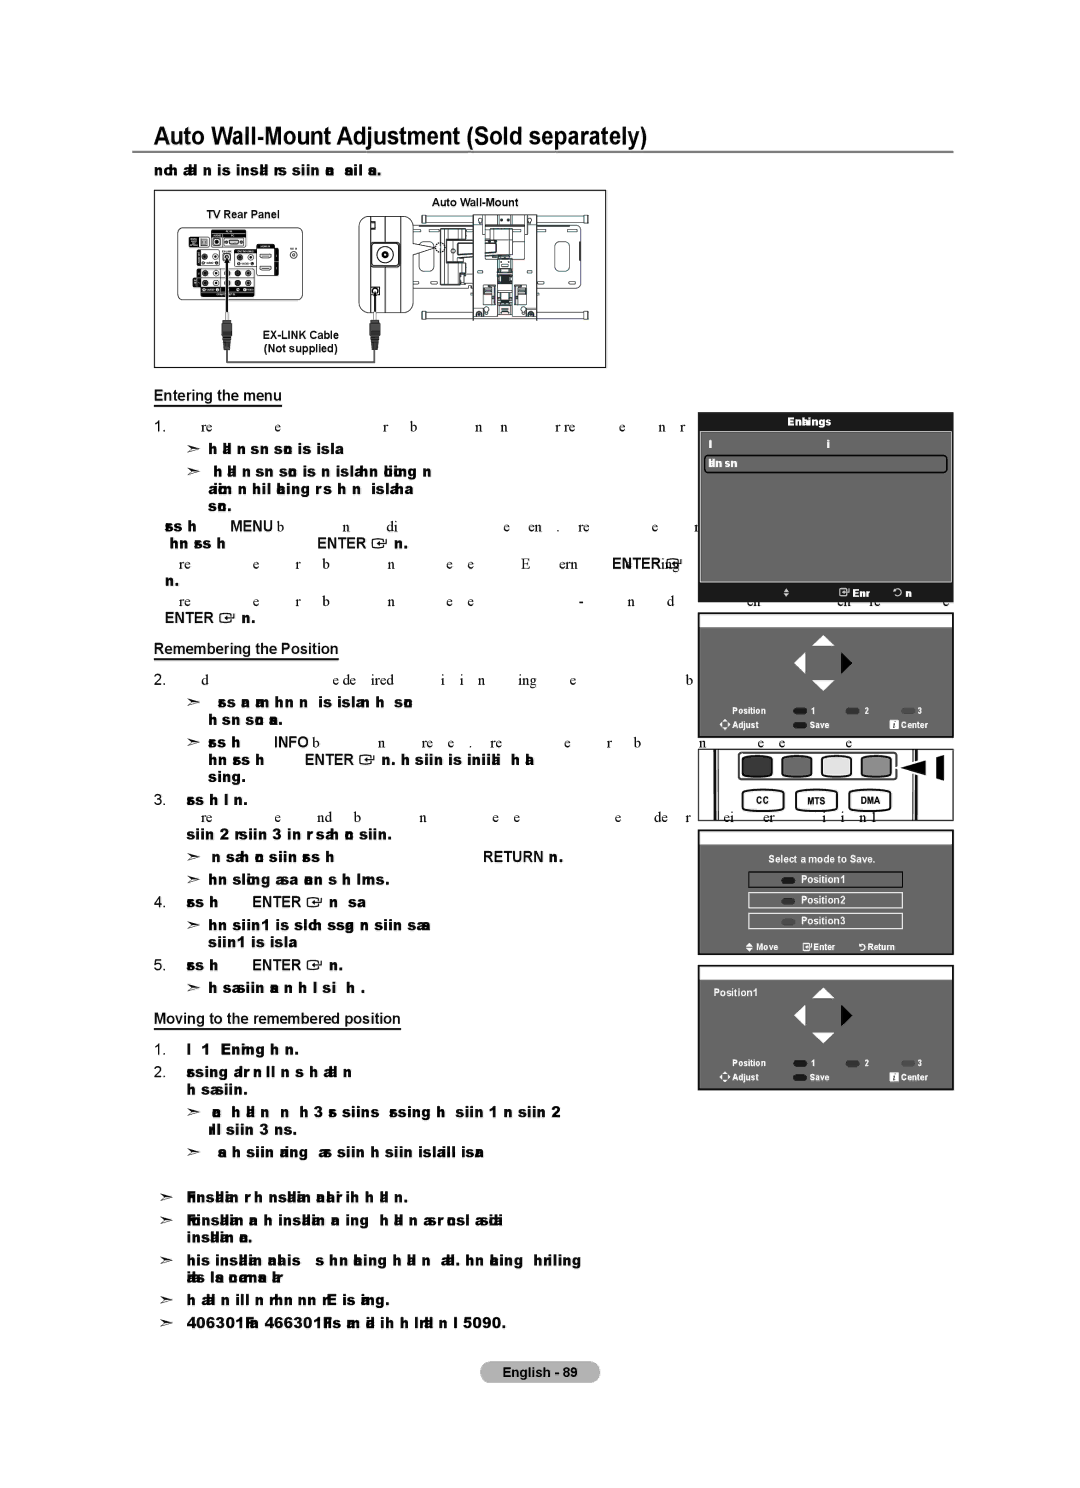
Moving to the remembered position
Auto Wall-Mount Adjustment Sold separately
Entering the menu
Remembering the Position
LCD-TV
Wall Mount Kit Specifications Vesa
Optional
Using the Anti-Theft Kensington Lock
Wall
Securing the TV to the Wall
To avoid the TV from falling
Please purchase these additionally
Specifications
TOP View
Dimensions
TOP View Jack Panel Detail 3.7H X 9.1W
50.0
Version 2, June
GNU General Public License GPL
Preamble
Page
How to Apply These Terms to Your New Programs
No Warranty
Version 2.1, February
GNU Lesser General Public License Lgpl
Page
Page
No Warranty
END of Terms and Conditions
How to Apply These Terms to Your New Libraries
This page is intentionally Left blank
De série
Téléviseur ACL
Précautions à prendre lors de l’affichage d’une image fixe
États-Unis seulement
Autres pays
Aux États-Unis 1-800-SAMSUNG
Table des matières
Symboles Appuyer Remarque Bouton d’accès rapide
Guide de l’utilisateur
Accessoires
Informations générales Liste des fonctions
Connexion HDMI/DVI entre votre PC et ce téléviseur
Alimentation
Présentation du panneau de commande
Haut-Parleurs Capteur de la télécommande
Boutons situés en bas à droite du panneau
Pannear arrière de la télévision
Présentation du panneau de branchement
Hdmi in 1, 2, 3 / DVI INHDMI2R-AUDIO-L
Boutons numériques
Télécommande
Antennes avec Câble rond de 75 Ω
Insertion des piles dans la télécommande
Connexions Connexion d’antennes VHF et UHF
Antennes avec Câble bipolaire plat de 300 Ω
Câble sans boîte de jonction
Connexion du Câble TV
Branchez ce Câble à un séparateur bidirectionnel
Audio entre la prise
Qu’est-ce que le mode Hdmi ?
Boîtier décodeur
Branchez les câbles
Branchez les câbles audio entre les prises
Connexion d’un caméscope
Connexion vidéo
Branchement d’un magnétoscope
Connexion S-Vidéo
Connexion d’un amplificateur/home cinéma DVD
Branchement d’un système audio numérique
Fonction Prêt à l’emploi
Fonctionnement Mise en marche et arrêt de la télévision
Prêt à l’emploi
Changement des canal
Utilisation des boutons de canal
Utilisation du pavé numérique
Visualisation de l’affichage
Réglage du volume
Visualisation des menus
Réglage facile
Sélection de la source du signal vidéo
Utilisation de la touche Tools
Mémorisation des canal
Arrêter Prog. auto?
Prog. auto
Prog. auto Choisir les antennes à mettre en mémoire Air
Choisir le tableau de câblodiffusion Analogique
Entrer le nom
Pour sélectionner la source
Pour éditer le nom de la source
Liste source
Dynamic
Mode Standard
Contrôle de L’image Changement du format normal de l’image
Personnalisation des réglages de l’image
Réglage du noir
Mode Film
Paramétrage de la fonction Réglages des détails
Activation de la fonction Réglages des détails
Réglage de l’espace couleur
Réglage du paramètre gamma
Personnalisation de l’espace couleur
Réglages des détails Réglage du noir
Réglage de l’équilibrage du blanc
Réglage du ton chair
Réglage de l’amélioration des bords de l’image
Équilibrage du blanc Ton chair Améliorat. bords Off XvYCC
Réinitialisation de l’image Does not perform a screen reset
Rétablir les paramètres de réglage de l’image d’usine
Réglage du xvYCC
Sélection de la nuance de couleur
Configuration des options d’image
Chaude1 ou Chaude2 n’est activée qu’en mode d’image Film
Activation des options d’image
Format large
Source de l’entrée Format de l’image
Numér. seul
Réglage de DNIe Digital Natural Image engine
Mode Film Off
Nv nr Hdmi Normal Mode Film Off Mode bleu seu
Réglage de la réduction numérique des bruits
Options d’image Format 169 Réduct. bruit num Auto
Réglage du mode Film
Réglage du Mode bleu seulement
Réglage du Motion Plus 120Hz aut
Paramètres ISI Image principale Image secondaire
Redimensionnement de la fenêtre ISI
Visionnement Image sur Image
Comment activer la fonction Image sur Image
Changement du canal ISI
Égaliseur
Mode Personnel
Contrôle du Son Changement du format normal du son
Personnalisation du son
Entièrement compatible avec tous les formats multicanaux
Paramétrage de la technologie TruSurround XT
Bouton Enter
Son multi-piste Stéréo
Choix de la langue privilégiée
Appuyez sur le bouton Enter
Langue privilégiée English
Volume auto Off
Contrôle automatique du volume
Sélection de haut-parleur
Sélect. son Principale
Activation du son de l’image ISI secondaire
Rétablir les paramètres de son par défaut
Connexion du casque Vendu séparément
Afficher tous les canaux
Contrôle des Chaînes Gestion des canaux
Liste des canaux
Liste des canaux
Ajout et suppression de canaux
Sélection des canaux favoris
Appuyer sur la touche Tools de la télécommande
Ajout de plusieurs canaux aux canaux favoris
01 01 10 09 am
Pour réserver une émission écoute par minuterie
Guide d’émissions numériques et réservation d’émission
Air Une fois
Option programmée
Confirmer une réservation d’émission
Modifier une réservation d’émission
Annuler une réservation
Air
Identification des canaux analogiques
Mémorisation des canaux Prog. auto
Sélection et désélection de tous les canaux
Syn. Précise
Suppression des canaux brouillés canaux numériques
Syntonisation fine des chaînes analogiques
Effacer les canaux brouillés
Puissance signal
Contrôle de la puissance du signal numérique
Puissance signal
Entrée HDMI/DVI
Configuration de votre logiciel PC basée surWindows XP
Entrée D-Sub Mode Résolution Fréquence Polarité
Modes d’affichage
Réglage Auto
Configurer votre téléviseur avec votre PC
Comment utiliser le réglage automatiq
Réglage de la qualité de l’écran
Initialisation de la position de l’écran rapide et fin
Changement de la position de l’écran
Option 1 Réglage manuel de l’horloge
Paramètre D’heure Régler l’horloge
Heure
Fuseau hor
Horloge Mode horloge Auto
Option 2 Réglage Automatiquement de l’horloge
Fuseau hor ’ été Off
Mise en veille Off
Paramétrer le minuteur
Pour annuler la mise en veille
Heure
Câble
Réglage de la minuterie de mise en marche/arrêt
Arrêt automatique
Antenne
Langue
Description de la Fonction Sélection d’une langue de menu
Utilisation de la fonction puce V-Chip
Réglage de votre numéro d’identification personnel NIP
Changer NIP Nouveau NIP Confirmer NIP
Comment activer/désactiver la fonction puce
Chip Blocage V-Chip Off
Changer NIP
Français canadien
TV-Y Jeunes enfants
Entrez NIP
Blocage V-Chip Contrôle parental TV
Chip Blocage V-Chip Contrôle parental TV Classif. Mpaa
Blocage V-Chip
Perm. tout Ans+ Bloq. tout 13 ans+ 16 ans+ 18 ans+
Classif. obtenue TV-G/MPAA X/Anglais canadien C8+
Chip Blocage V-Chip Contrôle parental TV Classif. Mpaa
Sous-titres
Texte4, puis appuyez sur Enter
Sous-titres
Sous-titres Off
Affichage des sous-titres messages texte à l’écran Numérique
Mode ss-titres codés
Réglages externes
Réglage du mode Divertissement
Réglage de la mélodie de marche/arrêt du téléviseur
La mélodie est inaudible
Économiseur énergie Off
Fonction économiseur d’énergie
Mise à niveau du logiciel
’adapter aux scènes
Essai de son
Autodiagnostic
Test d’autodiagnostic Test de l’image Test de son Model No
Essai d’image
Branchement d’un dispositif USB
Utilisation de la fonction Wiselink
Liste de photos
Utilisation de la liste de photos
Utilisation du menu Wiselink
Le menu Wiselink s’affiche
Visualiser les groupes
Affichage à l’écran
Fenêtre d’information sur la photo
Unité de tri actuelle
Date
Liste de photos triées
Mois
Trie les photos par mois
Sur Enter
Couleur
Modification de l’information relative à la couleur
Modification de l’information de plusieurs fichiers
Préf
Dossier
Modification des réglages favoris
Visualisation de l’information photo
Suppression d’un fichier photo
Visualiser un diaporama
Visualisation d’une photo ou d’un diaporama
Lecture groupe cour
Lancer ou arrêter un diaporama
Visionnement d’une photo
Rotation
Musique de fond
Il est possible de zoomer les images en mode Plein écran
Icône
Vitesse du diaporama
Choisir le fichier de musique de fond
Image Mode
Son Mode
Sélection musique de fond
Appuyer sur la touche ou pour sélectionner Music, puis sur
Utilisation de la liste musicale
Norme de tri actuelle
Les fichiers musicaux sont affichés
Tri de la liste de fichiers musicaux
Titre
Ambiance
Artis
Modification de l’information sur l’ambiance
Supp. sécuritéCatherine
Suppression de plusieurs fichiers musicaux
Suppression d’un fichier musical
Visualisation de l’information
Lecture d’un fichier musical
Lecture d’un fichier musical
Lecture du groupe musical
Musique Répéter
Lecture des fichiers musicaux sélectionnés
Reprise de la lecture de la musique
Musique Mode de répétition
Utilisation du menu de configuration
Appuyer sur la touche ou pour sélectionner Setup, puis sur
Permet de commander la vitesse du diaporama
Branchement d’appareils Anynet+
Propos d’Anynet+ Qu’est-ce qu’Anynet+?
Anynet+ HDMI-CEC Liste appareils Configuration
Configuration d’Anynet+
La fonction Anynet+ HDMI-CEC est activée
Balayage et permutation entre les appareils Anynet+
Lorsque l’appareil branché n’est pas affiché
Enregistrement
Écoute par l’intermédiaire d’un récepteur
Lorsque plus d’un appareil d’enregistrement est branché
Dépannage de la fonction Anynet+
Annexe Identification des problèmes
Problème Solution possible
Connecté à l’entrée PC
Clavier Il est possible que l’image ne soit pas
Démonter la base
Installation du support
Réglez à la position souhaitée à l’aide des touches
Support mural à réglage automatique vendu séparément
Pour entrer dans le menu
Mémorisation de la position
Spécifications du jeu d’installation murale Vesa
Utilisation du verrouillage Kensington antivol
Pour éviter la chute du téléviseur
Fixation du téléviseur au mur
Poids
Résolution PC
Spécifications
Son
VUE DU Haut Details DU Panneau DES Prises 3.7H X 9.1W
LN46A630M1F
LN52A630M1F