User Guide
Contents
Chapter Getting Started
Latest processor has been adopted for
Product Features
Turned off. Optional
Tips
Or fatality
Safety Precaution Notations
Before You Start
Text Notations
About HDD Capacity Representation
Precautions for Operating System Support
Copyright
About the Product Capacity Representation Standard
About Memory Capacity Representation
There is a danger of suffocation
Safety Precautions
Installation Related
Keep the plastic bags out of the reach of children
Do not touch the main plug or power cord with wet hands
Power Related
Do not unplug the power cord out by pulling the cable only
Connect the power cord to the AC adapter firmly
AC Adapter Usage Precautions
Use only the AC adapter supplied with the product
Please use the computer within
Battery Usage Related
Use an authorized battery and AC adapter only
There is a danger of electric shock or choking
There is a danger of an explosion or fire
Usage Related
Failure to do so, may cause electric shock
Upgrade Related
Never disassemble the power supply or AC adapter
This may result in harming or burning your skin
Custody and Movement Related
Do not place a heavy object over the product
Use only a battery authorized by Samsung Electronics
Dispose of worn-out batteries properly
Use a wall outlet or multi-plug with a grounding part
Take care not to drop the product while using it
Do not insert your fingers into the PC Card Slot
Do not use a damaged or modified CD/Floppy Disk
Check CDs for cracks and damage prior to use
Never disassemble or repair the product by yourself
Take care when touching the product or parts
Take care not to throw or drop a computer part or device
Use parts authorized by Samsung Electronics only
Safety Precautions
Proper Posture
Proper Posture During Computer Use
Eye Position
Proper Posture During Computer Use
Hand Position
Operation Condition
Volume Control Headphones and Speakers
Check your volume first to listen to music
Illumination
For 15.6 inch models
Using the camera lens, web cam
Overview
Front View
For 14/13.3 inch models
Power Button Turns the computer on and off
For 12.1 inch models
For 15.6/14/13.3 inch models
Status Indicators
USB Port port such as a keyboard/mouse, digital Camera, etc
Right View
Security Slot
Left View
What is a chargeable USB port?
Be dangerous
DC Jack
Through these holes
Back View
Bottom View
Turning the computer on
Entering Sleep mode
Adjusting the screen brightness
Turning the Computer On and Off
For Windows
Click Start Shut down mode to shutdown the computer
Using the Power button in Windows Vista
Turning the computer off
Click Turn Off
For Windows XP
Click the Start
Click Turn Off Computer
Samsung
Samsung Fast Booting Optional
Using Fast Booting
While the Fast Booting function is enabled
Chapter Using the computer
Either type a or B is provided depending on the model
Keyboard
Shortcut Keys
Type a Model Type B Model
This key may not be provided depending on the keyboard type
Shows the remaining battery charge
Enters the Euro monetary unit symbol
Mutes or cancels mute
Speed Maximum performance mode
Low-noise/low power consumption with one-click
Silent Low-noise and low power consumption mode
Normal Normal Mode
Other Function Keys
Volume Control
Screen Brightness Control
Numeric Key For 15.6 inch models
Touchpad Right Button
Touchpad
Touchpad Left Button
Scroll Area
Click Function
Basic Touchpad Functions
Moving the cursor on the screen
Double-Click Function
Drag Function
Gesture Function of the Touchpad Optional
Move function
Scroll Function
Rotation function
Zoom Functions
Sound Mouse Elan Options button
Configuring the Gesture Function
Mouse Device Settings tab Settings button
Touchpad On/Off Function
Learning basic touch screen operations
Using the Touch Screen
Touch Operation Function
Executing a program Simulating a shortcut key
Using the Gesture Function of the Touch Screen
Select Gesture Settings
Executing predefined actions
Click 4 Points Calibration in the Tools tab
Screen Calibration
To further improve the precision
Utility
Touch screen use precautions
About Space?
Using the touch program Play Touch Optional
Running the touch programPlay Touch
Play Touch Start Screen
Number Function
Help Screen
Home Manager Screen
Click an item to view the corresponding usage for it
Create a shortcut icon in the Space
Creating My Shortcuts photo, music, video
Tap the file twice, and the screen is expanded to full
Caption Play Control buttons
Video Shortcut Icon Full Screen Play
Thumbnail Explorer Minimize Play Touch Play at media size
State
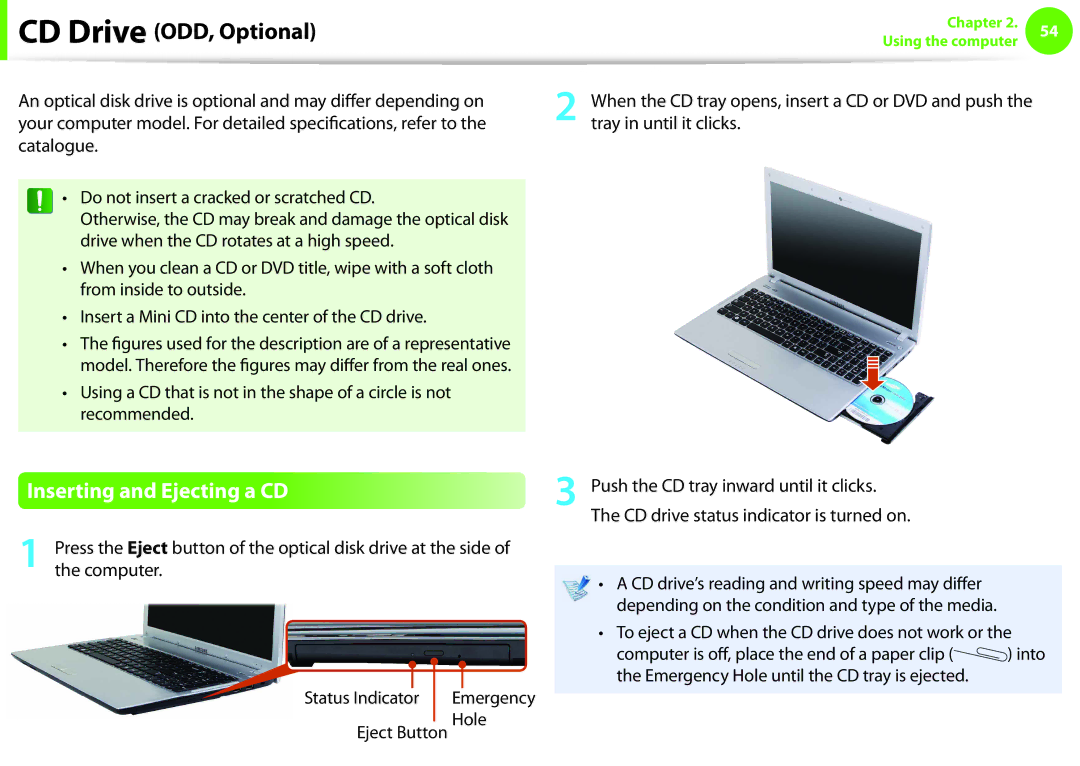
Emergency Hole
Inserting and Ejecting a CD
Computer is off, place the end of a paper clip
Emergency Hole until the CD tray is ejected
Multi Card Slot Optional
Using the card
To remove a memory card
Using a Mini SD and RS-MMC
Take hold of the end of the card and remove the card
Click Start to the formatting
To format a memory card
Click Start Computer
Format
Monitor or TV with the monitor cable 15 pin
Connecting an External Display Device
Connecting to the monitor port
About the connection cable
Press
Alternatively, to set up dual view
Monitor Projector
Connecting through the Hdmi port Optional
Then click Resize Desktop
Setting up Hdmi TV video Optional
For Nvidia graphics cards
Panel
Click OK Horizontal Resize Bar
If a window appears where you can select the mode, select
Basic Mode and click OK
For Intel graphics cards
Executed by using the external graphics chipset
Using graphics more efficiently optional
Only .exe files can be registered
Sound Sound
Setting up Hdmi TV audio Optional
Select Playback Devices
Alternatively, click the Control Panel Hardware
Ilesf
Connecting an External Digital Device
Connecting and using a camera or camcorder
Camera Camcorder
Connecting an External Digital Device
Adjusting the Volume using the Keyboard
Adjusting the Volume
Adjusting the Volume using the Volume Adjustment Program
You can also use the internal MIC
Using the Sound Recorder
For Windows 7/Vista
Connect a microphone to the microphone jack
Sound Recorder
Devices Sounds and Audio Devices
Properties
Controls and click OK
User Mode
Using SoundAlive Optional
Basic Mode
Advanced Mode
For Windows Vista
Wired Network
Wired Network
Configure the IP settings
Using the WOL Wake On LAN function
Network settings have been completed
Wired Network
Connecting to a Wireless LAN
Wireless Network Optional
What is an Access Point AP?
For Windows Vista
View Available Wireless Networks
Click the Wireless Network Connection icon from
Checking the network connection status
Network connection diagram
Configuring the network settings for your computer and TV
Dhcp checkbox
Devices that can share content
Adding shared content on your computer
Click My computer Add Folder . The Browse For
Playing content on your TV using your computer
Playlist
Adding a video, photo or music file to the playlist
For Windows Media Player
Item you want to add to the playlist, and then click Add to
Click Library Media Sharing
Explorer
My media checkbox and then click OK
Using the computer
Chapter Settings and Upgrade
LCD Brightness Control
Controlling the Brightness Using the Keyboard
You can adjust the LCD brightness in 8 levels
Saving battery power consumption
LCD bad pixels principle of computer
Instructions for Cleaning the LCD
Turn the computer on
Bios Setup
Entering the Bios Setup
After a moment, the Bios setup screen appears
Setup Menu Help
Bios Setup Screen
Setup, you have to use the keyboard
System Setup Keys
Setting a Supervisor Password
Setting a Boot Password
Set Supervisor Password item, press Enter
Set the Password on boot item to Enabled
Setting a User Password
Setting Up a Boot Password
Setting up a Hard Disk Drive Password Optional
Supervisor Password item, press Enter
Deactivating the Password
Enter
Press the F6 key to move up to the top item
Changing the Boot Priority
Adding or Replacing Memory Modules
Upgrading Memory
Removing a memory module
Down while pulling the memory module latches outward
Remove the memory cover
Push the memory module catches outward. If the memory
Battery
Battery
Installing/Removing the Battery
Precautions
To use the shortcut key to view
Charging the Battery
Measuring the Remaining Battery Charge
Confirming the battery charge in the Taskbar
Decreasing the LCD Brightness
Extending the Battery Usage Time
Battery Usage Time Information
Using Battery Manager Optional
Using the Easy Battery Manager power options
Usage Mode of Samsung Battery Manager
System and battery
What is the Power-saving Effect?
When Using Games or Multimedia
Battery Normal Mode Battery Life Extension Mode
Extending the Battery Life Optional
Battery Life Extension Mode
Samsung logo appears, to start the Bios Setup
Using the Battery Calibration Function
Depending on the computer model and driver version
Using the Security Slot
Chapter Backup / Restore
Backup/Restore Functions
Samsung Recovery Solution Functions
System Software Functions
Restore Function
Partition Setup & Initial Status Backup
Initial Status Backup screen appears
Restoring the computer
Samsung Recovery Solution Optional
Restore menu
Complete Backup/Restore
Samsung Recovery Solution Optional
Complete Backup
When the ‘Restart the System’ message appears after
When backing up onto DVD
Complete Restore
Proceed to Step
Data Backup
Data Backup/Restore
Click Backup and then click Data Backup
Data Restore begins
Data Restore
Click Data Restore
Select a backup item to be restored in the backup list
System Software Installation
Installing System Software
System Software Function
System Software Backup
System Software Backup
Specify the Save Path
What is a Recovery Area?
Recovery Solution Representation Optional
Chapter Appendix
Safety Instructions
Important Safety Information
Setting Up your System
Care During Use
Instruction On Safety Operation of NotePC
Laser Safety
Battery Disposal
Laser Safety Note
Connect and Disconnect the AC adapter
Power Cord Requirements
General Requirements
Regulatory Compliance Statements
Wireless Guidance
United States of America
USA and Canada Safety Requirements and Notices
Explosive Device Proximity Warning
Use On Aircraft Caution
Unintentional Emitter per FCC Part
If fitted with 2.4G band or 5G band
Intentional emitter per FCC Part
FCC Part 68 If fitted with a modem device
FCC Statement for Wireless LAN use
Unintentional Emitter per ICES-003
Canada
Intentional Emitter per RSS
Regulatory Compliance Statements
Regulatory Compliance Statements
European Union CE Marking and Compliance Notices
Brazil
European Union
European Directives
Danish
Česky
Czech
Dansk
Latviski
Ελληνική Greek
Français French
Italiano
Norsk
Íslenska
Icelandic
Sem gerðar eru í tilskipun 1999/5/EC
Belgium
General
France
Regulatory Compliance Statements
Correct disposal of batteries in this product
Weee Symbol Information
Product Specifications
Energy Star Partner
Registered Trademarks
Glossary
Backup
IEEE802.XX
Network
Folder that can be used by other users on the network
Share
Index