setting up your refrigerator
5 ![]()
![]() 2
2
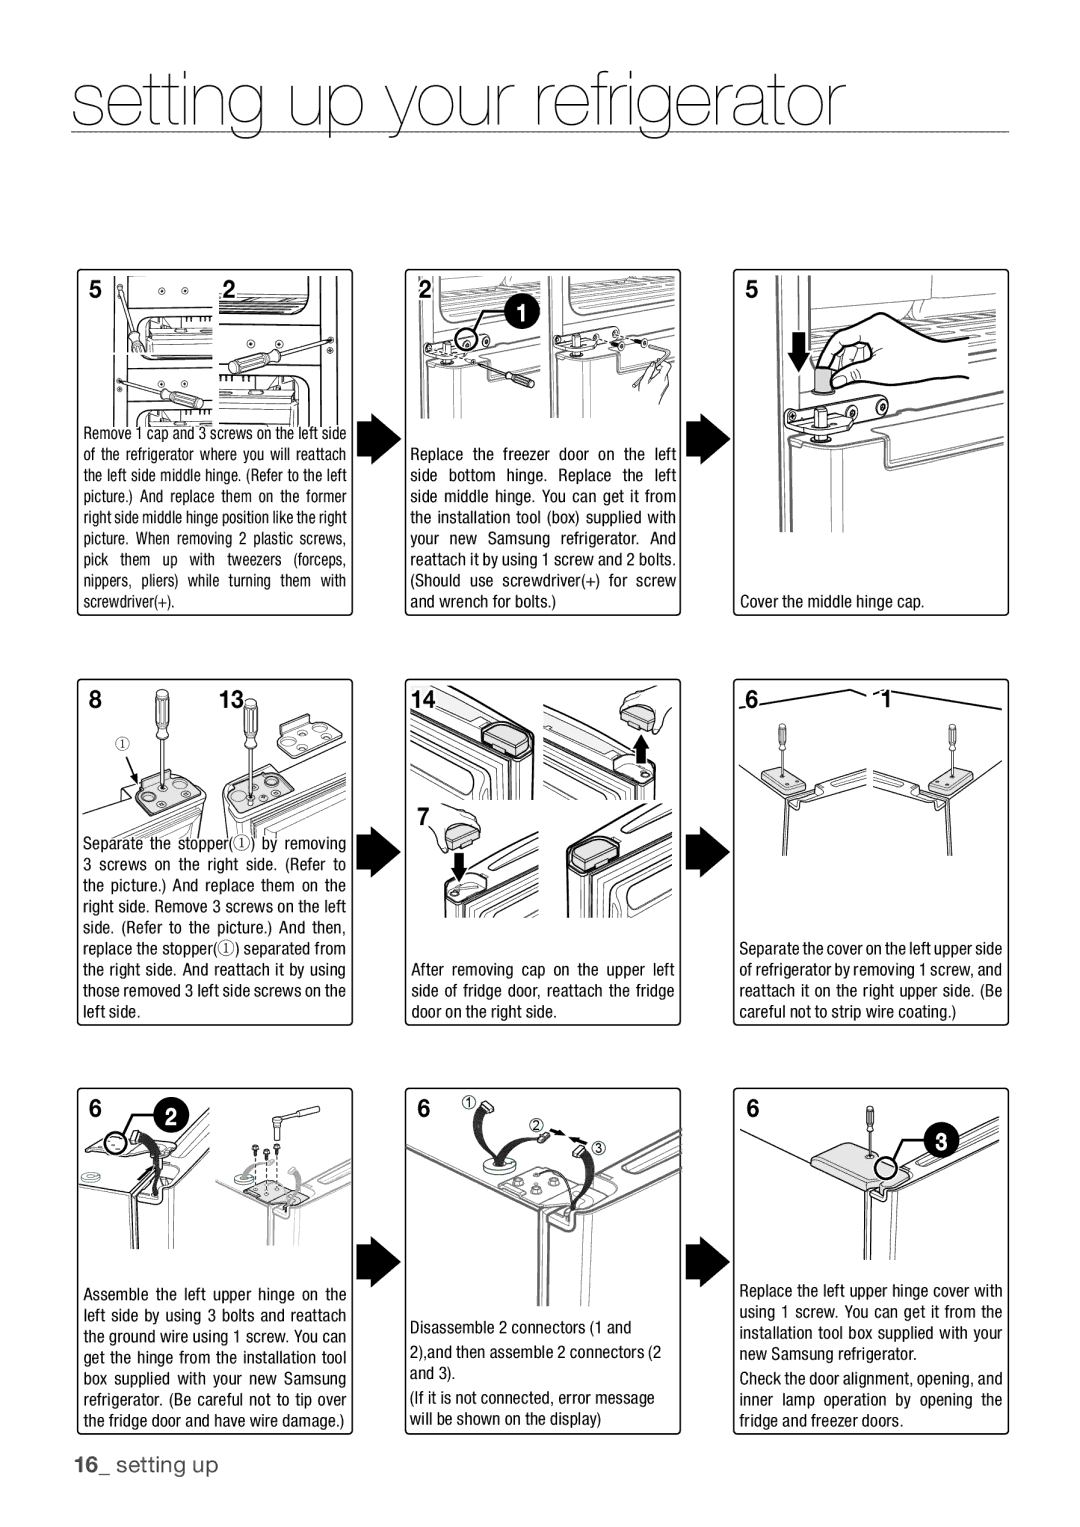
Remove 1 cap and 3 screws on the left side of the refrigerator where you will![]() reattach the left side middle hinge. (Refer to the left picture.) And replace them on the former right side middle hinge position like the right picture. When removing 2 plastic screws, pick them up with tweezers (forceps, nippers, pliers) while turning them with screwdriver(+).
reattach the left side middle hinge. (Refer to the left picture.) And replace them on the former right side middle hinge position like the right picture. When removing 2 plastic screws, pick them up with tweezers (forceps, nippers, pliers) while turning them with screwdriver(+).
25
![]() 1
1
Replace the freezer door on the left |
|
side bottom hinge. Replace the left |
|
side middle hinge. You can get it from |
|
the installation tool (box) supplied with |
|
your new Samsung refrigerator. And |
|
reattach it by using 1 screw and 2 bolts. |
|
(Should use screwdriver(+) for screw |
|
and wrench for bolts.) | Cover the middle hinge cap. |
8 13
①
Separate the stopper(①) by removing 3 screws on the right side. (Refer to the picture.) And replace them on the right side. Remove 3 screws on the left side. (Refer to the picture.) And then, replace the stopper(①) separated from the right side. And reattach it by using those removed 3 left side screws on the left side.
6 ![]() 2
2![]()
14
7![]()
![]()
After removing cap on the upper left side of fridge door, reattach the fridge door on the right side.
6 1
2
![]() 3
3
6 1
Separate the cover on the left upper side of refrigerator by removing 1 screw, and reattach it on the right upper side. (Be careful![]() not to strip wire coating.)
not to strip wire coating.)
6
![]() 3
3
Assembl![]() e the left upper hinge on the left side by using 3 bolts and reattach the ground wire using 1 screw. You can get the hinge from the installation tool
e the left upper hinge on the left side by using 3 bolts and reattach the ground wire using 1 screw. You can get the hinge from the installation tool![]() box supplied with your new Samsung refrigerator. (Be careful
box supplied with your new Samsung refrigerator. (Be careful![]() not to tip over the fridge door and have wire damage.)
not to tip over the fridge door and have wire damage.)
Disassemble 2 connectors (1 and
2),and then assemble 2 connectors (2 and 3).
(If it![]()
![]() is not connected, error message will
is not connected, error message will![]() be shown on the display)
be shown on the display)
Replace the left upper hinge cover with using 1 screw. You can get it from the installation tool![]() box supplied with your new Samsung refrigerator.
box supplied with your new Samsung refrigerator.
Check the door alignment, opening, and inner![]()
![]() lamp operation by opening the fridge and freezer doors.
lamp operation by opening the fridge and freezer doors.
16_ setting up