SNC-B5395
Safety precautions
Page
Important safety instructions
Contents
Setting Up
Using the Camera
Appendix
Features
Preparation
Precautions Installation and Use
Recommended PC Specifications
Compatible IP Routers
Video Memory 128MB
COMPATIBlE POE SWITChES
ChECKING ThE Components in ThE Package
Image Part name Standard Quantity Usage
Names of EACh Part
Front
Inside
Installation and connection
Removing ThE Cover
Setting switches
Setting function switches
Installation and Connection
Inserting/Removing an SdhC Memory Card
What is a memory card?
Contacts Lock Switch
Memory Card Information not included
Selecting a memory card that’s suitable for you
Connecting Ethernet Cable
Connect the Ethernet cable to the network port as shown
INSTAllING Camera
Before installation
About the installation holes
Installing on a pipe
To install your camera bottom on a pipe
Installation and Connection
INSTAllATION ANd Connection
Installing the camera on the ceiling
Disassembling/assembling the Main body from the Case
Adjusting the camera direction
Panning Tilting Lens rotation
Connecting
Alarm In/Out Connection Diagram
To connect input and output ports
Connecting Power
Connecting a Monitor Output
SNC-B5395
Connecting to Audio Input/Output
MicrophonePre-Amp
Pre-Amp Speaker
Audio I/O Block diagram
Pre-Amp Speaker Microphone Pre-Amp
Network connection & setup
Network Connection & Setup
Setting the IP address
Connecting a local PC in the IP router to the camera
Connecting to the camera from a remote PC
SNC-B5395
Connecting to the camera from an IP router external PC
Configuration-DHCP for Internet Connection Type
Documentation
Connecting to the camera from a remote PC
Connecting the camera directly to local area networking
Connecting to the camera from a local PC in the LAN
IP Installer screen layout
IP Installer
SEARChING for ThE Camera
Setting static ip
MANUAl Network Setting
Camera list
Click the Manual Set button
PORTfields, set up port numbers
Enter your password
Camera is set to the manually entered IP and is restarted
Number of Http
Set the IP and port settings for camera differently
If more than one camera are connected to an IP Router
Automatic network setting is finished
Click the OK button
Setting dynamic ip
DyNAMIC IP Setting
Examples of using dynamic IP
Dynamic IP Check
Port FORWARdING Port Mapping Setting
Manual Port Forwarding
��using the camera
Connecting to the camera
Connecting to the camera using the IP Installer program
Checking the ddNS address
For Windows XP Service Pack
Click the Install ActiveX Control
If the following screen appears, click the Install button
Logging to the camera
Click the Log In button
Using ThE Viewer Screen
Main Screen layout
Name Button Function and description
Camera function buttons Audio buttons View Screen
Screen Size & Partition Buttons
To Capture a Video
To Print a Video
Click OK
At a desired scene, click the Print button
At desired scene, click Record button Set up the AVI save
Insufficient Disk Space Setting
Amount designated under this setting
To Record a Video
Using ThE SEARCh Viewer Screen
Capture button Print button Record button
Timeline Display Playback function buttons View Screen
Calendar Selection
At a desired scene Click the Capture button
At desired scene, click the Record button Click OK
Select the timeframe you wish to search, using the timeline
To Search the Video data
To Control Playback
From the calendar, select the date you wish to search
Setting up
Setting ThE Camera
Setup Screen Layout
Setupbasic
To setup Video/Audio
Click Basic Video & Audio
To Setup IP settings
IP Type Shows the current camera IP setting type
Click Basic IP
To Setup Users
Click Basic User
Enter user ID and password
For the ID and password, up to
Click the Apply button
User from the Operator and User in the Level field
Password, Confirm Password
Window, modify User ID
Or Level of the user account Click the Apply button
Click the Delete button in the User window
To set the display language
Click Basic Language
SySTEM Configuration
To set date/time
Click System DATE/TIME
Setting time is applied
To view the log information
Click System LOG
To update the software
Software Update window appears
Click System
To reset the system
Click System Reset
Reset window appears Restart The Reset window appears
LAyOUT Configuration
To Set text
You can display text on the screen
Click Overlay
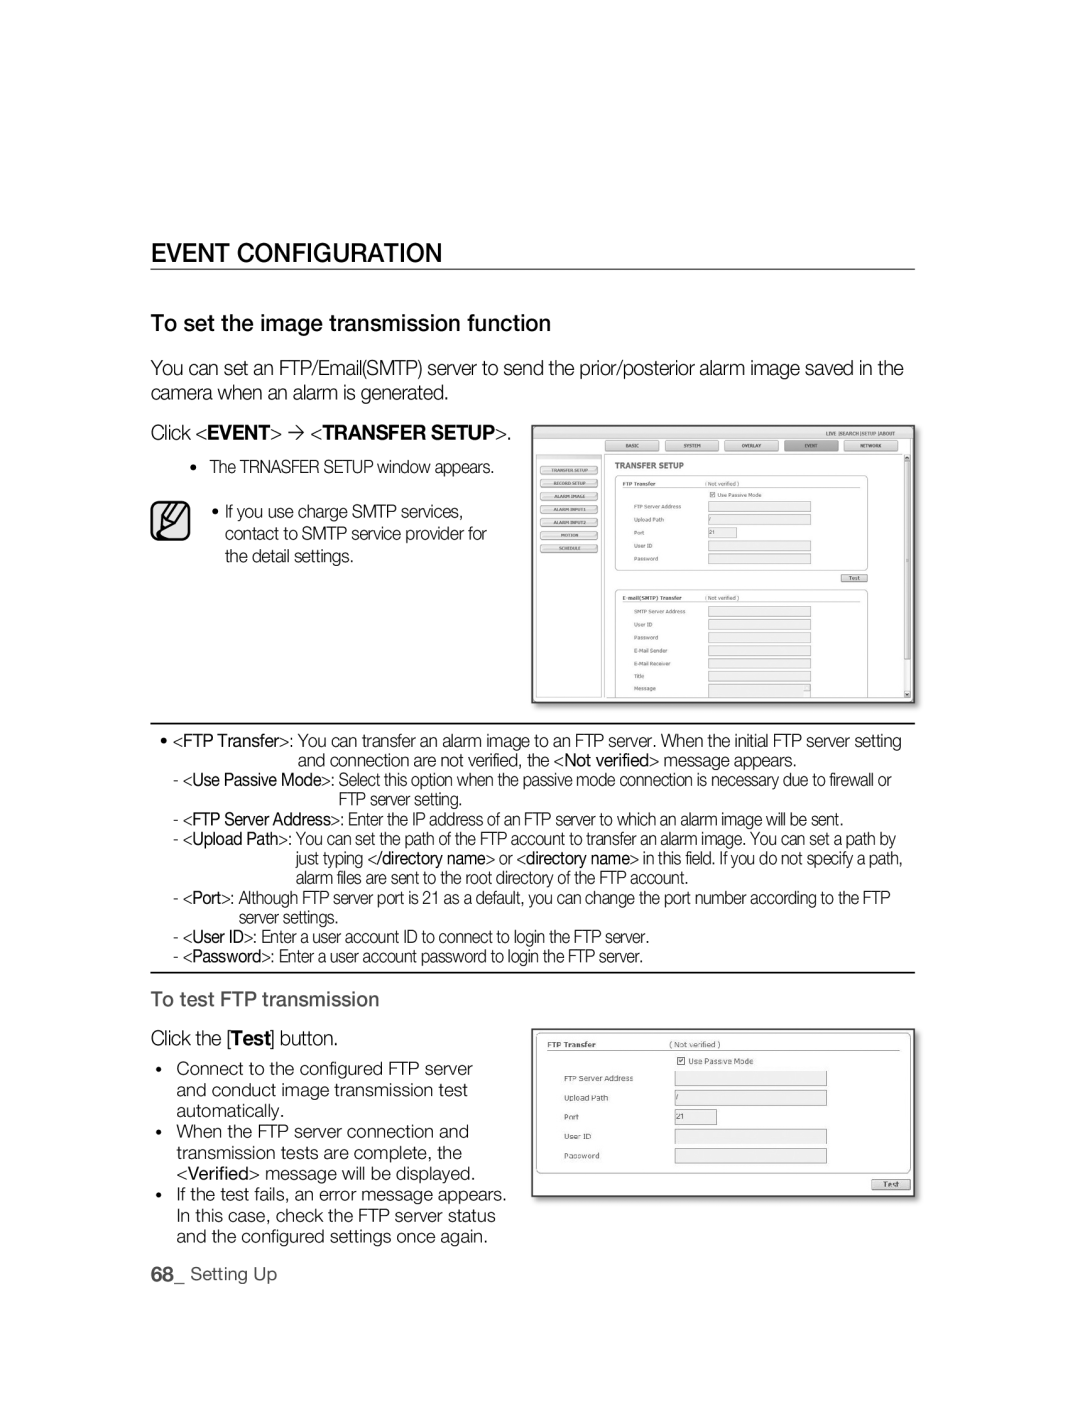
Click Event Transfer Setup
Trnasfer Setup window appears
To set the image transmission function
Click the Test button
To setup the record
Click Event Record Setup
To set an alarm image
To set an alarm input
Click Event Alarm Input 1 or Alarm Input
Transfer Setup settings
To set the motion detection function
Click Event Motion
To complete the setting, click the Apply button
To set a motion detection target area
You can set a specific area to detect a motion
Selected area is colored in yellow
To set scheduled transmission
Click Event Schedule
Network Configuration
To set video streaming
To set ddNS
Troubleshooting
부록appendix
Enabled Motion Detection
Feature under Motion
Camera Is it possible to configure
But didn’t trigger an alarm
Specifications
Details
Video Resolution
Alarm IN/OUT
Alarm Event
Time Setup
Power
Power Consumption
Operation Temperature
Dimension
SNC-B5395
GPL/LGPL Software License
Lgpl S/W
Appendix
Appendix
Appendix
Appendix
Appendix
Appendix
Appendix
Appendix
Appendix
Appendix
Appendix
Appendix
Correct Disposal of This Product
Kullanım talimatları
Olanakları hayal edin
Güvenlik önlemleri
Dİkkat
Dİkkat
Önemli güvenlik yönergeleri
İçindekiler
Hazırlık
Kurulum ve Bağlantı
Statik IP Ayarlama Dinamik IP Ayarlama
Ayarlama
Kameranın Kullanımı
Hazırlık
Özellikler
Önlemler Kurulum VE Kullanim
Önerilen PC Özellikleri
Uyumlu IP Yönlendiriciler
Ekran Hafızası 128MB
Uyumlu POE Anahtarlar
Ambalajdaki Parçalarin Kontrol Edilmesi
Görüntü Parça Adı Standart Miktar Kullanım
Kamera Kullanım Kılavuzu Harici Kablo Test Monitor Kablosu
HER Parçanin İsmİ
Hazırlık07
Kurulum ve bağlantı
Kapağin Kaldirilmasi
Anahtarlari Ayarlamak
Fonksiyon anahtarlarını ayarlamak
Kısa tanım
ATW Otomatik Beyaz Denge Takibi
AWC Otomatik Beyaz Denge Kontrolü
Sdhc Hafıza Kartını Takmak/Çıkartmak
Sdhc Hafıza Kartını Takmak
Sdhc Hafıza Kartını Çıkartmak
Hafıza Kartı Bilgisi dahil değil
Hafıza kartı nedir?
Size uygun bir hafıza kartı seçmek
Hafıza Kartı Kullanımı
Ethernet Kablosunun Bağlanması
Ethernet kablosunu gösterildiği gibi ağ portuna bağlayın
Kalıplı Kablonun doğrudan bağlanması
UTP Kablo kullanarak Kalıplı Kablo bağlantısı
Kameranin Kurulumu
Kurulum öncesi
Kurulum delikleri hakkında
Kameranızı kurmadan önce aşağıdaki uyarıları okumalısınız
Boru üzerine kurulum
Kameranın altının boruya bağlanması
Kameranın kenarının boruya bağlanması
Kurulum VE Bağlanti
Kamerayı tavana kurmak
Kurulum yerinde bir delik açtıktan sonra kablolama durumu
Ana gövdenin Muhafazadan çıkarılması/takılması
Saat yönünün tersine çevirerek iki vidayı gevşetin
Kamera yönünü ayarlamak
Gezdirme Eğme Mercek döndürme
Alarm Giriş/Çıkış Bağlantı Şeması
Alarm hatlarını arkadaki giriş ve çıkış portlarına bağlayın
Bağlanti
Giriş ve çıkış portlarını bağlamak
Gücü Bağlamak
Bir Monitör Çıkışı Bağlamak
Ses Giriş/Çıkışa Bağlamak
Hoparlör Pre-Amp MikrofonPre-Amp
Ses I/O Blok Şeması
Ses Kodeği
Tam ÇiftYönlü Ses Audio
Audio out
Ağ bağlantısı & kurulumu
Ağ ayarlarınızı ağ yapılandırmanıza göre ayarlayabilirsiniz
Ağ bağlantısı ve kurulum işlemleri aşağıda verilmiştir
Bir IP yönlendiriciye
IP yönlendiricinin adreesi için ürün belgelerine bakınız
IP adresini ayarlamak
IP yönlendiricide yerel bir PCyi kameraya bağlamak
Bkz. Statik IP Ayarı sayfa 36 ya da Dinamik IP Ayarı sayfa
Örn http//192.168.1.2
Uzaktan bir PCden kameraya bağlanmak
30 Ağ Bağlantısı & Kurulumu
IP yönlendirici harici PC üzerinden kameraya bağlanmak
Kamerayi Doğrudan DHCP-TABANLI XDSL/KABLO Modeme Bağlamak
Bu Dhcp kullanan modem için etkindir
IP Yönlendiricinin Ayarlanması
Bağlantı tipi için Otomatik Yapılandırma-DHCP seçin
Uzaktan bir PCden kameraya bağlanmak
Kamerayi Doğrudan Yerel Alan Ağina Bağlamak
Kameraya LAN üzerinde yerel bir PCden bağlanmak
IP Installer ekran düzeni
Kamerayi Aramak
If not using an IP router
Statik ip ayarlamak
Manuel AĞ Ayari
Manual Set tuşuna tıklayın
Port bölgesinde, port numaralarını Ayarlayın
Eğer birden fazla kamera bir IP Yönlendiriciye bağlıysa
Kamera için IP ve port ayarlarını farklı yapın
Öğeler 1inci kamera 2inci kamera IP ile İlgili
Öğeler
Otomatik AĞ Ayari
Auto Set tuşuna tıklayın
Şifrenizi girin
OK tuşuna tıklayın
Dinamik ip ayarlamak
Dinamik IP Ayarlama
Dinamik IP kullanım örnekleri
Dinamik IP Kontrolü
Port Yönlendirme Port Eşleme Ayari
Manuel Port Yönlendirme
Applications & Gaming ´ Port Range Forward tıklayın, IP
Yönlendiricinin Ayarlar menüsünde Yer alır
Kameranın kullanımı
Kameraya Bağlanmak
Kameraya bağlanmak
IP Installer programını kullanarak kameraya bağlamak
Ddns adresini kontrol etmek
Windows XP Service Pack 2 için
Activex Kurulumu
İlk giriş için, kullanıcı ID değeri root ve şifre
Log In tuşuna tıklayın
İzleme Ekranini Kullanmak
Ana Ekran Düzeni
İsim Düğme Fonksiyon ve Tanım
Bağlantı Durumu
Penceresi Yakalama
Tuşu
Yazdırma
Bir Video Yakalamak
Bir Videoyu Yazdırmak
Bir Video Kaydetmek
Bir kere daha tıklayın
İarama İ Ekranini Kullanmak
12 İzleme Ekranı
İstenen bir sahnede,PRINT tuşuna tıklayın
İstenilen sahnede, Save tuşuna tıklayın
Bir kaydı durdurmak için Save tuşuna bir kere daha tıklayın
Video Verisi Arama
Oynatmayı Konrol Etmek
Takvimdenseçin. arama yapmak istediğiniz tarihi
Fonksiyon Tanımı
Ayarlama
Kamerayi Ayarlamak
Setup Ayar Ekranı Düzeni
Setupbasic
Tamal Yapilandirma
Video/Ses Ayarlama
Basic ´ Video & Audio tıklayın
Video ayarını tamamlamak için, Apply tuşuna tıklayın
IP ayarlarını yapmak
Ayarı tamamlamak için, Apply tuşuna tıklayın
Basic ´ IP tıklayın. IP Ayar penceresi belirir
IP Type Mevcut kamera IP ayar tipini gösterir
Kullanıcıları Ayarlama
Basic ´ User tıklayın
User penceresinde, Insert tuşuna Tıklayın
Kullanıcı ID ve şifresini girin
Kullanıcı iznini seçin
Apply tuşuna tıklayın
ID, Password, Confirm Password
Penceresinde değiştirilecek kullanıcı
Hesabını seçin
User penceresinde Modify tuşuna
Gösterim dilini ayarlamak
Basic ´ Language tıklayın
System Configuration Sistem Yapilandirma
Tarih/saat ayarlamak
DATE/TIME penceresi belirir
Kütük bilgisini görüntülemek için
PC Viewer tıklayın
Zamanı doğrudan ayarlayabilirsiniz
System ´ LOG tıklayın
System ´ Software Update tıklayın
Yazılımı güncellemek
User penceresinde, Browse tuşuna tıklayın
Bir güncelleme dosyası seçin ve Open tuşuna tıklayın
Sistemi sıfırlamak
Düzen Yapilandirma
Metni ayarlamak için
Ekranda metin gösterebilirsiniz
Buna tıklayın Overlay ´
Event ´ Transfer Setup tıklayın
Transfer Setup penceresi belirir
Olay Yapilandirma
Görüntü iletim fonksiyonunu ayarlamak için
Event ´ Record Setup tıklayın
Kaydı ayarlamak
Bir alarm görüntüsü ayarlamak
Event ´ Alarm Image tıklayın
Ayarı tamamlamak için
Bir alarm girişi ayarlamak
Da Alarm Input 2tıklayın
Alarm Input pencersi belirir
Ayarı tamamlamak için, Apply tuşuna
Hareket algılama fonksiyonunu ayarlamak
Event ´ Motion tıklayın
Motion penceresi belirir
Hareket Algılama Hedef bölgesi ayarlamak
Planlı iletimi ayarlamak
Event ´ Schedule tıklayın. Planlama penceresi belirecektir
Network ´ Streaming Setup tıklayın
Streaming Setup penceresi belirir
AĞ Yapilandirmasi
Duraksız video aktarımını ayarlamak
Ddns ayarlamak
Network ´ Ddns tıklayın
Ddns penceresi belirir
Sorun Giderme
Görüntü belirmiyor
Olsa bile FTP/SMTP
Gönderilmiyor
Etkin değilken Hareket
Öğe Ayrıntılar
Öğe
Öğe Ayrıntılar
SNC-B5395
GPL/LGPL Software License
84 Ek
08 EK
86 Ek
08 EK
88 Ek
08 EK
90 Ek
08 EK
92 Ek
08 EK
94 Ek
08 EK
Bu Ürünün Doğru Şekilde Atılması
Návod k použití
Pøedstavte si možnosti
Bezpečnostní upozornění
Upozornění
Upozornění
Důležité bezpečnostní pokyny
Obsah
Příprava
Instalace a připojení
Nastavení statické IP adresy Nastavení dynamické IP adresy
Nastavení
Dodatek
Používání kamery
Příprava
Vlastnosti
Upozornění Instalace a Používání
Doporučená Konfigurace PC
Kompatibilní IP Routery
· Grafická karta Radon, Ovidia · Video paměť 128MB
Kompatibilní POE Přepínače
Kontrola Komponent Obsažených V Balení
Zkontrolujte, zda balení obsahuje následující položky
Obrázek Název Standard Počet Použití
Názvy Jednotlivých Částí
Pohled zepředu
Přepínače funkcí Tlačítko Reset
Pohled zevnitř
Instalace a připojení
Odstranění Krytu
Nastavení Přepínačů
Nastavení funkčních přepínačů
Funkce kamery nastavíte pomocí těchto osmi přepínačů
Místo tmavého obrazu
Instalace a připojení
Vkládání a vyndávání paměťové karty Sdhc
Vkládání paměťové karty Sdhc
Paměťovou kartu Sdhc zastrčte ve směru šipky viz obr
Vyndávání paměťové karty Sdhc
Informace k paměťové kartě není součástí balení
Co je paměťová karta?
Výběr karty, která bude vhodná pro vaše účely
Použití paměťové karty
Připojování ethernetového kabelu
Ethernetový kabel připojte k síťovému portu viz obrázek
Přímé připojení kabelu s konektorem
Připojení kabelu s konektorem pomocí UTP kabelu
Instalace Kamery
Před instalací
Montážní otvory
Instalace pomocí trubice
Připojení trubice ke spodní části kamery
Zajištění vodotěsnosti, použijte před namontováním
Místě spojení
Připojení trubice k boční části kamery
Protáhněte obrazové a napájecí
Kamery
Instalace a P Ipojení
Instalace kamery na strop
Přimontování a odmontování hlavního těla kamery ke/od krytu
Nastavení směru kamery
Panorámování Naklánění Rotace objektivu
Schéma připojení ke vstupním a výstupním portům alarmu
Připojení
Připojení ke vstupním a výstupním portům
Zapojení do elektrické sítě
Připojení výstupu na monitor
SNC-B5395 Monitor
Připojení k audio vstupu a výstupu
Reproduktor Předzesilovač MikrofonPředzesilovač
Viz strana
Schéma zapojení vstupních a výstupních audio portů
· Audio Codec
· Plný duplex · Audio vstup
· Audio výstup
Připojení k síti a nastavení
Můžete provést nastavení sítě podle vaší síťové konfigurace
Připojení k síti a nastavení
Maska podsítě Výchozí brána
Př.3 Adresa LAN IP IP routeru je 192.168.xxx.1 IP adresa
Krok 3 Nastavení IP adresy
Krok 4 Připojení lokálního počítače s IP routerem ke kameře
Př. http//192.168.1.2
Krok 5 Připojení ke kameře ze vzdáleného počítače
Maska podsítě Výchozí brána
Př.1 Adresa LAN IP IP routeru je 192.168.1.1 IP adresa
Krok 3 Připojení lokálního počítače s IP routerem ke kameře
Např. http//192.168.1.2
Připojení Kamery Přímo K Dhcp XDSL/KABELOVÉMU Modemu
Nastavení IP routeru
Dynamické IP adresy nastavení na straně
Do adresového řádku prohlížeče zadejte IP adresu routeru
Připojení ke kameře ze vzdáleného počítače
Na vzdáleném počítači spusťte Internetový prohlížeč
Připojení Kamery Přímo K Lokální Počítačové Síti
Připojení ke kameře z lokálního počítače v síti LAN
Rozvržení okna programu IP Installer
Vyhledání Kamery
Nastavení statické IP adresy
Manuální Nastavení Parametrů Sítě
Ze seznamu kamer si zvolte Požadovanou kameru
Klepněte na tlačítko Manual Set
Polích Port nastavte čísla portů
Zadejte své heslo
Klepněte na tlačítko OK
· Manuální nastavení parametrů sítě je dokončeno
Pokud je k IP routeru připojena více než jedna kamera
Parametry První kamera Druhá kamera Parametry k IP
Protokolu
Porty
Automatické Nastavení Parametrů Sítě
Nastavení dynamické IP adresy
Nastavení Dynamické IP Adresy
Příklady dynamického přidělování IP adresy
Kontrola dynamické IP adresy
Nastavení Přesměrování Portů Mapování Portů
UDP Port
Použití kamery
Připojení KE Kameře
Připojení ke kameře
Připojení ke kameře prostřednictvím programu IP Installer
Kontrola Ddns adresy
Pro Windows XP Service Pack
Install ActiveX Control
Instalace Ovládacích Prvků Activex
Přihlášení ke kameře
Klepněte na tlačítko Log
Použití Aplikace Viewer
Hlavní rozložení okna
Funkce a popis
Zde naleznete různé informace o programu, verzi Výrobci atd
Soubor Jpeg nebo BMP
Zařízení Zaznamená aktuální snímaný obraz a uloží jej jako
Zobrazí pořízený snímek na obrazovku
Pořízení snímku
Tisk pořízeného snímku
Při snímání požadovaného obrazu klepněte na tlačítko Print
Klepněte na tlačítko OK.Vytiskne se pořízený snímek
Záznam videa
Pro ukončení záznamu klepněte ještě jednou na tlačítko Save
· 2-1 Adresář pro uložení
Tuto uvedenou hranici
Použití Okna Search Aplikace Viewer
Název Tlačítko Funkce a popis
Obrazovka aplikace Viewer
52 Používání kamery
Při snímaní požadovaného obrazu klepněte na tlačítko Save
Prohledávání Video záznamů
Ovládání přehrávání
Popis funkce
Nastavení
Nastavení Kamery
Nastavení rozvržení okna
Základní Konfigurace
Nastavení funkce Video/Audio
Nastavení funkcí video ukončíte klepnutím na tlačítko Apply
· Zobrazí se okno Video & Audio
· Zobrazí se okno IP Setting
Nastavení IP parametrů
Klepněte na Basic ´ IP
Nastavení ukončíte klepnutím na tlačítko Apply
Nastavení uživatelů
Klepněte na Basic ´ User
· Zobrazí se okno User
Okně USER, klepněte na tlačítko Insert
Zadejte ID uživatele a heslo
Klepněte na tlačítko Apply
· Zobrazí se okno Insert User
Okně upravte User ID
Nebo Level uživatelského účtu
· O úrovních uživatelských oprávnění
Jazykové nastavení
Klepněte na Basic ´ Language
· Jazykové nastavení bylo změněno na požadovaný jazyk
Konfigurace Systému
Nastavení data/času
· Zobrazí se okno DATE/TIME
Náhled na informace provozního protokolu
Nastavte den a čas volbou Manual Klepněte na tlačítko Apply
Klepněte na System ´ LOG
· Zobrazí se okno Log obsahující provozní protokol
Klepněte na System ´ Software Update
Okně User klepněte na tlačítko Install
Aktualizace softwaru
Okně USER, klepněte na tlačítko Browse
Resetování systému
Konfigurace Rozvržení
Nastavení textu
Na obrazovce lze zobrazovat text
Klepněte na Overlay ´ Overlay Text
Konfigurace Událostí
Nastavení funkce přenosu obrazů
Klepněte na Event ´
Klepněte na tlačítko Test
Klepněte na Event ´ Record Setup
· Zobrazí se okno Record Setup
Stav serveru FTP a nakonfigurovaná nastavení
Nastavení nahrávání
Nastavení obrazu při spuštěném alarmu
Pre/Post Alarm Image M odeslat
Klepněte na Event ´ Alarm Input 1 nebo Alarm Input
· Spustí se okno Alarm Input
Nastavení vstupu obrazu při spuštěném polašném zařízení
Nastavení funkce detekce pohybu
Klepněte na Event ´ Motion
· Zobrazí se okno Motion
Nastavení cílové oblasti pro detekci pohybu
Volbu zrušíte opětovným klepnutím na čtverec
· Čtverec se změní zpět na svoji původní barvu
Nastavení plánovaného přenosu dat
· Zobrazí se okno Schedule
· Zobrazí se okno Streaming Setup
Síťová Konfigurace
Nastavení video streamingu
UDPUnicast Týká se přenosu dat pouze na jeden přijímač
Nastavení Ddns
· Zobrazí se okno Ddns
Dodatek
Řešení Problémů
Nezobrazují se žádné
Obrazy
Zaktivoval jsem funkci
Soubory se neodesílají
Technické Údaje
Položka Podrobnosti
Položka
08 P Íloha
82 Příloha
GPL/LGPL Software License
84 Příloha
08 P Íloha
86 Příloha
08 P Íloha
88 Příloha
08 P Íloha
90 Příloha
08 P Íloha
92 Příloha
08 P Íloha
94 Příloha
08 P Íloha
Správná likvidace tohoto produktu
Zničení elektrického a elektronického zařízení
Memo
Memo
Memo
AB68-00718F00