1-8. Using the Printer
Control Panel
Serial Interface(RS-232C, RS-485) Specification
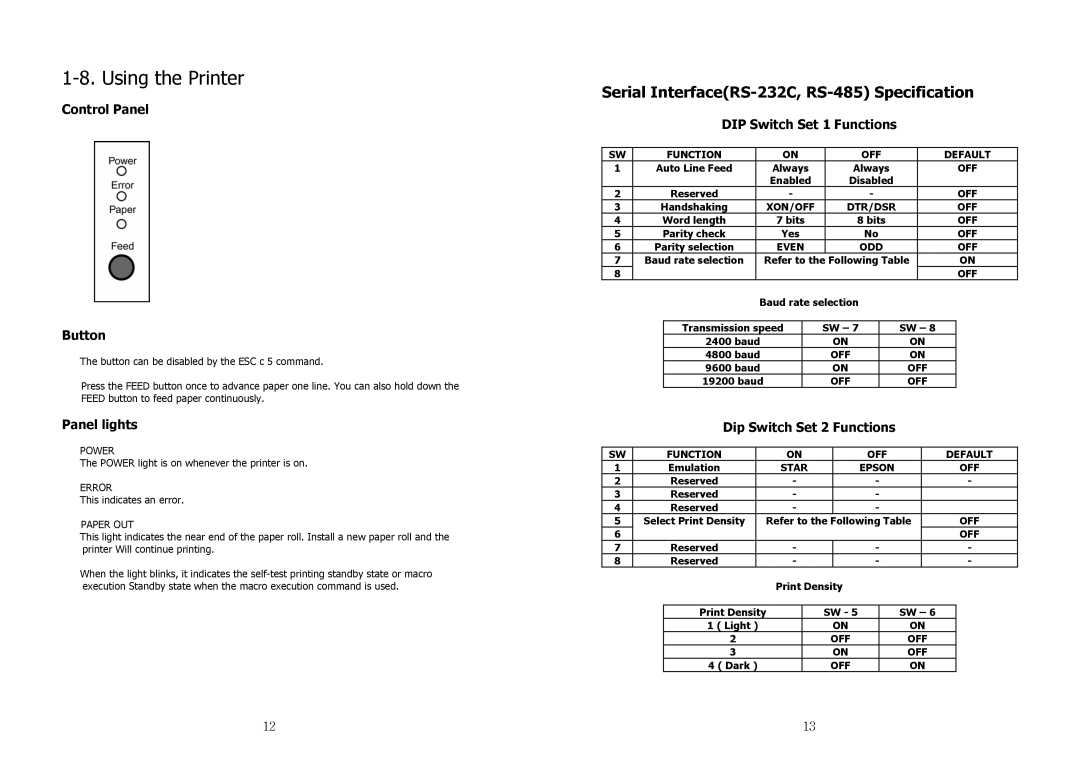
DIP Switch Set 1 Functions
SW | FUNCTION | ON | OFF | DEFAULT |
1 | Auto Line Feed | Always | Always | OFF |
|
| Enabled | Disabled |
|
2 | Reserved | - | - | OFF |
3 | Handshaking | XON/OFF | DTR/DSR | OFF |
4 | Word length | 7 bits | 8 bits | OFF |
5 | Parity check | Yes | No | OFF |
6 | Parity selection | EVEN | ODD | OFF |
7 | Baud rate selection | Refer to the | Following Table | ON |
8 |
|
|
| OFF |
Baud rate selection
Button
The button can be disabled by the ESC c 5 command.
Press the FEED button once to advance paper one line. You can also hold down the FEED button to feed paper continuously.
Transmission speed
2400 baud
4800 baud
9600 baud
19200 baud
SW – 7 | SW – 8 |
ON | ON |
OFF | ON |
ON | OFF |
OFF | OFF |
Panel lights | Dip Switch Set 2 Functions |
POWER
The POWER light is on whenever the printer is on.
ERROR
This indicates an error.
PAPER OUT
This light indicates the near end of the paper roll. Install a new paper roll and the printer Will continue printing.
When the light blinks, it indicates the
SW | FUNCTION | ON | OFF | DEFAULT |
1 | Emulation | STAR | EPSON | OFF |
2 | Reserved | - | - | - |
3 | Reserved | - | - |
|
4 | Reserved | - | - |
|
5 | Select Print Density | Refer to the | Following Table | OFF |
6 |
|
|
| OFF |
7 | Reserved | - | - | - |
8 | Reserved | - | - | - |
| Print Density |
| |
Print Density |
|
|
|
| SW - 5 | SW – 6 | |
1 ( Light ) |
| ON | ON |
2 |
| OFF | OFF |
3 |
| ON | OFF |
4 ( Dark ) |
| OFF | ON |
12 | 13 |
