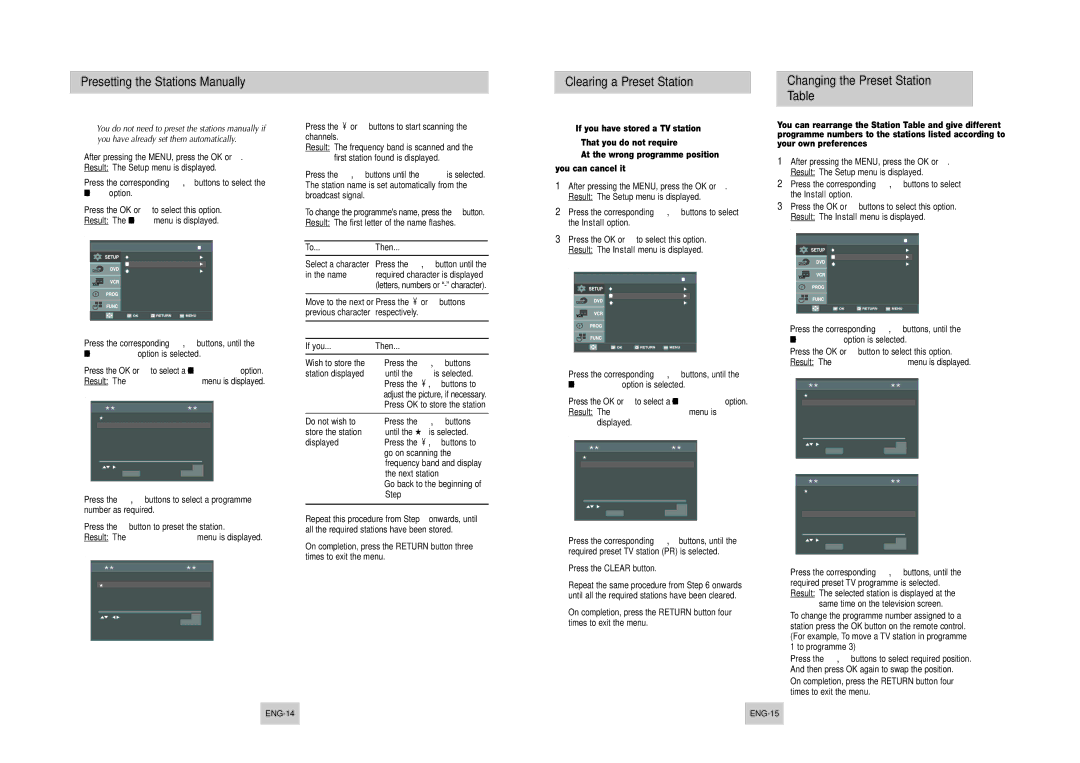
Presetting the Stations Manually

Clearing a Preset Station

Changing the Preset Station Table

You do not need to preset the stations manually if you have already set them automatically.

1After pressing the MENU, press the OK or . Result: The Setup menu is displayed.

2 Press the corresponding

,buttons to select the

Install option.


3Press the OK or to select this option. Result: The Install menu is displayed.

Install

Auto Setup

Manual Setup

VCR Output CH

: CH 60

4 Press the corresponding ,buttons, until the Manual Setup option is selected.

5Press the OK or to select a Manual Setup option. Result: The TV STATION TABLE menu is displayed.

TV STATION TABLE

PR

CH

NAME

1


2


3


4


5


SWAPPING : OK

DELETE : CLEAR

RETURN

6Press the ,buttons to select a programme number as required.

7Press the button to preset the station.

Result: The MANUAL TUNING menu is displayed.


MANUAL TUNING


PR

:


CH

: - - -


MFT

: -


NAME

: - - - -


MEMORY :


OK


RETURN


8Press the or buttons to start scanning the channels.

Result: The frequency band is scanned and the first station found is displayed.

9Press the ,buttons until the NAME is selected. The station name is set automatically from the broadcast signal.

10To change the programme’s name, press the button. Result: The first letter of the name flashes.

11To...Then...


Select a character

Press the

,button until the


in the name

required character is displayed


(letters, numbers or “-” character).


Move to the next or Press the or buttons


previous character

respectively.


12 If you...

Then...


Wish to store the

Press the

,buttons


station displayed

until the MFT is selected.


Press the , buttons to


adjust the picture, if necessary.


Press OK to store the station


Do not wish to

Press the

,buttons


store the station

until the CH is selected.


displayed

Press the , buttons to

go on scanning the frequency band and display the next station

Go back to the beginning of Step 12

13Repeat this procedure from Step 6 onwards, until all the required stations have been stored.

14On completion, press the RETURN button three times to exit the menu.

If you have stored a TV station:

That you do not require

At the wrong programme position

you can cancel it.

1After pressing the MENU, press the OK or . Result: The Setup menu is displayed.

2 Press the corresponding

,buttons to select

the Install option.


3Press the OK or to select this option. Result: The Install menu is displayed.

Install

Auto Setup

Manual Setup

VCR Output CH

: CH 60

4 Press the corresponding ,buttons, until the Manual Setup option is selected.

5Press the OK or to select a Manual Setup option. Result: The TV STATION TABLE menu is

displayed.

TV STATION TABLE

PR CH NAME

121


SWAPPING : OK

DELETE : CLEAR

RETURN

6 Press the corresponding ,buttons, until the required preset TV station (PR) is selected.

7Press the CLEAR button.

8Repeat the same procedure from Step 6 onwards until all the required stations have been cleared.

9On completion, press the RETURN button four times to exit the menu.

You can rearrange the Station Table and give different programme numbers to the stations listed according to your own preferences.

1After pressing the MENU, press the OK or . Result: The Setup menu is displayed.

2 Press the corresponding

,buttons to select

the Install option.


3Press the OK or buttons to select this option. Result: The Install menu is displayed.

Install

Auto Setup

Manual Setup

VCR Output CH

: CH 60

4 Press the corresponding ,buttons, until the Manual Setup option is selected.

5Press the OK or button to select this option. Result: The TV STATION TABLE menu is displayed.


TV STATION TABLE


PR

CH

NAME


1


21

- - - -


2


3


4


5


SWAPPING :


OK


DELETE :

CLEAR


RETURN


TV STATION TABLE


PR

CH

NAME


1


2


3


21

- - - -


4


5


SWAPPING :


OK


DELETE :

CLEAR


RETURN


6 Press the corresponding

,buttons, until the

required preset TV programme is selected. Result: The selected station is displayed at the

same time on the television screen.

7To change the programme number assigned to a station press the OK button on the remote control. (For example, To move a TV station in programme 1 to programme 3)

8Press the ,buttons to select required position. And then press OK again to swap the position.

9On completion, press the RETURN button four times to exit the menu.

ENG-14

ENG-15

Page 8
Image 8
Samsung SV-DVD540, SV-DVD440, SV-DVD545 manual Install option, ENG-14 ENG-15

SV-DVD545, SV-DVD540, SV-DVD440 specifications

The Samsung SV-DVD540 is a versatile and compact DVD player that has earned a reputation for its reliability and ease of use. Designed with both functionality and aesthetics in mind, this player is perfect for users who want a straightforward device to enjoy their favorite movies and media.

One of the standout features of the Samsung SV-DVD540 is its ability to play a wide variety of disc formats, including DVD-R, DVD-RW, CD-R, CD-RW, and standard DVDs. This versatility allows users to watch their favorite films, home videos, or listen to music CDs without compatibility issues. The player also supports multiple audio formats, ensuring a quality sound experience regardless of the media being played.

The DV-D540 incorporates Samsung's advanced video technology, which enhances the clarity and color of the images produced. With its progressive scan capability, this DVD player offers a clearer, smoother picture by reducing motion blur. This feature is particularly beneficial when viewing fast-paced action films or sports, as it enhances the overall viewing experience.

Another noteworthy characteristic of the SV-DVD540 is its user-friendly interface. The remote control is intuitively designed, making navigation simple and efficient for users of all ages. Whether you're looking to access the setup menu, adjust playback options, or browse through your DVD collection, the controls are straightforward and responsive. This ease of use sets the player apart from more complex systems that may overwhelm beginners.

The sleek and compact design of the Samsung SV-DVD540 also makes it a fitting addition to any entertainment setup. It can easily fit on most shelves or TV stands without taking up too much space, adding to its appeal as a home media device.

In terms of output, the SV-DVD540 features multiple connection options, including composite video and audio outputs, allowing it to connect seamlessly to a variety of televisions and sound systems. This flexibility ensures that users can set up their entertainment system to meet their needs comfortably.

Overall, the Samsung SV-DVD540 is a reliable and high-performing DVD player that combines various robust features with a user-friendly design, making it a popular choice for anyone looking to enhance their home media experience. Whether you’re revisiting classic films or discovering new releases, the SV-DVD540 is an excellent companion for entertainment enthusiasts.