SERIES RECORDING
This is a convenient function in which when two or more VCRs are connected the second unit starts recording when the tape on the first unit reaches the end.
Connecting | Operating | Description |
method | method | of operation |
|
|
|
Refer to the | • Select to No. 4 in the MENU | • When the tape in the first unit |
connection | • Select to "ON" for SERIES | arrives at its end during |
method for | using the SHIFT ❷!and ❿ | recording, the second unit begins |
series recording | button. | recording. When the tape in the |
(page 37) |
| second unit arrives at its end and |
|
| during recording, the next unit |
|
| begins recording if connected. |
|
| • When the series recording mode |
|
| is selected, the second unit |
|
| performs recording even if the |
|
| power is turned off. |
|
| • As a constant alarm sounding, |
|
| you can clear it by only pressing |
|
| any key. |
|
|
|
 ALARM RECORDING
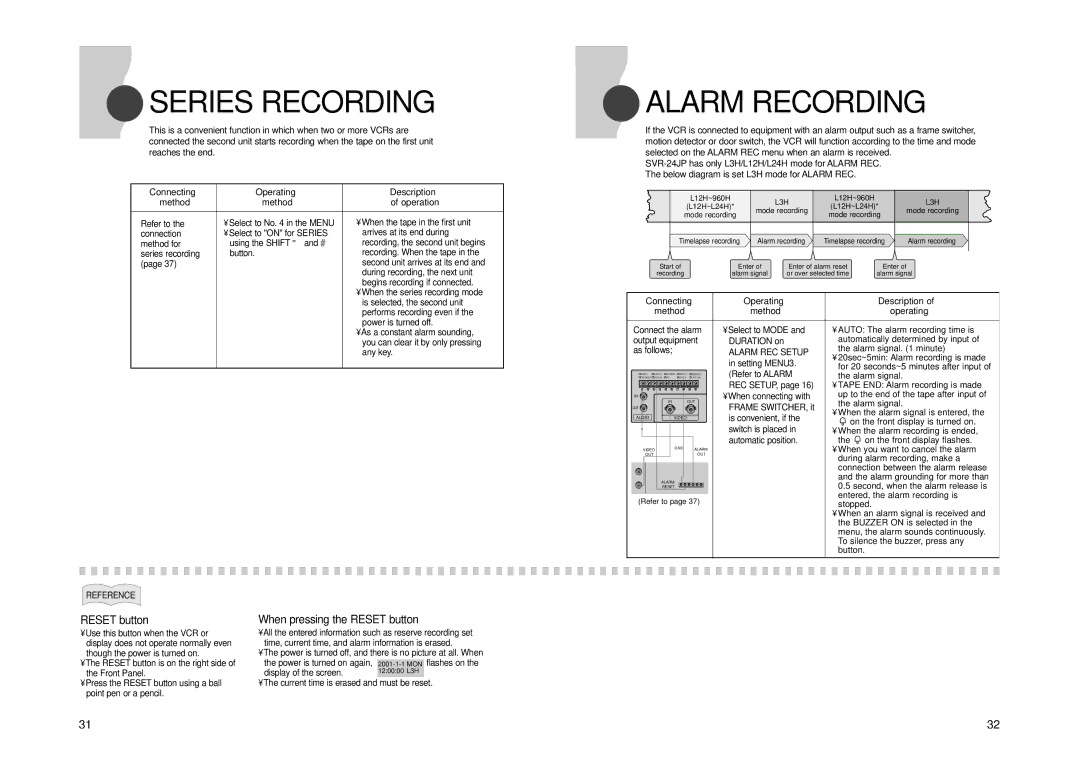
If the VCR is connected to equipment with an alarm output such as a frame switcher, motion detector or door switch, the VCR will function according to the time and mode selected on the ALARM REC menu when an alarm is received.
|
| L12H~960H |
| L3H | L12H~960H |
|
| L3H |
|
| (L12H~L24H)* |
| (L12H~L24H)* |
| |||
|
| mode recording |
| mode recording | ||||
|
| mode recording | mode recording |
| ||||
|
|
|
|
|
| |||
| Timelapse recording | Alarm recording | Timelapse recording |
| Alarm recording | |||
|
|
|
|
|
|
|
|
|
Start of | Enter of | Enter of alarm reset | Enter of |
| ||||
recording | alarm signal | or over selected time | alarm signal | |||||
| Connecting | Operating |
| Description of | |||||||
|
|
| method |
|
| method |
| operating | |||
Connect the alarm | • Select to MODE and | • AUTO: The alarm recording time is | |||||||||
output equipment | DURATION on | automatically determined by input of | |||||||||
as follows; |
|
|
|
| ALARM REC SETUP | the alarm signal. (1 minute) | |||||
|
|
|
|
|
|
|
|
| in setting MENU3. | • 20sec~5min: Alarm recording is made | |
|
|
|
|
|
|
|
|
| for 20 seconds~5 minutes after input of | ||
|
|
|
|
|
|
|
|
| (Refer to ALARM | ||
6 | TAPE END OUT 7 | SERIES OUT 8 | GND | 9 | SERIES IN | 10 | 1 SHOT RECIN | the alarm signal. | |||
1 | ALARM IN | 2 | ALARM OUT 3 | ALARM RESET 4 | ERROR OUT | 5 | TRIGGER OUT |
|
|
| |
| 1 | 2 | 3 4 5 6 | 7 | 8 | 9 | 10 | REC SETUP, page 16) | • TAPE END: Alarm recording is made | ||
IN |
|
|
|
|
|
|
|
| • When connecting with | up to the end of the tape after input of | |
|
|
|
| IN |
| OUT | FRAME SWITCHER, it | the alarm signal. | |||
OUT |
|
|
|
|
|
|
|
| • When the alarm signal is entered, the | ||
AUDIO |
|
| VIDEO |
|
| is convenient, if the | |||||
|
|
|
| on the front display is turned on. | |||||||
|
|
|
|
|
|
|
|
| switch is placed in | ||
|
|
|
|
|
|
|
|
| • When the alarm recording is ended, | ||
|
|
|
|
|
|
|
|
| automatic position. | the | on the front display flashes. |
| VIDEO |
| GND |
| ALARM |
| • When you want to cancel the alarm | ||||
| OUT |
|
|
|
|
| OUT |
| during alarm recording, make a | ||
|
|
|
|
|
|
|
|
|
| ||
|
|
|
|
|
|
|
|
|
| connection between the alarm release | |
|
|
| ALARM |
|
|
|
| and the alarm grounding for more than | |||
|
|
|
|
|
|
| 0.5 second, when the alarm release is | ||||
|
|
| RESET |
|
|
|
| ||||
(Refer to page 37) |
| entered, the alarm recording is | |||||||||
| stopped. | ||||||||||
|
|
|
|
|
|
|
|
|
| • When an alarm signal is received and | |
|
|
|
|
|
|
|
|
|
| the BUZZER ON is selected in the | |
|
|
|
|
|
|
|
|
|
| menu, the alarm sounds continuously. | |
|
|
|
|
|
|
|
|
|
| To silence the buzzer, press any | |
|
|
|
|
|
|
|
|
|
| button. |
|
RECORDING
REFERENCE
RESET button
•Use this button when the VCR or display does not operate normally even though the power is turned on.
•The RESET button is on the right side of the Front Panel.
•Press the RESET button using a ball point pen or a pencil.
When pressing the RESET button
•All the entered information such as reserve recording set time, current time, and alarm information is erased.
•The power is turned off, and there is no picture at all. When
the power is turned on again,flashes on the display of the screen.
• The current time is erased and must be reset.
31 | 32 |