LFD Display
Table of contents
Sound Adjustment
Support
Specifications
Correct disposal of batteries in this product
Copyright
Before Using the Product
Power off the product and computer
Safety Precautions
Cleaning
Symbols
Storage
Electricity and Safety
Installation
Product or cause a fire
Install the product in a kitchen or near a kitchen counter
Sloped surface, etc
Operation
Product failure, an electric shock or fire may result
Output ports, etc
Page
Preparations
Checking the Contents
Components
Checking the Components
Following items can be purchased at your nearest retailer
Items sold separately
Or return to the previous menu
Parts
Control Panel
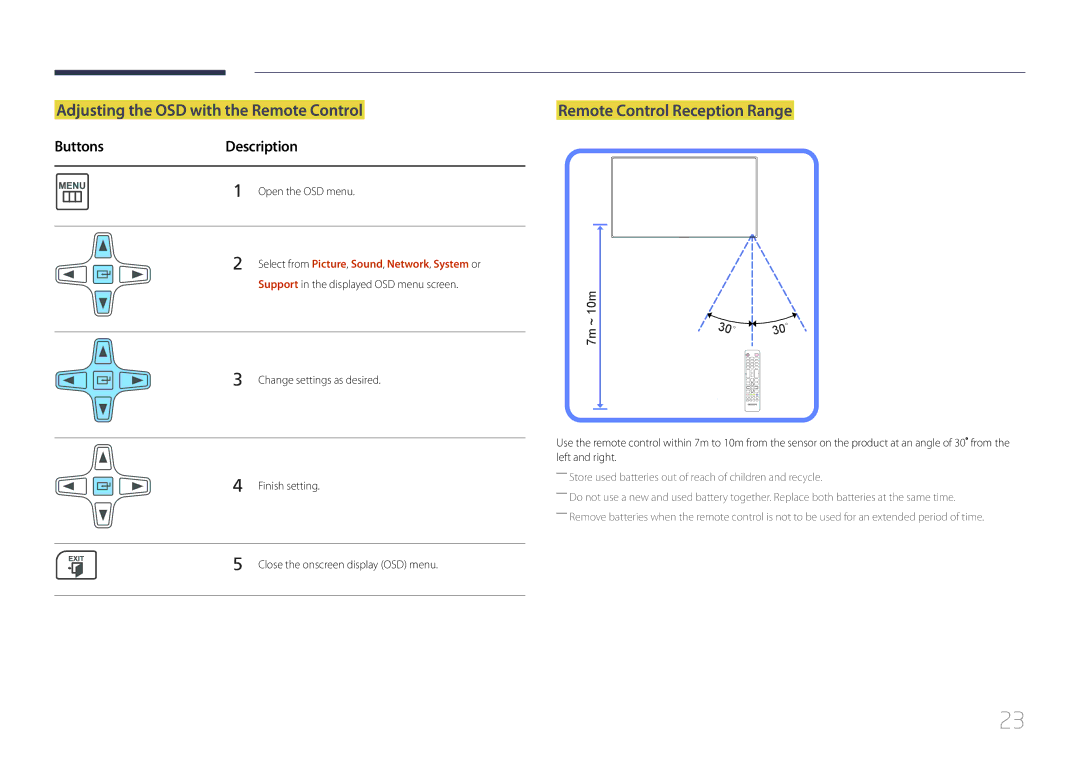
ButtonsDescription
RJ45
Reverse Side
Port Description
To lock an anti-theft locking device
Assembling the Holder-Wire stand
Contents Home Launch Button
Remote Control
Anynet+ modes
To place batteries in the remote control
Return to the previous menu
PC, DVI, HDMI, or DisplayPort
Select from Picture, Sound, Network, System or
Adjusting the OSD with the Remote Control
Remote Control Reception Range
Products 1
Connection Using an IR Stereo Cable sold separately
Ventilation
Installation on a Perpendicular Wall
Tilting Angle and Rotation
Model name
Dimensions
Installation on an Indented Wall
Plane view
Installing the Wall Mount Kit
Installing the Wall Mount
Preparing before installing Wall-Mount
UE55C
Wall Mount Kit Specifications Vesa
RS232C Cable
Remote Control RS232C
Pin Signal
Cable Connection
Female
Pin No Standard Colour Signal
RS232C cable Connector 9-Pin D-Sub to Stereo Cable
LAN Cable
Cross LAN cable PC to PC
Connector RJ45
Signal
Direct LAN cable PC to HUB
Connection
Connection
Command type Value range
Viewing control state Get control command
Controlling Set control command
Command
Volume control
Power control
Input Source An input source code to be set on a product
Setting the input source Set Input Source
Input source control
Screen mode control
PIP On/Off control
Auto adjustment control PC and BNC only
Full Natural
Video Wall Mode Control
Safety Lock
Set Video Wall
Video Wall On
Set Video Wall On/Off
WallOn Same as above Nak
Off
10x10 Video Wall Model
Set Number
10x10 Video Wall Model 1 ~
Pre-connection Checkpoints
Connecting and Using a Source Device
Before Connecting
Connection using a DVI cable Digital type
Connecting to a PC
Connection using the D-SUB cable Analogue type
Connection Using an Hdmi Cable
Connection Using an HDMI-DVI Cable
Precautions for using DP
Connection Using an DP Cable
Changing the Resolution on Windows Vista
Changing the Resolution
Changing the Resolution on Windows XP
Changing the Resolution on Windows
Connection Using the component Cable
Connecting to a Video Device
Connection Using the AV Cable
Using an Hdmi cable or Hdmi to DVI Cable up to 1080p
Connection Using an Hdmi Cable
Connecting an External Monitor
Connecting to an Audio System
MagicInfo
Connecting the network box Sold separately
Entering MagicInfo mode
Press Source on the remote control, and select MagicInfo
Select TCP/IP step
Enter the IP information
Source
MENUm → Support → Contents Home → Source → Entere
Changing the Input source
Configuring settings for Multi Control
Using MDC
Configuring Settings for Multi Control
Uninstallation
MDC Programme Installation/Uninstallation
Monitor Computer
What is MDC?
Connecting to MDC
Using MDC via RS-232C serial data communications standards
Connection using a direct LAN cable
Using MDC via Ethernet
Connection using a cross LAN cable
Connection Management
Launching the programme displays the user login window
User Login
Auto Set ID
Cloning
Command Retry
Getting Started with MDC
Channel Change the channel
Main Screen Layout Menus
Menu Bar
Input Source Change the input source
Alert
Volume
Custom
Screen Adjustment
Color
Adjust the colours for the selected display device
Adjust the tint for the selected display device
Adjust the Hdmi Black Level for the selected display device
You can view details of the selected screen size
Size
Reduces Mpeg noise to provide improved picture quality
Controls the LED backlight to maximize picture clarity
3D Control
Advanced features
Adjust each colour red, green, blue darkness
Adjust the screen contrast
Adjust the primary colour intensity
Adjust the colour temperature for a more natural picture
Adjust the treble for the selected display
Sound Adjustment
System Setup
Adjust the bass for the selected display
Channel can be changed if PIP Source is TV
Select the format to display the split screen
View the PIP Size of the current display
Select a PIP input source
Configure the fan speed
General Fan & Temperature
Set the product to automatically power on
Select a method to configure the fan speed
Lock the buttons on the display device
Security OSD Display
Lock the on-screen menus
Time
On Time Set the time to power on the selected display device
Screen Burn Protection
End Time Set end time to display screen saver
Start Time Set start time to display screen saver
Safety Screen Lamp Control
Enter a message to display on the screen
Enable or disable Ticker
Security Reset
Tool Settings
Options Edit Column
Edit Column
View the programme information
Monitor Window Information
Resizing a Window
Other Functions
Create groups and manage the list of sets on a group basis
Group Management
Deleting Groups
Edit Group window displayed, click Rename
Schedule Management
Renaming Groups
Creating Schedules
To delete a schedule, select the schedule and click Delete
Schedule Modification
Deleting a Schedule
To modify a schedule, select the schedule and click Edit
Following message appears
Troubleshooting Guide
IssueSolution
Remote control does not work
Page
If the input source is AV, Component, HDMI1, HDMI2
Screen Adjustment
Picture Mode
If the input source is PC, DVI or DisplayPort
MENUm→ Picture → Entere
Input source Picture Mode Adjustable options
Picture Size
Screen Adjustment
Screen Adjustment
MENUm→ Picture → Screen Adjustment → Entere
Input Source Picture Size
Picture Sizes available by Input Source
Select the Zoom or Position. Press the E button
Position
Zoom/Position
Press the E button
Resolution Select
PC Screen Adjustment
MENUm→ Picture → Rotation → Entere
Auto Adjustment
MENUm→ Picture → Auto Adjustment → Entere
Rotation
MENUm→ Picture → Aspect Ratio → Entere
Aspect Ratio
MENUm→ Picture → Advanced Settings → Entere
Advanced Settings
Advanced Settings
Input Source Picture Mode Advanced Settings
100
Gamma
101
White Balance
10p White Balance
Motion Lighting
102
Expert Pattern
Picture Options
Input source Picture Mode Picture Options
Picture Options
103
Digital Noise Filter
104
Colour Tone
Colour Temp
Motion Plus
Film Mode
105
Hdmi Black Level
Dynamic Backlight
Reset Picture
106
Calibrated value
107
Sound Adjustment
Sound Mode
MENUm → Sound → Sound Mode → Entere
108
Sound Effect
109
Speaker Settings
MENUm → Sound → Speaker Settings → Entere
Auto Volume Off / Normal / Night
110
Reset Sound
Reset all sound settings to the factory defaults
MENUm → Sound → Reset Sound → Entere
Network
Network Settings
Connecting to a Wired Network
MENUm → Network → Network Settings → Entere
112
Wired Network Settings
Automatic Network Settings
Manual Network Settings
113
Connecting to a Wireless Network
114
Wireless Network Setting
Automatic Network Setup
Manual Network Setup
115
How to set up manually
How to set up using Wpspbc
Go to Network Settings screen
116
Wi-Fi Direct
MENUm → Network → Wi-Fi Direct → Entere
Network Status
Device Name
AllShare Settings
Using the AllShare Play Function
Soft AP
Multi Control
System
Multi Control
118
Clock Set
Sleep Timer
Time
119
120
On Timer
On Timer1 ~ On Timer7
Holiday Management
Off Timer
121
MENUm → System → Menu Language → Entere
Menu Language
122
System
MENUm → System → Rotate menu → Entere
Rotate menu
123
124
Eco Solution
Button Lock
Safety Lock
Security
125
PC , DVI , HDMI1 , HDMI2 , DisplayPort
PIP Settings
126
Main picture Sub picture
Off / 2 hours / 4 hours / 8 hours / 10 hours
Auto Protection Time
127
MENUm → System → Auto Protection Time → Entere
Pixel Shift
Available Pixel Shift Settings and Optimum Settings
Screen Burn Protection
128
129
Timer
Timer
Off / Light / Dark
130
Immediate display
Rolling bar / Fading screen
Vertical Top / Middle / Bottom
Ticker
131
MENUm → System → Ticker → Entere
Format
Video Wall
132
Video Wall
Screen Position
133
Vertical
134
Source AutoSwitch Settings
135
General
Standby Control
Auto Power
136
Sound Feedback
Lamp Schedule
Power On Adjustment
Temperature Control
137
Anynet+ HDMI-CEC
Anynet+ HDMI-CEC
138
Anynet+ HDMI-CEC
No / Yes
Switching between Anynet+ Devices
139
Auto Turn Off
Anynet+ device ... appears on
Troubleshooting for Anynet+
Problem Possible Solution
140
141
Problem
142
Play Mode
DivX Video On Demand
Magic Clone
Reset System
Magic Clone
143
Synced power-off
Reset All
PC module power
Synced power-on
145
Software Update
MENUm → Support → Software Update → Entere
Support
Contact Samsung
Contents Home
AllShare Play
147
MagicInfo Videowall S
Information
148
Edit Name
USB HDD greater than 2TB is not supported
What is AllShare Play?
AllShare Play
149
File system and formats
150
Compatible devices with AllShare Play
151
Using a USB device
Connecting a USB device
MENUm → Support → Contents Home → AllShare Play → Entere
152
Connecting to a PC over a network
Background Music On and Background Music Setting features
153
Using the AllShare Play features
Sort Criteria Operation Videos Photos Music
Using the Basic AllShare Play Features
154
Sorting the file lists
Creating a Playlist
155
Playing Selected Files
Copying Files
Option Name Operations Recently played Whats new Playlist
My list
156
My list options
Playing a Video
Using the Play Continuously Function Resume Play
Videos
157
Viewing a Photo or Slide Show
Photos
158
Playing Music
Music
159
Option Name Operations Videos Photos Music
Videos / Photos / Music Play Option menu
160
161
Subtitle
Supported image resolutions
Supported Subtitle and AllShare Play file formats
162
File Extension Type Codec Comments
163
Supported music file formats
Supported Video Formats
164
165
Read before using MagicInfo Lite player
MagicInfo Lite
166
Contents
Video Audio
167
Flash
168
Vertical text
169
3D Shadow Effects not supported
170
Access the server you have assigned to your device
Approving a connected device from the server
To specify the group
171
Device Group Select
Network schedule
MagicInfo Lite
172
MagicInfo Lite player
Internal Auto Play
173
Local schedule
USB Device Auto Play
174
Registering a Local schedule
175
Local Schedule Manager
Duration
176
Select Duration
Modifying a Local schedule
177
Next, select Delete
178
Deleting a Local schedule
Select Edit
Select Stop
179
Running a Local schedule
Stopping a Local schedule
Details of the schedule will be displayed
180
Viewing the details of a Local schedule
Device. Select Yes to copy the files
181
Copying a Local schedule
182
Content manager
Copying content
Select Content manager in the MagicInfo Lite menu screen
183
Deleting content
Active / Passive
Settings
Server Network Settings
184
185
186
When Content is Running
Viewing the details of the content that is running
Background Music Off / On
187
PIP Off / On
Activate or deactivate the PIP function
188
Read before using MagicInfo Premium S Player
MagicInfo Premium S
File Formats Compatible with MagicInfo Premium S Player
Image
189
190
Flash Power Point
Charts Vertical text
Masked Image, Tiled Image content not supported
Template Manager Supported in USB Device Auto Play
191
Template files
Creation/editing/playback are only available
More than one sound output cannot be used
192
Network Schedule Multiframe
Template files and LFD.lfd files
Others
193
194
195
MagicInfo Premium S Player
MagicInfo Premium S
196
Template Player
197
198
199
200
201
202
203
204
205
Registering a Template
206
Template Manager
207
Contents
Select sound or background music
208
209
210
To run MagicInfo Premium S, connect to a network
211
212
213
214
215
Read before using MagicInfo Videowall S Player
MagicInfo Videowall S
File Formats Compatible with MagicInfo Videowall S Player
Video
216
Available Not available
217
Restrictions
Only one video Videos file can be played per client
218
Default Storage
MENUm → Support → Contents Home → MagicInfo Videowall S →
MagicInfo Videowall S
219
220
Troubleshooting Guide
Testing the Product
Checking the Resolution and Frequency
221
Installation issue PC mode
Screen issue
Not Optimum Mode is displayed
222
Adjust Brightness and Contrast
Sharpness
223
Go to Sound and change Speaker Select to Internal
Sound issue
224
225
Remote control issue
Source device issue
There is audible sound when the volume is muted
PIP menu is not available
Other issue
226
IR sensor is not functioning
There is no sound in Hdmi mode
PC display settings cannot be saved
227
Question Answer
Settings
How can I change the resolution?
228
Question
How do I set powersaving mode?
229
230
Specifications
231
232
Rating Typical Max
PowerSaver
PowerSaver Normal Operation Power saving mode Power off
233
Vertical Frequency Pixel Clock Sync Polarity KHz MHz
Preset Timing Modes
234
235
236
Appendix
Contact Samsung World Wide
237
238
239
240
241
242
243
211350370
244
0685 88 99
0800 300
Not a product defect
Responsibility for the Pay Service Cost to Customers
Product damage caused by customers fault
245
Applicable in countries with separate collection systems
246
Correct disposal of batteries in this product
Optimum Picture Quality
Optimum Picture Quality and Afterimage Burn-in Prevention
247
Preventing afterimage burn-in
What is afterimage burn-in?
248
Prevention of Afterimage Burn-in
Move and change text every 30 minutes as shown below
249
250
Licence
251
Terminology