Media Play - Additional Functions
■■Videos/Music/Photos Play Option menus When playing a file, press theTOOLS button.
Category | Operation | Videos | Music | Photos |
| | | | |
Title | You can select another video file | c | | |
to play directly. | | |
Repeat Mode | You can play movie and music | c | c | |
files repeatedly. | |
Picture Size | You can adjust the picture size to | c | | |
your preference. | | |
Picture Mode | You can adjust the picture setting. | c | | c |
Sound Mode | You can adjust the sound setting. | c | c | c |
| You can play the video with | | | |
Subtitle | Subtitles. This function only works | c | | |
Setting | if the subtitles have the same file | | |
| name as the video. | | | |
Audio Format | You can select the digital audio | c | | |
output format. | | |
Audio | You can change the audio | | | |
language if the video has more | c | | |
Language | | |
| than one language. | | | |
Stop Slide | | | | |
Show / | You can start or stop a Slide | | | c |
Start Slide | Show. | | |
| | |
Show | | | | |
Slide Show | You can select the slide show | | | c |
Speed | speed during the slide show. | | |
Background | You can set and select | | | |
background music when | | | c |
Music | | |
| watching a Slide Show. | | | |
Zoom | You can zoom into images in full | | | c |
screen mode. | | |
Rotate | You can rotate images in full | | | c |
screen mode. | | |
Information | You can see detailed information | c | c | c |
about the played file. |
Settings
Using the Setup Menu
■■DivX® Video On Demand : Shows the registration code authorized for the TV. If you connect to the DivX web site and register with the 10-digit registration code, you can download the VOD activation file. Once you play it using Media Play, the registration is completed.
✎✎ For more information on DivX® VOD, visit “http://vod.divx. com”.
■■Information: Select to view information about the connected USB device.
Other Information
Installing the Wall Mount Kit
The wall mount kit (sold separately) allows you to mount the TV on the wall.
For detailed information about installing the wall mount, see the instructions provided with the wall mount items. Contact a technician for assistance when installing the wall mount bracket. Samsung Electronics is not responsible for any damage to the product or injury to yourself or others if you elect to install the wall mount on your own.
Wall Mount Kit Specifications (VESA)
✎✎ The wall mount kit is not supplied, but sold separately.
Install your wall mount on a solid wall perpendicular to the floor. When attaching to other building materials, please contact your nearest dealer. If you install the TV on a ceiling or slanted wall, it may fall and result in severe personal injury.
✎✎ NOTE
xxStandard dimensions for wall mount kits are shown in the table below.
xxWhen purchasing our wall mount kit, a detailed installation manual and all parts necessary for assembly are provided.
xxDo not use screws that do not comply with the VESA standard screw specifications.
xxDo not use screws that are longer than the standard dimension or do not comply with the VESA standard screw specifications. Screws that are too long may cause damage to the inside of the TV set.
xxFor wall mounts that do not comply with the VESA standard screw specifications, the length of the screws may differ depending on the wall mount specifications.
xxDo not fasten the screws too firmly. This may damage the product or cause the product to fall, leading to personal injury. Samsung is not liable for these kinds of accidents.
xxSamsung is not liable for product damage or personal injury when a non-VESA or non-specified wall mount is used or the consumer fails to follow the product installation instructions.
xxDo not mount the TV at more than a 15 degree tilt. xxAlways have two people mount the TV on a wall.
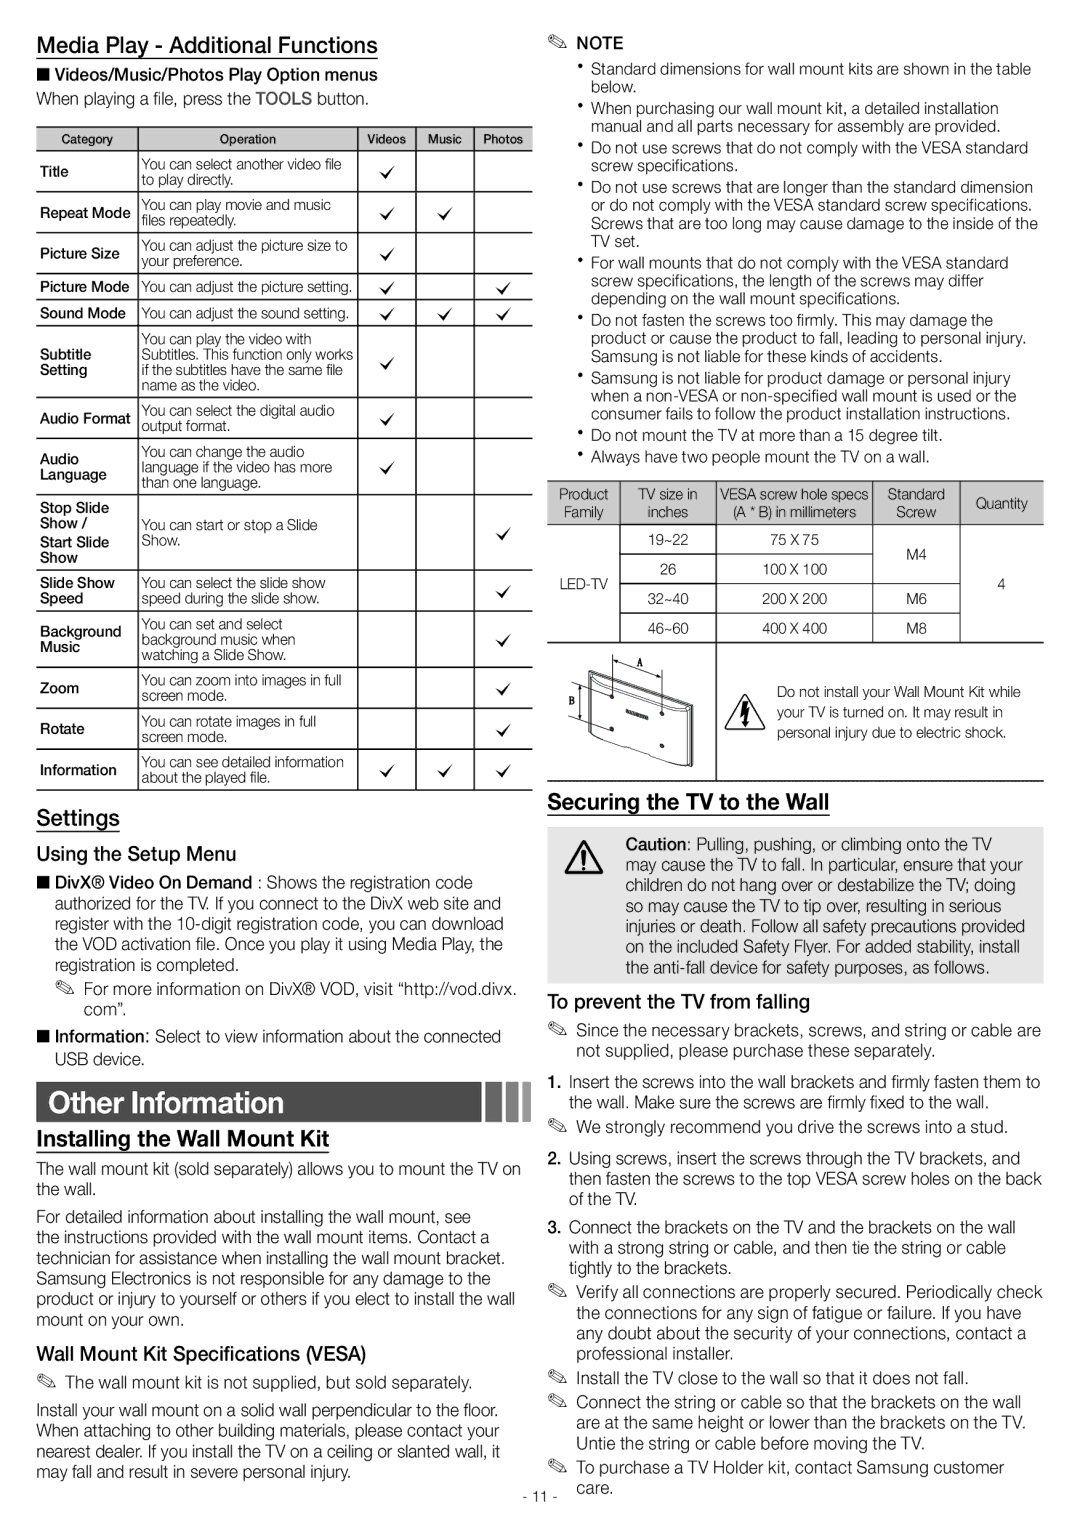
| Product | TV size in | VESA screw hole specs | Standard | Quantity |
| Family | inches | (A * B) in millimeters | Screw |
| |
| | | | | | |
| | | 19~22 | 75 X 75 | M4 | |
| | | | | |
| LED-TV | 26 | 100 X 100 | 4 |
| |
| | | |
| 32~40 | 200 X 200 | M6 |
| | | |
| | | | | | |
| | | 46~60 | 400 X 400 | M8 | |
| | | | | | |
| | | | Do not install your Wall Mount Kit while |
| | | |
| | | | your TV is turned on. It may result in |
| | | |
| | | | personal injury due to electric shock. |
| | | | | | |
Securing the TV to the Wall
Caution: Pulling, pushing, or climbing onto the TV may cause the TV to fall. In particular, ensure that your children do not hang over or destabilize the TV; doing so may cause the TV to tip over, resulting in serious injuries or death. Follow all safety precautions provided on the included Safety Flyer. For added stability, install the anti-fall device for safety purposes, as follows.
To prevent the TV from falling
✎✎ Since the necessary brackets, screws, and string or cable are not supplied, please purchase these separately.
1.Insert the screws into the wall brackets and firmly fasten them to the wall. Make sure the screws are firmly fixed to the wall.
✎✎ We strongly recommend you drive the screws into a stud.
2.Using screws, insert the screws through the TV brackets, and then fasten the screws to the top VESA screw holes on the back of the TV.
3.Connect the brackets on the TV and the brackets on the wall with a strong string or cable, and then tie the string or cable tightly to the brackets.
✎✎ Verify all connections are properly secured. Periodically check the connections for any sign of fatigue or failure. If you have any doubt about the security of your connections, contact a professional installer.
✎✎ Install the TV close to the wall so that it does not fall.
✎✎ Connect the string or cable so that the brackets on the wall are at the same height or lower than the brackets on the TV. Untie the string or cable before moving the TV.
✎✎ To purchase a TV Holder kit, contact Samsung customer care.