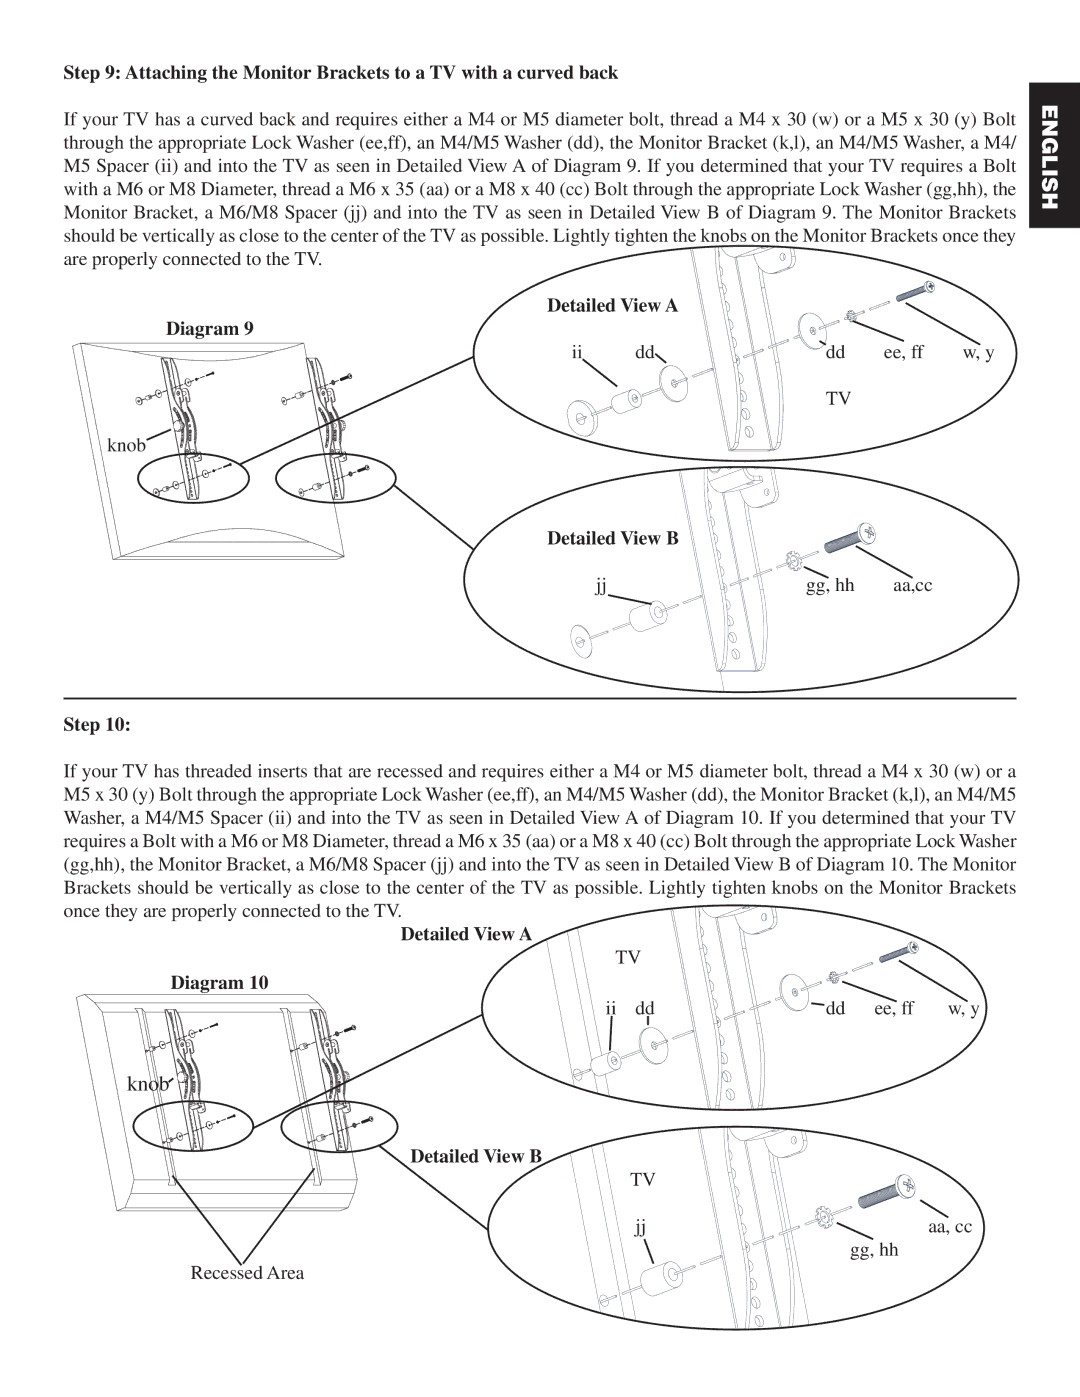
Step 9: Attaching the Monitor Brackets to a TV with a curved back
If your TV has a curved back and requires either a M4 or M5 diameter bolt, thread a M4 x 30 (w) or a M5 x 30 (y) Bolt through the appropriate Lock Washer (ee,ff), an M4/M5 Washer (dd), the Monitor Bracket (k,l), an M4/M5 Washer, a M4/ M5 Spacer (ii) and into the TV as seen in Detailed View A of Diagram 9. If you determined that your TV requires a Bolt with a M6 or M8 Diameter, thread a M6 x 35 (aa) or a M8 x 40 (cc) Bolt through the appropriate Lock Washer (gg,hh), the Monitor Bracket, a M6/M8 Spacer (jj) and into the TV as seen in Detailed View B of Diagram 9. The Monitor Brackets should be vertically as close to the center of the TV as possible. Lightly tighten the knobs on the Monitor Brackets once they are properly connected to the TV.![]()
Detailed View A |
|
|
| |
Diagram 9 |
|
|
|
|
ii | dd | dd | ee, ff | w, y |
![]()
![]()
![]()
![]()
![]()
![]()
![]()
![]()
![]()
![]() TV knob
TV knob![]()
![]()
![]()
![]()
![]()
![]()
ENGLISH
Detailed View B
jj | gg, hh | aa,cc |
Step 10:
If your TV has threaded inserts that are recessed and requires either a M4 or M5 diameter bolt, thread a M4 x 30 (w) or a M5 x 30 (y) Bolt through the appropriate Lock Washer (ee,ff), an M4/M5 Washer (dd), the Monitor Bracket (k,l), an M4/M5 Washer, a M4/M5 Spacer (ii) and into the TV as seen in Detailed View A of Diagram 10. If you determined that your TV requires a Bolt with a M6 or M8 Diameter, thread a M6 x 35 (aa) or a M8 x 40 (cc) Bolt through the appropriate Lock Washer (gg,hh), the Monitor Bracket, a M6/M8 Spacer (jj) and into the TV as seen in Detailed View B of Diagram 10. The Monitor Brackets should be vertically as close to the center of the TV as possible. Lightly tighten knobs on the Monitor Brackets once they are properly connected to the TV.![]()
Detailed View A
TV
Diagram 10
ii dd | dd | ee, ff | w, y |
knob![]()
![]()
![]()
![]()
![]()

![]()
![]()
![]()
Detailed View B
TV
jj | aa, cc |
gg, hh
Recessed Area
