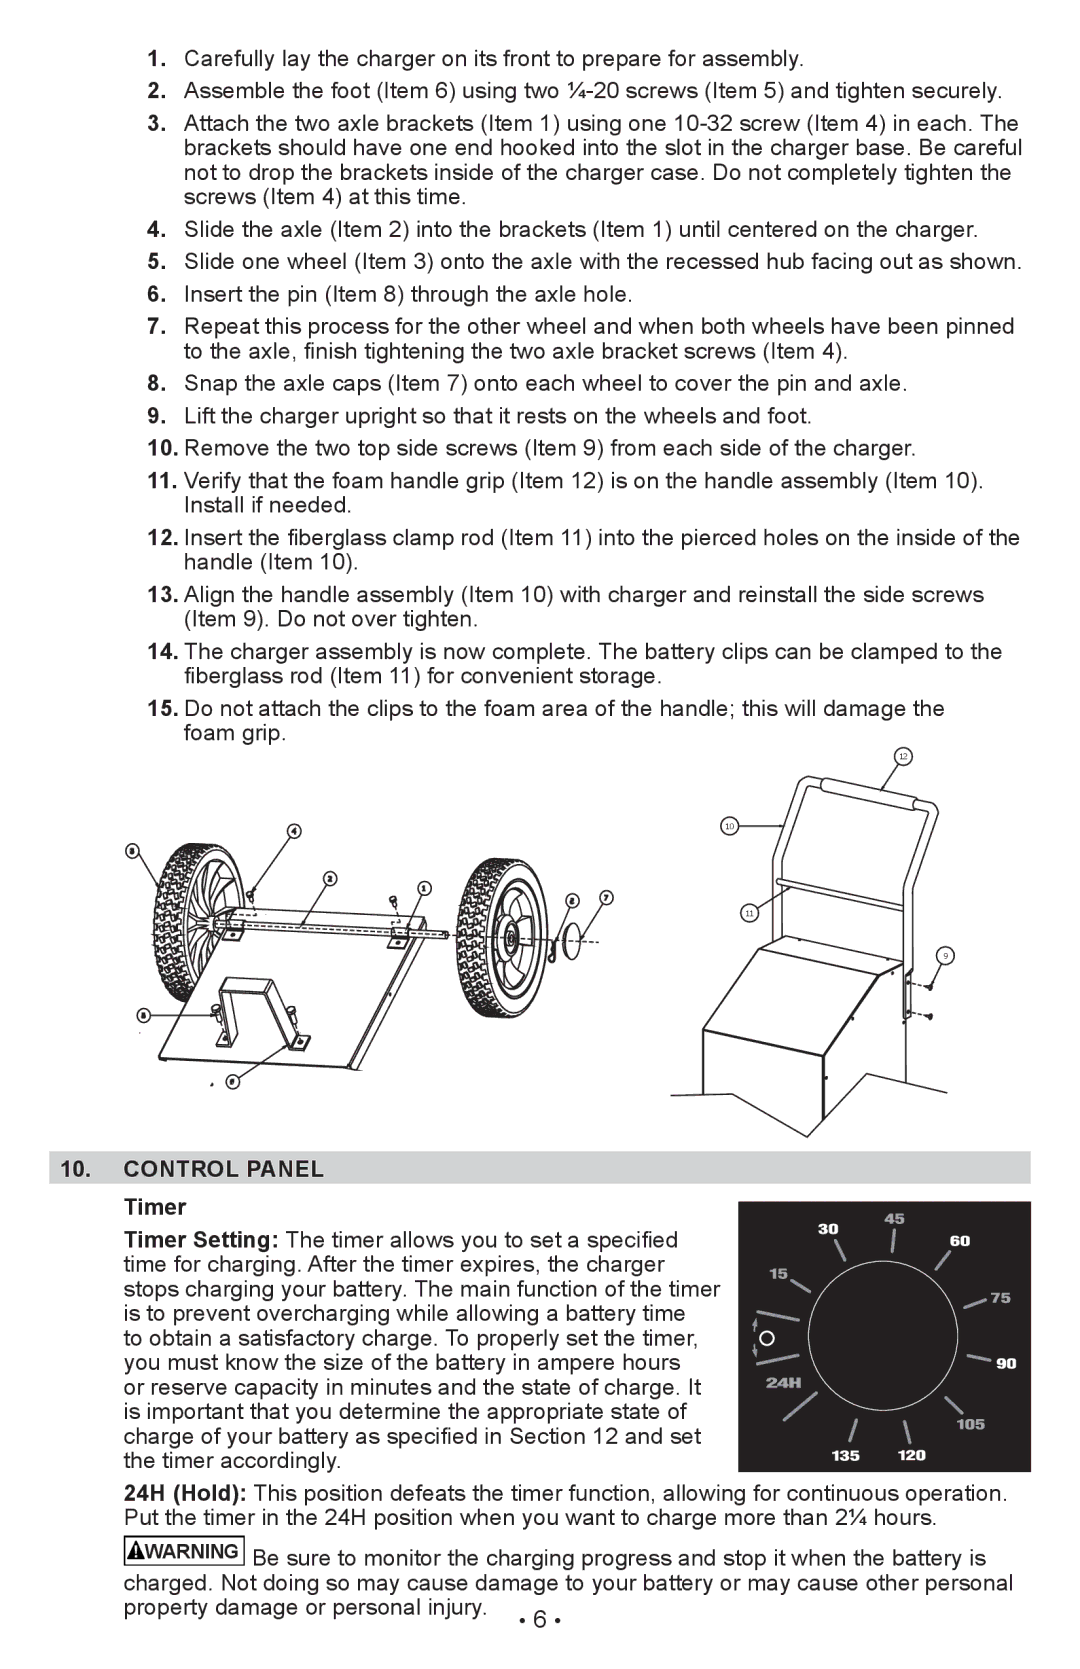
1.Carefully lay the charger on its front to prepare for assembly.

2.Assemble the foot (Item 6) using two ¼-20 screws (Item 5) and tighten securely.

3.Attach the two axle brackets (Item 1) using one 10-32 screw (Item 4) in each. The brackets should have one end hooked into the slot in the charger base. Be careful not to drop the brackets inside of the charger case. Do not completely tighten the screws (Item 4) at this time.

4.Slide the axle (Item 2) into the brackets (Item 1) until centered on the charger.

5.Slide one wheel (Item 3) onto the axle with the recessed hub facing out as shown.

6.Insert the pin (Item 8) through the axle hole.

7.Repeat this process for the other wheel and when both wheels have been pinned to the axle, finish tightening the two axle bracket screws (Item 4).

8.Snap the axle caps (Item 7) onto each wheel to cover the pin and axle.

9.Lift the charger upright so that it rests on the wheels and foot.

10.Remove the two top side screws (Item 9) from each side of the charger.

11.Verify that the foam handle grip (Item 12) is on the handle assembly (Item 10). Install if needed.

12.Insert the fiberglass clamp rod (Item 11) into the pierced holes on the inside of the handle (Item 10).

13.Align the handle assembly (Item 10) with charger and reinstall the side screws (Item 9). Do not over tighten.

14.The charger assembly is now complete. The battery clips can be clamped to the fiberglass rod (Item 11) for convenient storage.

15.Do not attach the clips to the foam area of the handle; this will damage the foam grip.

12

10

11

9

10.CONTROL PANEL

Timer

Timer Setting: The timer allows you to set a specified time for charging. After the timer expires, the charger stops charging your battery. The main function of the timer

is to prevent overcharging while allowing a battery time to obtain a satisfactory charge. To properly set the timer,

you must know the size of the battery in ampere hours or reserve capacity in minutes and the state of charge. It

is important that you determine the appropriate state of charge of your battery as specified in Section 12 and set the timer accordingly.

24H (Hold): This position defeats the timer function, allowing for continuous operation. Put the timer in the 24H position when you want to charge more than 2¼ hours.

WARNING Be sure to monitor the charging progress and stop it when the battery is charged. Not doing so may cause damage to your battery or may cause other personal property damage or personal injury. 6

Page 6
Image 6
Schumacher PWI70300A owner manual Control Panel

PWI70300A specifications

The Schumacher PWI70300A is a versatile and powerful 7 Amp fully automatic battery maintainer and charger that has been designed to cater to the needs of both everyday drivers and automotive enthusiasts. This model stands out for its blend of advanced technology and user-friendly features, making it suitable for various battery types, including 6V and 12V lead-acid batteries.

One of the main features of the PWI70300A is its automatic multi-stage charging system. This technology helps in optimizing battery performance and lifespan by delivering the appropriate charge based on the battery's condition. It automatically switches from bulk charge to absorption and then to maintenance mode once the battery reaches full charge, ensuring that there is no overcharging, which can cause damage.

The lightweight and compact design of the PWI70300A enhances its portability, allowing users to easily carry it around or store it in tight spaces. Additionally, the unit comes equipped with a user-friendly LED indicator, which provides real-time feedback about the charging status. This feature simplifies the charging process, as users can easily gauge whether the battery is charging, fully charged, or requires attention.

Notably, the PWI70300A is designed with safety as a priority. It includes built-in protections against reverse polarity, short circuit, and over-temperature, which significantly reduces the risks associated with battery charging. This makes it an ideal choice for those who may not have extensive experience with battery maintenance.

The Schumacher PWI70300A also shines in its versatility, as it is compatible with a wide range of electrical vehicles, including cars, motorcycles, and ATVs. This makes it a valuable addition to the toolkit of any vehicle owner. The inclusion of clamps and ring terminals ensures flexible connectivity options, allowing users to choose the most convenient way to connect the charger.

In summary, the Schumacher PWI70300A is a robust and dependable battery maintainer and charger, ideal for anyone looking to extend the life of their batteries while still being easy to use. With its automatic charging capabilities, safety features, portability, and compatibility with various vehicles, it presents an excellent investment for maintaining battery health and performance. Whether for professional use or personal convenience, the Schumacher PWI70300A delivers on quality and reliability.