E.OPERATING INSTRUCTIONS: CHARGING BATTERY IN VEHICLE

When charging battery in the vehicle, take care to determine the battery type and which post is grounded. To reduce risk of a spark near battery, follow these steps when battery is installed in vehicle. WARNING: A spark near battery may cause battery explosion.

1.Position AC power cord and DC charging cords to reduce risk of damage by hood, door, or moving engine parts.

2.Stay clear of fan blades, belts, pulleys, and other parts that can cause injury.

3.Check polarity of battery posts. Battery case will be marked by each post: POSITIVE (POS, P, +) and NEGATIVE (NEG, N, -). NOTE: The positive battery post usually has a larger diameter than the negative post.

4.Determine which post of battery is ground (connected) to chassis.

NOTE: The negative post is normally grounded.

NEGATIVE GROUNDED POST

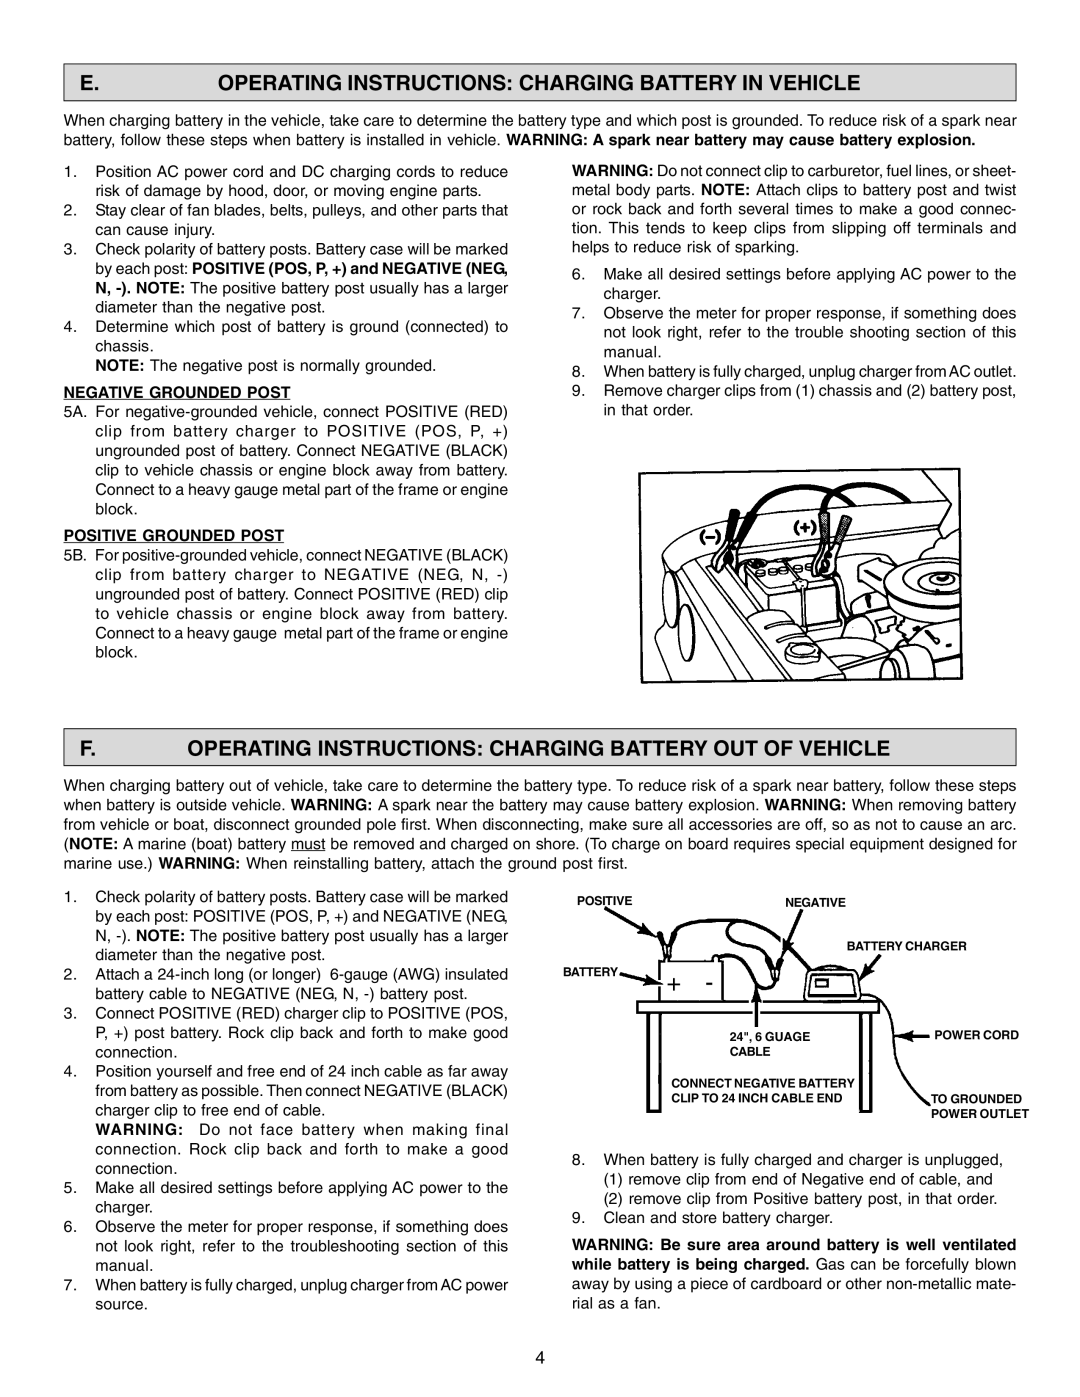
5A. For negative-grounded vehicle, connect POSITIVE (RED) clip from battery charger to POSITIVE (POS, P, +) ungrounded post of battery. Connect NEGATIVE (BLACK) clip to vehicle chassis or engine block away from battery. Connect to a heavy gauge metal part of the frame or engine block.

POSITIVE GROUNDED POST

5B. For positive-grounded vehicle, connect NEGATIVE (BLACK) clip from battery charger to NEGATIVE (NEG, N, -) ungrounded post of battery. Connect POSITIVE (RED) clip to vehicle chassis or engine block away from battery. Connect to a heavy gauge metal part of the frame or engine block.

WARNING: Do not connect clip to carburetor, fuel lines, or sheet-

metal body parts. NOTE: Attach clips to battery post and twist or rock back and forth several times to make a good connec- tion. This tends to keep clips from slipping off terminals and helps to reduce risk of sparking.

6.Make all desired settings before applying AC power to the charger.

7.Observe the meter for proper response, if something does not look right, refer to the trouble shooting section of this manual.

8.When battery is fully charged, unplug charger from AC outlet.

9.Remove charger clips from (1) chassis and (2) battery post, in that order.

F.OPERATING INSTRUCTIONS: CHARGING BATTERY OUT OF VEHICLE

When charging battery out of vehicle, take care to determine the battery type. To reduce risk of a spark near battery, follow these steps when battery is outside vehicle. WARNING: A spark near the battery may cause battery explosion. WARNING: When removing battery from vehicle or boat, disconnect grounded pole first. When disconnecting, make sure all accessories are off, so as not to cause an arc. (NOTE: A marine (boat) battery must be removed and charged on shore. (To charge on board requires special equipment designed for marine use.) WARNING: When reinstalling battery, attach the ground post first.

1. Check polarity of battery posts. Battery case will be marked

by each post: POSITIVE (POS, P, +) and NEGATIVE (NEG,

N, -). NOTE: The positive battery post usually has a larger

POSITIVE

NEGATIVE


diameter than the negative post.

2.

Attach a 24-inch long (or longer) 6-gauge (AWG) insulated


battery cable to NEGATIVE (NEG, N, -) battery post.

3.

Connect POSITIVE (RED) charger clip to POSITIVE (POS,


P, +) post battery. Rock clip back and forth to make good


connection.

4.

Position yourself and free end of 24 inch cable as far away


from battery as possible. Then connect NEGATIVE (BLACK)


charger clip to free end of cable.


WARNING: Do not face battery when making final


connection. Rock clip back and forth to make a good

BATTERY

BATTERY CHARGER

+ -

24", 6 GUAGE

POWER CORD

CABLE


CONNECT NEGATIVE BATTERY


CLIP TO 24 INCH CABLE END

TO GROUNDED


POWER OUTLET


connection.

5.

Make all desired settings before applying AC power to the


charger.

6.

Observe the meter for proper response, if something does


not look right, refer to the troubleshooting section of this


manual.

7.

When battery is fully charged, unplug charger from AC power


source.

8.When battery is fully charged and charger is unplugged,

(1)remove clip from end of Negative end of cable, and

(2)remove clip from Positive battery post, in that order.

9.Clean and store battery charger.

WARNING: Be sure area around battery is well ventilated while battery is being charged. Gas can be forcefully blown

away by using a piece of cardboard or other non-metallic mate- rial as a fan.

4

Page 4
Image 4
Schumacher SE-2150MA Operating Instructions Charging Battery in Vehicle, Negative Grounded Post, Positive Grounded Post

SE-2150MA specifications

The Schumacher SE-2150MA is a highly versatile and efficient battery charger and maintainer designed for a variety of automotive applications. This compact and powerful device is particularly popular among car enthusiasts and those who require a reliable solution for recharging and maintaining lead-acid batteries, including conventional, AGM, and gel types.

One of the standout features of the Schumacher SE-2150MA is its automatic multi-stage charging technology. This advanced system ensures that the battery is charged quickly and efficiently while minimizing the risk of overcharging. The multi-stage process involves bulk charging, absorption, and float modes, which together promote optimal battery health and longevity. The device is equipped with an intelligent microprocessor that monitors and adjusts the charging process in real-time, providing precise and safe charging for both 12V and 6V batteries.

The SE-2150MA also boasts a built-in LCD display that clearly shows the charge status, voltage, and other relevant information at a glance. This feature enhances user experience, enabling users to keep track of the charging process without having to guess or rely on indicators alone. Additionally, the device is designed with safety in mind; it includes protection against reverse polarity, short circuits, and overheating, ensuring safe operation even for those who may be less experienced with battery maintenance.

Another notable aspect of the Schumacher SE-2150MA is its compact and lightweight design, making it easy to store and transport. This aspect is particularly appreciated by users who need a portable solution that can easily be taken from one vehicle to another or stored in a tight space when not in use.

Furthermore, the SE-2150MA features alligator clips and ring terminals, providing versatility in connection options. This allows users to connect the charger to various types of batteries easily and securely. The long cables enhance maneuverability, making it convenient to reach difficult areas within the engine compartment.

Overall, the Schumacher SE-2150MA combines user-friendly operation, advanced technology, and robust design to deliver a reliable battery charging solution for automotive enthusiasts and everyday drivers alike. Whether for seasonal maintenance or regular use, this charger offers an effective way to keep batteries in peak condition, reflecting Schumacher’s legacy of quality and innovation in automotive care products.