Windows 95, Windows NT 3.51, Window NT 3.50 (requires DM upgrade drivers), OS/2 V3.0 (Warp full pack), and OS/2
Before you install a
Removing the Dynamic Drive Overlay
If Disk Manager installs a dynamic drive overlay (DDO) and you do not need this software to access the full capacity of your drive, you can remove the dynamic drive overlay without losing your data. However, you will lose access to the full capacity of your drive unless you have another method for accessing
!Caution. Before you attempt to remove a DDO, make a backup copy of all the data on your hard
disc. Also, run CHKDSK, SCANDISK or a third- party equivalent to detect and repair any damaged files before you follow the procedure below. If the DDO migration program encounters a serious file problem or is interrupted by a power loss or hardware failure, the migration will fail and your data will be lost.
1Boot the computer to Drive C.
2Insert your DiscWizard diskette into Drive A.
3Type A:\dm to start Disk Manager.
4Select the Select Installation Options Menu.
5Select (M)aintenance Menu.
6Select (M)igrate Dynamic Drive. This program moves the data on your drive so that it can be accessed without the DDO. The migration may take up to an hour to complete, depending on the size of your drive.
7When the migration program has finished, exit Disk Manager.
8Remove the diskette and reboot the computer. Enter your system setup program (see your system manual for details).
9Configure the hard drive with the Cylinder/Head/Sector parameters shown for your drive in the table in Section 2, “Configuring Your Computer,” on the front side of this sheet. Save your changes and exit the system setup program.
10When your computer has rebooted, insert the DiscWizard diskette into drive A.
11Type A:\dm and choose the Maintenance Menu.
12Select Uninstall (D)isk Manager.
13Select the correct drive to uninstall.
14When the uninstall is complete, exit Disk Manager and reboot.
Note. Disk Manager can also remove a drive overlay placed by the
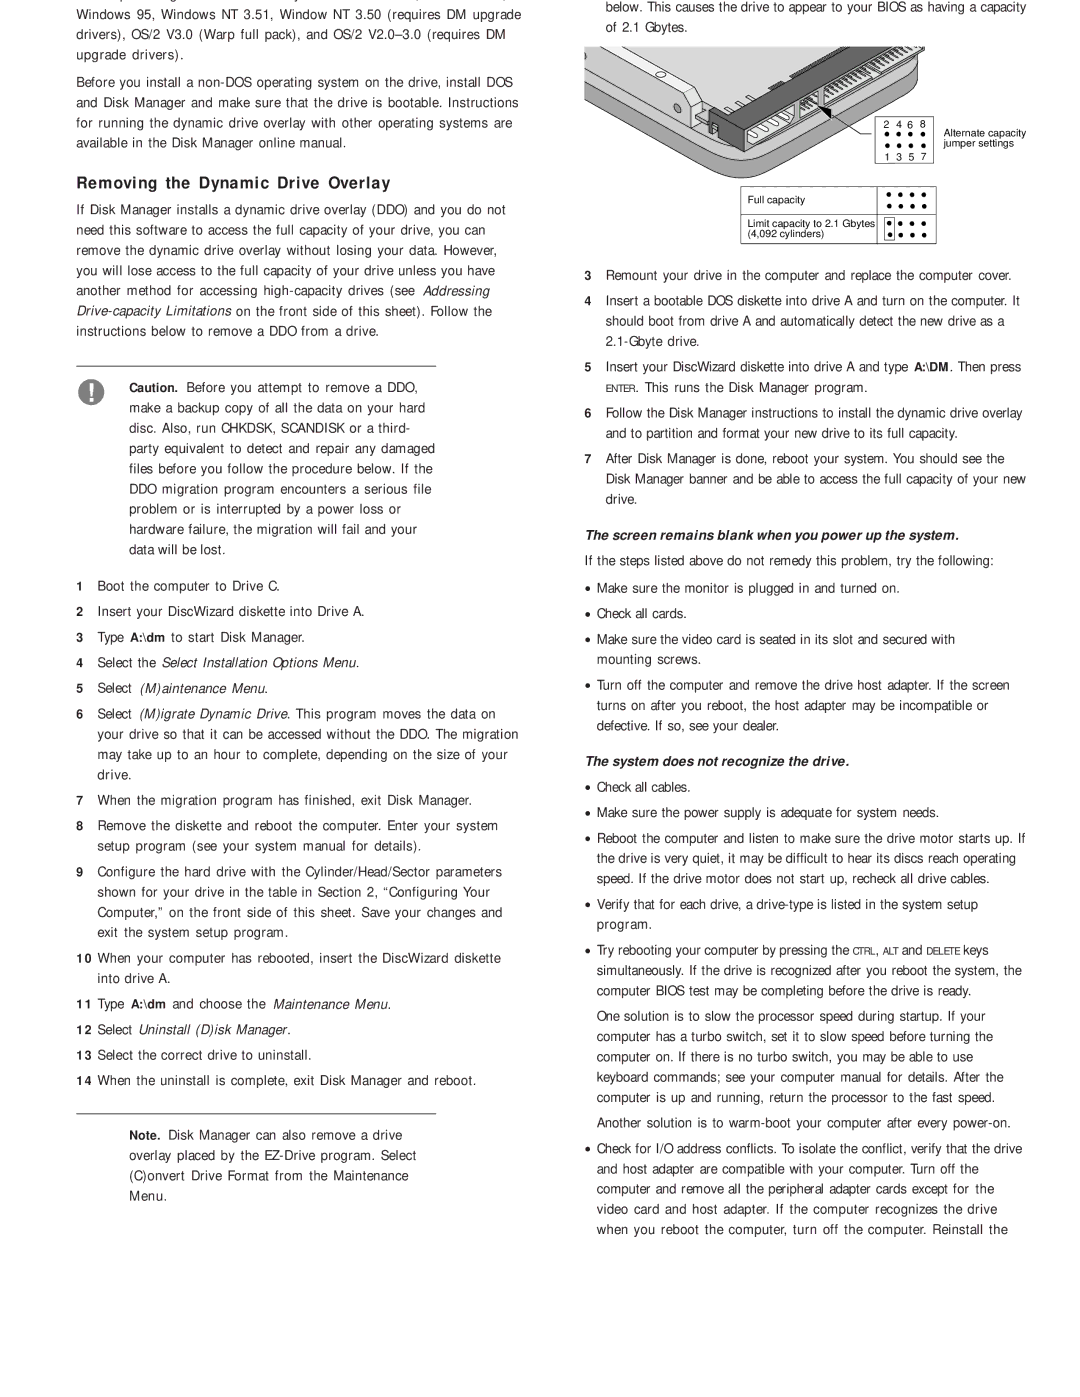
below. This causes the drive to appear to your BIOS as having a capacity of 2.1 Gbytes.
2 4 6 8
Alternate capacity
![]()
![]()
![]()
![]() jumper settings 1 3 5 7
jumper settings 1 3 5 7
Full capacity
Limit capacity to 2.1 Gbytes (4,092 cylinders)
3Remount your drive in the computer and replace the computer cover.
4Insert a bootable DOS diskette into drive A and turn on the computer. It should boot from drive A and automatically detect the new drive as a
5Insert your DiscWizard diskette into drive A and type A:\DM. Then press ENTER. This runs the Disk Manager program.
6Follow the Disk Manager instructions to install the dynamic drive overlay and to partition and format your new drive to its full capacity.
7After Disk Manager is done, reboot your system. You should see the Disk Manager banner and be able to access the full capacity of your new drive.
The screen remains blank when you power up the system.
If the steps listed above do not remedy this problem, try the following:
•Make sure the monitor is plugged in and turned on.
•Check all cards.
•Make sure the video card is seated in its slot and secured with mounting screws.
•Turn off the computer and remove the drive host adapter. If the screen turns on after you reboot, the host adapter may be incompatible or defective. If so, see your dealer.
The system does not recognize the drive.
•Check all cables.
•Make sure the power supply is adequate for system needs.
•Reboot the computer and listen to make sure the drive motor starts up. If the drive is very quiet, it may be difficult to hear its discs reach operating speed. If the drive motor does not start up, recheck all drive cables.
•Verify that for each drive, a
•Try rebooting your computer by pressing the CTRL, ALT and DELETE keys simultaneously. If the drive is recognized after you reboot the system, the computer BIOS test may be completing before the drive is ready.
One solution is to slow the processor speed during startup. If your computer has a turbo switch, set it to slow speed before turning the computer on. If there is no turbo switch, you may be able to use keyboard commands; see your computer manual for details. After the computer is up and running, return the processor to the fast speed.
Another solution is to
•Check for I/O address conflicts. To isolate the conflict, verify that the drive and host adapter are compatible with your computer. Turn off the computer and remove all the peripheral adapter cards except for the video card and host adapter. If the computer recognizes the drive when you reboot the computer, turn off the computer. Reinstall the