Owner’s Manual
Snow Thrower
247.888520
9 Horse Power 26” Two-Stage Wheel Drive
TABLE OF CONTENTS
WARRANTY INFORMATION
PRODUCT SPECIFICATIONS
Content
SAFE OPERATION PRACTICES
SAFETY
TRAINING
PREPARATION
MAINTENANCE AND STORAGE
YOUR RESPONSIBILITY
HARDWARE PACK
ASSEMBLY
Attaching Handle Assembly
Removing From Carton
Loose Parts
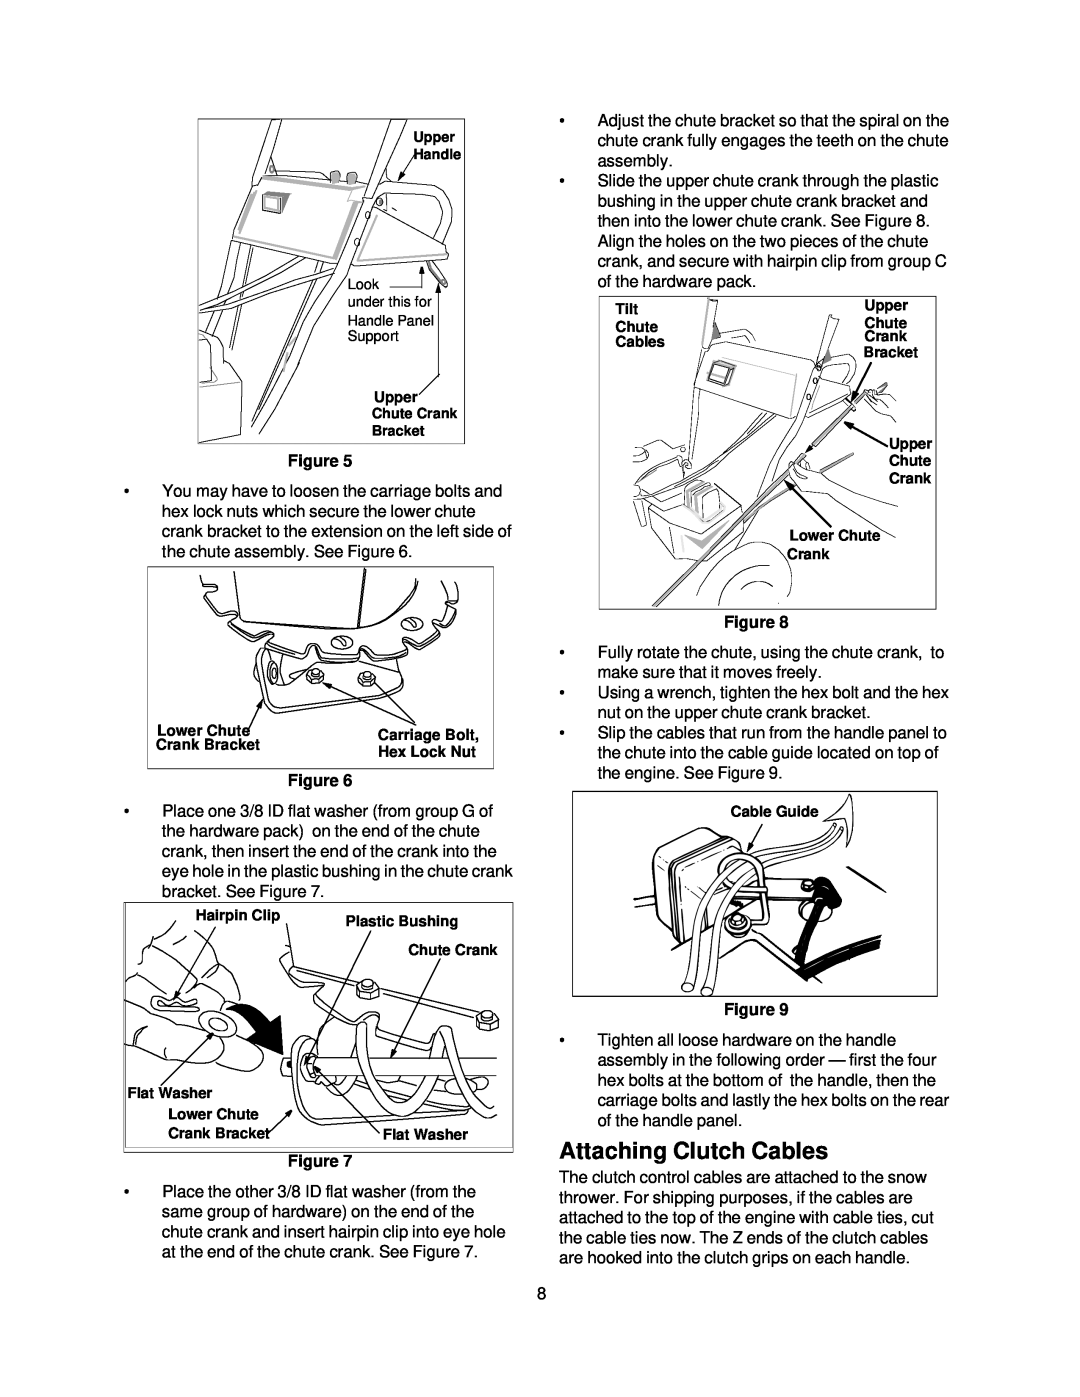
Attaching Chute Crank
ASSEMBLY
Attaching Chute
Attaching Clutch Cables
Lower Chute
Crank Bracket
Hex Lock Nut
Attaching Shift Rod
Attaching Turn Triggers
Lamp Wiring
Final Adjustments
Trigger Cable
Auger Control
Tire Pressure Pneumatic Tires
Skid Shoe Remove these hardware to adjust skid shoe
Skid Shoe
Knowing Your Snow Thrower
OPERATION
Meets ANSI Safety Standards
Safety Ignition Switch
Operating Controls
To Stop The Snow Thrower
Before Starting Engine
To Start Engine
Starting Instructions at a glance
A. Electric Starter
Push
Operating Snow Thrower
To Throw Snow
Warm Start
B. Recoil Starter
Operating Tips
Before Stopping
To avoid possible freeze-up of the starter, follow
Recoil Starter
MAINTENANCE
MAINTENANCE
General Recommendations
Customer Responsibilities
Engine Maintenance
Figure 19 Lubrication Chart
Viscosity Chart
Lubrication
Changing Oil
Spark Plug
SERVICE & ADJUSTMENTS
Adjustments
Chute Assembly
Traction Drive Clutch
Service
ADJUSTMENTS
Carburetor
Augers
PUSH
NOTE Use care to avoid pinching the control cable
NOTE Make sure that the auger cable is routed in front of the belt
Drive Belt
Changing Friction Wheel Rubber
Cover
Carburetor
Note If you placed plastic under the gas cap, be certain to remove it
OFF-SEASON STORAGE
Preparing Engine
Preparing Snow Thrower
STORAGE
TROUBLE-SHOOTING
Trouble
Possible Causes
Corrective Action
Spark Plug
ACCESSORIES
Belt Shave Plate
REPAIR PARTS
SEARS CRAFTSMAN 9.0 H.P. SNOW THROWER MODEL
PARTS LIST
Drive Clutch Cable routed below axle and hooked here
SEARS CRAFTSMAN 9.0 H.P. SNOW THROWER MODEL
NOTE For painted parts, please refer to the list of
Includes references 58 through
Hex B-Tapp Screw # 10-16 x
Handle Support Bracket L.H. 5/8
Handle Support Bracket R.H. 5/8
SEARS CRAFTSMAN 9.0 H.P. SNOW THROWER MODEL
SEARS CRAFTSMAN 9.0 H.P. SNOW THROWER MODEL
Page
Table continued on next page
Craftsman Engine Model No. 143.999005 for Craftsman
Snow Thrower Model
Recoil Starter
CARBURETOR
Page
Page
Page
domicilio, a entrega con piezas ordenar Para
domicilio, a reparación de servicio pedir Para
7084-659-800 1 semana la a días 7 pm, 7 a am 7 de Llame
5811-676-800 1 semana la a días 7 día, al horas 24 Llame
DE LOCALIZACION DE TABLA
Problema
correctora Accion
posible Causas
TEMPORAIENALMNADEC
Nieve de Expulsor del Preparación
motor del Preparación
usa si carburador el drene No .carburador al llegue
colocado
haberlo de gasolina, de tapa la de debajo colocado
34 Figura
33 Figura
apropiado
funcionamiento un para fricción de rueda la en goma
la simétricamente ensamblar importante Es NOTA
32 Figura
propulsora Correa
correa la de frente al encaminado esté
control
de cable el apretar evitar para precavido Sea NOTA
Service
25 Figura
23 Figura
24 Figura
AJUSTES & SERVICE
Ajustes
Canaleta La De Conjunto
21 Figura
Motor del Mantenimiento
20 Figura
comercial
solvente un con lavando y alambre de cepillo
MANTENIMIEN
Cambios De Mecanismo
cliente del Responsabilidades
Lubricacion
Ruedas La De Presion
Operacion De Consejos
Arranque de Abreviadas Instrucciones
operación su con familiarizarse
sin cambios de palanca la mueva NUNCA NOTA
Propulsor El Enganchar Para
Motor El Apagar Como
18 Figura
Motor Del Arranque
Aceite Y Gasolina De Llenado
eléctrico Arrancador
Nieve De Expulsor Del Detencion
OPERACION
Cambios De Palanca
Nieve De Expulsor Su Conozca
Gatillo Del Palanca
16 Figura
Deslizante Zapata la de Ajuste
Ajustes de sección la a refiérase detalles, más Para NOTA
desconectada está bujía la que asegurarse
transmisión la de cambios
Finales Ajustes
Lámpara la de Cableado
15 Figura
Cambios De Vara La De Fijacion
y velocidad sexta de posición la de fuera cambios
Giro De Gatillos Los De Fijacion
Embrague Del Cables Los De Fijacion
9 Figura
8 Figura
7 Figura
6 Figura
Canaleta La De Fijacion
Canaleta La De Manivela La De Fijacion
3 Figura
4 Figura
ENSAMBLADO
Mango Del Conjunto Del Fijacion
Requeridas Herramientas
Sueltas Piezas
FERRETERIA DE FERRETERIA DE CONJUNTO
NIEVE DE EXPULSOR DEL ACCESORIOS
Bujía
tiempos dos de Aceite
raspadora Barra gasolina de Recipiénte Correa
Sears nieve de expulsor su de segura operación
OPERACION DE SEGURAS PRACTICAS
OPERACION
PREPARACION
ENTRENAMIENTO
Producto Del Especificaciones
INFORMACIÓN DE GARANTIA
CONTENIDO DE TABLA
Propietario Del Manual
FUERZA DE CABALLOS NIEVE DE EXPULSOR
USA 60179 IL Estates, Hoffman ,.Co And Roebuck Sears
888520.247 Modelo De .No