Sears 36511, 36519 Excess slack in the chain could allow the range to, GAS Range Stability Device

Models: 36511 36519

1 39
Download 39 pages 38.71 Kb
Page 11
Image 11

KIT PART NO. (KIT 045) 344119

A WARNING:

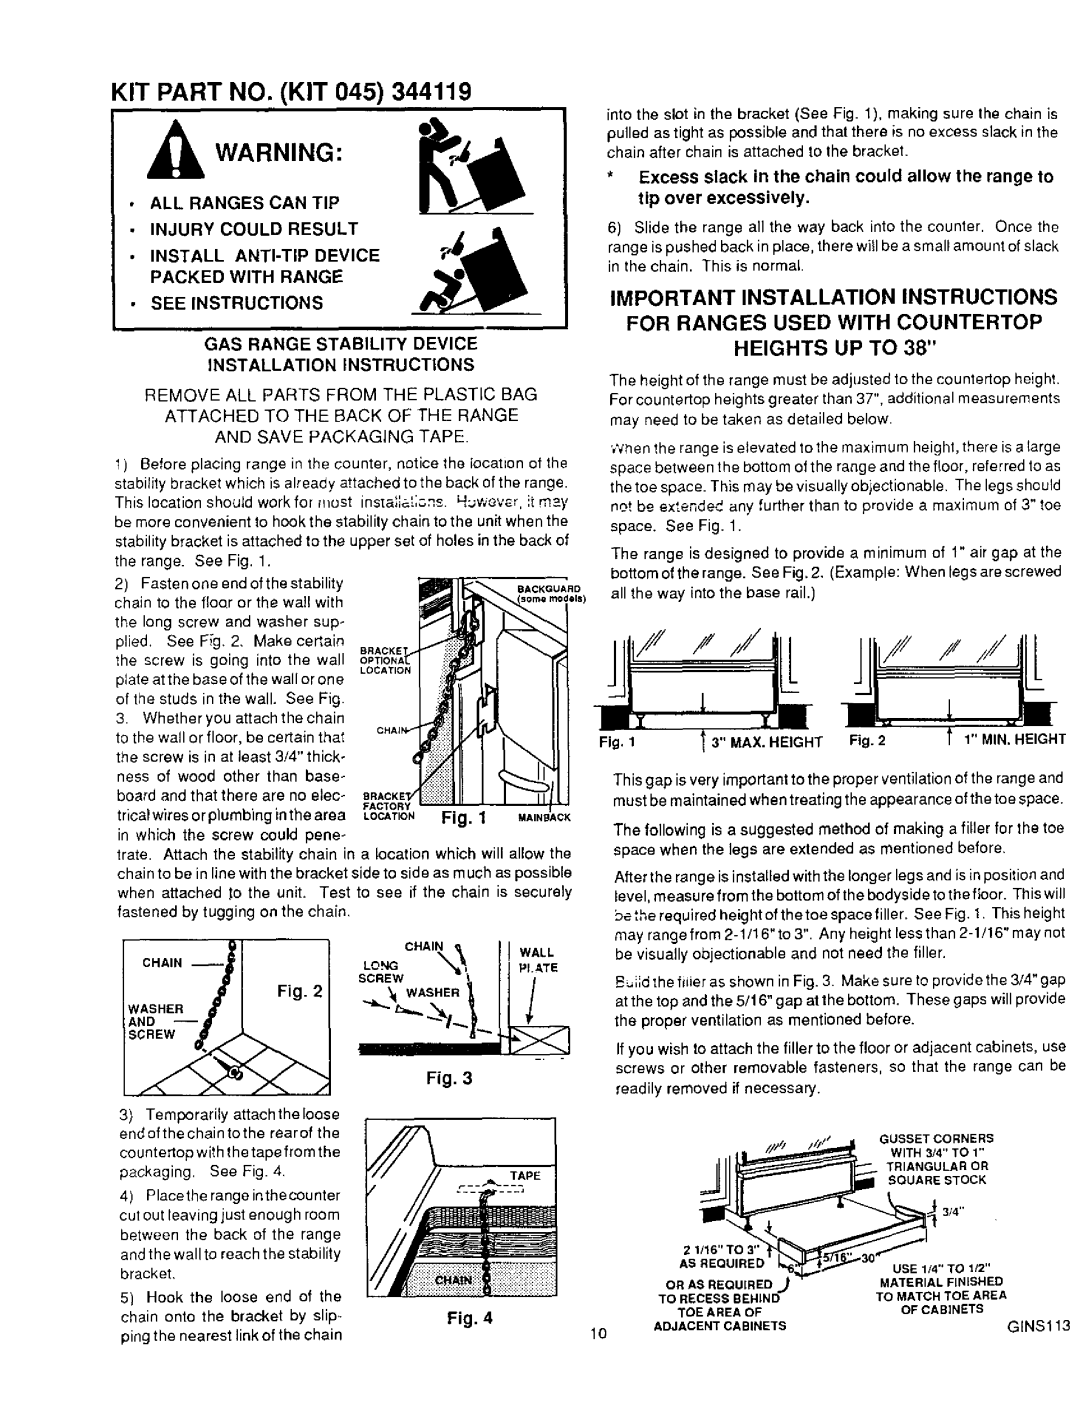
into the slot in the bracket (See Fig. 1), making sure the chain is pulled as tight as possible and that there is no excess slack in the chain after chain is attached to the bracket.

*Excess slack in the chain could allow the range to

ALL RANGES CAN TIP

INJURY COULD RESULT

INSTALL ANTI-TIP DEVICE PACKED WITH RANGE

tip over excessively.

6) Slide the range all the way back into the counter. Once the

range is pushed back in place, there will be a small amount of slack in the chain. This is normal.

SEE INSTRUCTIONS

IMPORTANT INSTALLATION INSTRUCTIONS FOR RANGES USED WITH COUNTERTOP

GAS RANGE STABILITY DEVICE

HEIGHTS UP TO 38"

INSTALLATION INSTRUCTIONS


REMOVE ALL PARTS FROM THE PLASTIC BAG ATTACHED TO THE BACK OF THE RANGE AND SAVE PACKAGING TAPE.

1)Before placing range in the counter, notice the Iocation of the stability bracket which is already attached to the back of the range. This location should work for r_ost instali_[;_,=s. H:_wew.r, it m_y be more convenient to hook the stability chain to the unit when the stability bracket is attached to the upper set of holes in the back of the range. See Fig. 1.

2)Fasten one end of the stability

chain to the floar or the wall with the long screw and washer sup- plied. See Ftg. 2. Make certain

the screw is going into the wall OPTIONA

LOCATION

The height of the range must be adjusted to the countertop height. For countertop heights greater than 37", additional measurements may need to be taken as detailed below.

WRen the range is etevated to the maximum height, there is a Iarge space between the bottom of the range and the floor, referred to as the toe space. This may be visually objectionable. The legs should not be extended any further than to provide a maximum of 3" toe space. See Fig. 1.

The range is designed to provide a minimum of 1" air gap at the bottom of the range. See Fig. 2. (Example: When legs are screwed all the way into the base rail.)

plate at the base of the wall or one of the studs in the wall. See Fig.

3.Whether you attach the chain

to the wall or floor, be certain that

CHAJ

Fig. 1

the screw is in at least 3/4" thick-

BRACKE_

ness of wood other than base-

board and that there are no elec- BRACK

FACTORY

tricalwiresorplumbinginthearea =.OCATION Fig. 1 MAINEIACK in which the screw could pene-

trate. Attach the stability chain in a location which will allow the chain to be in line with the bracket side to side as much as possible when attached _o the unit. Test to see if the chain is securely fastened by tugging on the chain,

CHAIN

Fig. 2

WASHER

AND

Fig. 3

This gap is very important to the proper ventilation of the range and must be maintained when treating the appearance of the toe space.

The following is a suggested method of making a filler for the toe space when the legs are extended as mentioned before.

After the range is installed with the longer legs and is in position and level, measu refrom the bottom of the bodyside to the floor. This will be the required height of the toe space filler. See Fig. 1, This height may range from 2-1/16" to 3". Any height less than 2-1/16" may not be visually objectionable and not need the filler.

B_.:,=,d',hefiiier as shown in Fig. 3. Make sure to provide the 3/4" gap at the top and the 5/16" gap at the bottom. These gaps will provide the proper ventilation as mentioned before.

If you wish to attach the filler to the floor Dr adjacent cabinets, use screws or other removable fasteners, so that the range can be

readily removed if necessary.

3) Temporarily attach the loose


end of the chain to the rear of the


GUSSETCORNERS


countertop with the tape from the


WITH _4"TO

1"

packaging,

See Fig. 4,


TRIANGULAR

OR


SQUARESTOCK


4) Placethe

range inthe counter


3/4"


cut out leaving just enough room


between the back of the range


and tile wall to reach the stability


AS REQUIRED

USE 1/4"

TO 1/2"

bracket.


OR AS REQUIRED

MATERIAL

FINtSHED


5) Hook the

loose end

of

the


TO MATCH

TOE AREA


TO RECESS

BEHIND

chain onto the bracket

by

slip-

Fig. 4


TOE A REA OF

OF CABINETS


GINS113

ping the nearest link of the chain

10

ADJACENT

CABINETS


Page 11
Image 11
Sears 36511 Excess slack in the chain could allow the range to, GAS Range Stability Device, Installation Instructions

36511, 36519 specifications

Sears 36519 and 36511 are notable appliances in the home and kitchen sector, highly regarded for their combination of efficiency, functionality, and stylish design. Both models cater to a distinct market segment, with a focus on enhancing the convenience of daily tasks while also providing energy efficiency and innovative technology.

The Sears 36519 model is primarily recognized for its cutting-edge features that streamline cooking and food preparation. With a large capacity and versatile cooking options, it allows users to explore various culinary techniques such as baking, roasting, and broiling with ease. One of the main highlights of the 36519 is its intuitive control panel, which offers easy navigation through different cooking modes and settings. This appliance also comes equipped with smart technology that can connect to home Wi-Fi networks, enabling users to access recipes, cooking tips, and even receive notifications on their smartphones.

On the other hand, the Sears 36511 model emphasizes energy efficiency and sustainability, making it an excellent choice for eco-conscious consumers. This appliance has received high energy ratings, showcasing its capability to consume less electricity without compromising performance. It features advanced insulation technology, which not only retains heat effectively but also minimizes environmental impact. Additionally, the 36511 includes a self-cleaning function, allowing for hassle-free maintenance and a focus on longevity and durability.

Both models also feature sleek and modern designs that fit seamlessly into various kitchen aesthetics. Their stainless steel finishes add a touch of elegance, and the ergonomic design ensures convenience during operation. The user-friendly interfaces further enhance the overall experience, allowing individuals of all culinary skill levels to maximize their kitchen productivity.

In terms of safety, both the 36519 and 36511 incorporate several key measures, including automatic shut-off functions and child lock features that provide peace of mind in busy family households. The combination of these characteristics makes both the Sears 36519 and 36511 exemplary choices for consumers seeking reliable and efficient appliances that deliver excellent performance while prioritizing sustainability and user-friendliness. Overall, these models reflect Sears' commitment to innovation and quality in household appliances.