ASSEMBLY

Read these instructions and Operator's Manual in its en- tirety before you attempt to assemble or operate your new high pressure washer. Your high pressure washer has, for

the most part, been assembled at the factory, except those parts left unassembled. Before you can operate your new high pressure washer, you must assemble the wheel kit and properly connect the high pressure hose.

IF YOU HAVE ANY PROBLEMS WITH THE ASSEMBLY

OF YOUR PRESSURE WASHER, PLEASE CALL THE PRESSURE WASHER HELPLINE AT 1-800-222-3136,

TOOLS REQUIRED FOR ASSEMBLY

Mallet

=2 adjustable wrenches OR the following wrenches:

• 5/t6" (Smm) combination wrench

=1/2" (13ram) combination wrench

=5/8" (16mm) combination wrench

,,I1/16" (18ram) combination wrench

=7/8" (22ram) combination wrench

=I5/16" (24ram) combination wrench

TO REMOVE PRESSURE WASHER FROM

CARTON

oRemove two boxes marked "PARTS INSIDE" and re- move the parts contained in both boxes.

,,Remove unit with one hand under pump and one hand under recoil starter.

Refer to Page 6, "Contents of Hardware Pack" for an illustrated listing of all the items included with your pressure washer. Become familiar with each piece before assem- bling the pressure washer. Check all contents against the illustrations on Page 6. If any parts are missing or dam- aged, call the Pressure Washer Helpline at 1-800_222- 3136.

HOW TO SET UP YOUR PRESSURE WASHER

TO INSTALL THE WHEEL KIT

Installing the wheel kit requires the tools listed, the guide handle and items included in the parts carton.

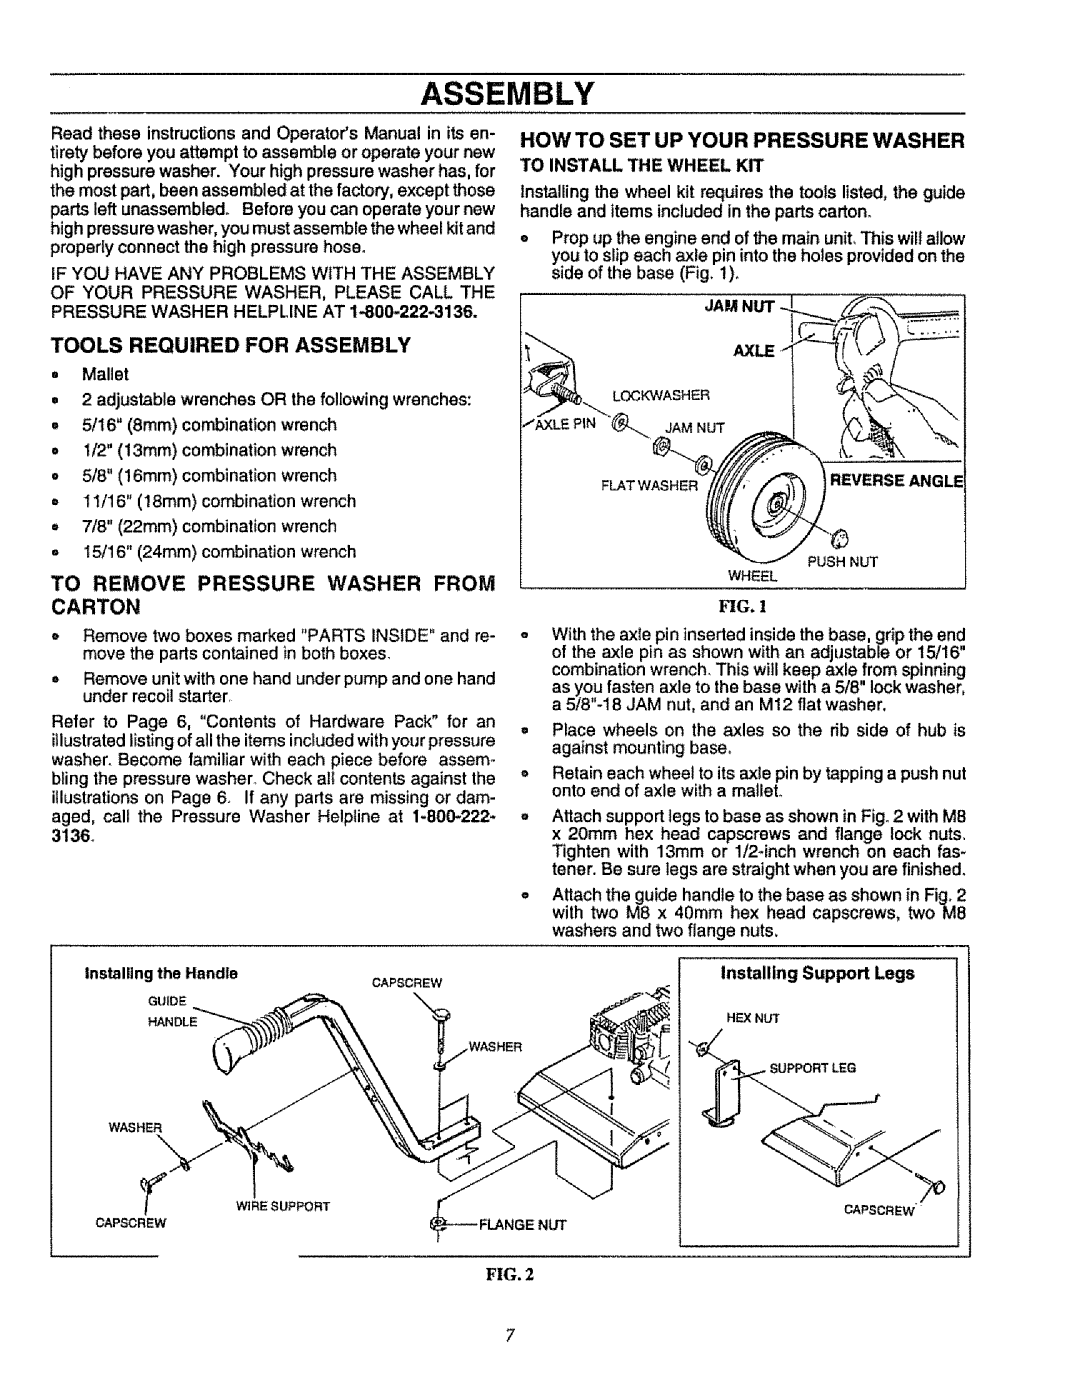
Prop up the engine end of the main unit, This wilt allow you to slip each axle pin into the holes provided on the side of the base (Fig. 1).

JAM NUT

AXLE

LOCKWASHER

JAM NUT

FLAT WASHER

REVERSE ANGLE


PUSH NUT


WHEEL

FIG. 1

oWith the axle pin inserted inside the base, grip the end of the axle pin as shown with an adjustable or 15/16 combination wrench. This will keep axle from spinning as you fasten axle to the base with a 5/8" lock washer, a 5/8"-18 JAM nut, and an M12 flat washer.

Place wheels on the axles so the rib side of hub is against mounting base.

oRetain each wheel to its axle pin by tapping a push nut onto end of axle with a malleL

oAttach support legs to base as shown in Fig. 2 with M8 x 20mm hex head capscrews and flange lock nuts. Tighten with 13mm or lt2-inch wrench on each fas- tener. Be sure legs are straight when you are finished.

Attach the guide handle to the base as shown in Fig. 2 with two M8 x 40mm hex head capscrews, two M8 washers and two flange nuts_

Installing the Handle

GUIDE

CAPSCREW

Installing Support Legs

HANDLE

HE.XNUT


WASHER

WASHER

\

WiRE SUPPORT

CAPSCREW


CAPSCREW

FIG. 2

Page 7
Image 7
Sears 580.75151 manual Tools Required for Assembly, To Remove Pressure Washer from

580.75151 specifications

The Sears 580.75151 is a vintage sewing machine that has captured the interest of hobbyists and collectors alike. This model reflects the qualities that made Sears a household name, merging functionality with a robust design.

One of the standout features of the Sears 580.75151 is its solid construction which contributes to the machine's durability. This model is built with a heavy-duty metal frame, ensuring stability while sewing, which is a critical factor for achieving even and professional-looking stitches. The weight and build quality make it less susceptible to vibrations, providing a smoother sewing experience.

The machine offers a variety of stitch options, making it versatile for different sewing projects. Users benefit from several straight and zigzag stitch settings, allowing them to customize their sewing tasks easily. The adjustable stitch length is another feature that enhances creativity, enabling users to create fine or bold patterns as desired. Additionally, it includes a reverse stitch function, which is essential for securely finishing seams.

One of the technological highlights of the Sears 580.75151 is its reliable drop-in bobbin system. This feature simplifies the process of threading and reloading the bobbin, minimizing downtime during sewing projects. The clear view cover over the bobbin area allows users to monitor the thread supply without interrupting their workflow.

In terms of ease of use, the machine is designed with an adjustable presser foot pressure, which provides better control over various fabric types. This adaptability is particularly beneficial for those who work with both lightweight and heavy materials. The machine also includes a built-in needle threader, which helps decrease the frustration of threading the needle, a common challenge for sewists.

The Sears 580.75151 is also known for its low maintenance requirements, with users appreciating the straightforward cleaning process. Its accessibility makes it an excellent option for both beginners and experienced sewists looking for a reliable machine that doesn’t require constant upkeep.

Overall, the Sears 580.75151 stands out as a solid sewing machine that combines vintage charm with practical features. Its variety of stitch options, durable construction, and user-friendly technologies make it a favorite among those who value quality and dependability in their sewing tools.