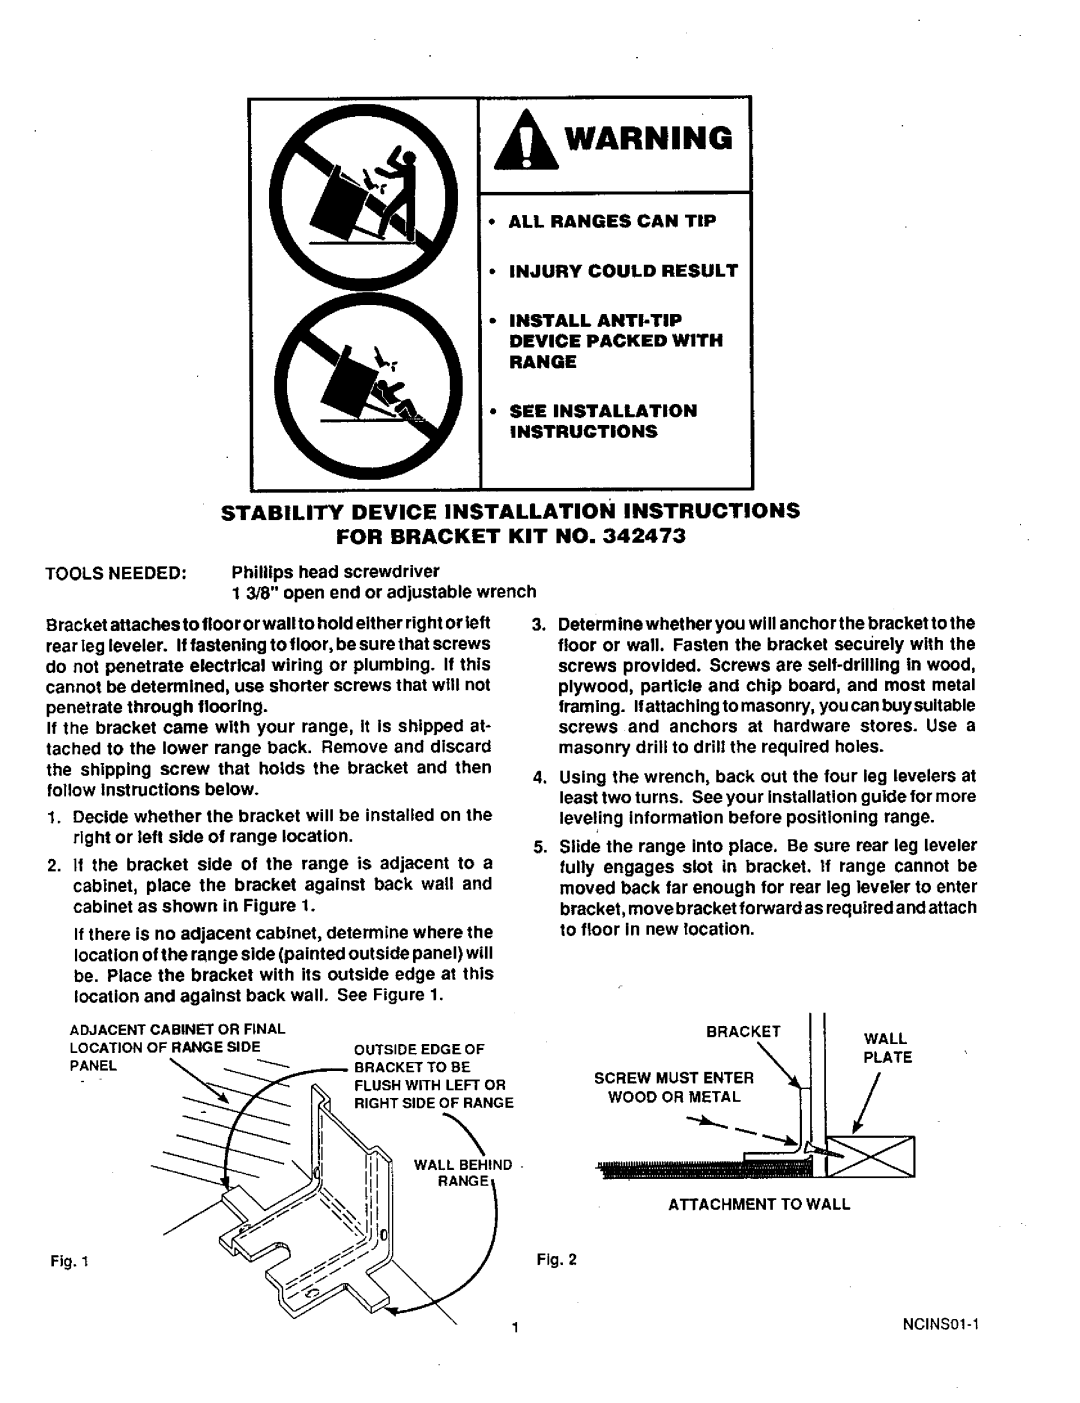
ALL RANGES CAN TIP

INJURY COULD RESULT

INSTALL ANTI-TIP DEVICE PACKED WITH RANGE

SEE INSTALLATION INSTRUCTIONS


STABILITY

DEVICE

INSTALLATION

INSTRUCTIONS


FOR BRACKET

KIT NO. 342473


TOOLS NEEDED:


Phillips head screwdriver


1 3/8" open end or adjustable wrench


Bracket attachesto

floor or wallto

hold either right or left

3.

Determine whet her you will anchor t he bracket to the

rear leg leveler. If fastening

to floor, be sure that screws


floor or wall. Fasten the bracket securely

with the

do not penetrate

electrical

wiring or plumbing. If this


screws

provided.

Screws are self-drilling

In wood,

cannot be determined,

use shorter screws that will not


plywood, particle

and chip

board,

and most metal

penetrate through

flooring.


framing. Ifattachlngtomasonry,

youcanbuysultable

If the bracket came with your range, It is shipped at-


screws

and anchors at hardware

stores. Use a

tached to the lower range back.

Remove and discard


masonry drill to drill the required holes.


the shipping screw that holds the bracket and then

4.

Using the wrench,

back out the four leg levelers at

follow Instructions

below.


least two turns. See your installation guide for more

1. Decide whether the bracket will be installed on the


leveling information before

positioning range.

right or left side of range location.


5,

Slide the range into place.

Be sure rear leg leveler

2. If the bracket side of the range is adjacent to a


fully engages slot in bracket.

If range cannot be

cabinet,

place

the

bracket

against back

wall and


moved

back far enough for rear leg leveler to enter

cabinet as shown

in Figure

1.


bracket, move bracket forward as required and attach

If there is no adjacent cabinet, determine where the


to floor in new location.


location of the range side (painted outside panel) will


be. Place the bracket with its outside edge at this


location and against back wall. See Figure 1.


ADJACENT

CABINET OR FINAL


BRACKET


WALL

LOCATION

OF RANGE

SIDE


OUTSIDE

EDGE OF


PLATE

PANEL


BRACKET

TO BE


SCREWMUST ENTER_


/


FLUSH WITH LEFT OR


WOOD OR METAL


RIGHT SIDE OF RANGE


\


/


WALL BEHIND

RANGE

"_=_". ""r_._ _

ATTACHMENT TO WALL

Fig, 1

Fig. 2

1

NCINS01-1

Page 2
Image 2
Sears 71381 warranty Tools Needed, Bracket Wall, Plate, Screwmust Enter, Wood or Metal

71381 specifications

Sears 71381 is a remarkable product that has captured the attention of consumers and technology enthusiasts alike. As part of Sears’ extensive catalog, this model stands out due to its innovative features, efficient performance, and user-friendly design.

At its core, the Sears 71381 is designed with a focus on versatility and convenience. It incorporates a powerful motor that ensures efficient operation, making it suitable for a variety of tasks. Whether you’re looking to tackle household chores or engage in more complex projects, this model can easily adapt to your needs. Its robust construction means that it is built to last, ensuring that consumers can rely on it for years to come.

One of the key features of the Sears 71381 is its advanced technology integration. Equipped with smart capabilities, it can enhance user experience, allowing for seamless operation. For instance, it may include options for automation or connectivity, making it possible to control the device remotely or through a dedicated application. This level of integration significantly elevates its functionality, appealing to tech-savvy users.

Another notable characteristic of the Sears 71381 is its ergonomic design. The model has been carefully crafted to ensure ease of use, featuring comfortable handles and intuitive controls. This attention to design detail means that even users who may be less experienced can operate the device with confidence. Furthermore, the compact size and lightweight nature make it easy to move around and store when not in use.

In terms of performance, the Sears 71381 does not disappoint. It delivers consistent results, ensuring that tasks are completed efficiently. The product is also designed with energy efficiency in mind, which can contribute to lower utility bills while remaining environmentally friendly.

Overall, the Sears 71381 is a standout model that combines power, technology, and thoughtful design. Its advanced features and ease of use make it a top choice for consumers looking to enhance their productivity in various tasks. Whether you are a seasoned professional or a casual user, the Sears 71381 is sure to meet and exceed your expectations, proving that it is a valuable addition to any home or workspace.