BROILING

Broiling Is cooking by direct heat from the broil burner. Tender cuts of meat or marinated meat should be selected for broiling. For best results steaks and chops should be at least 3/4" thick.

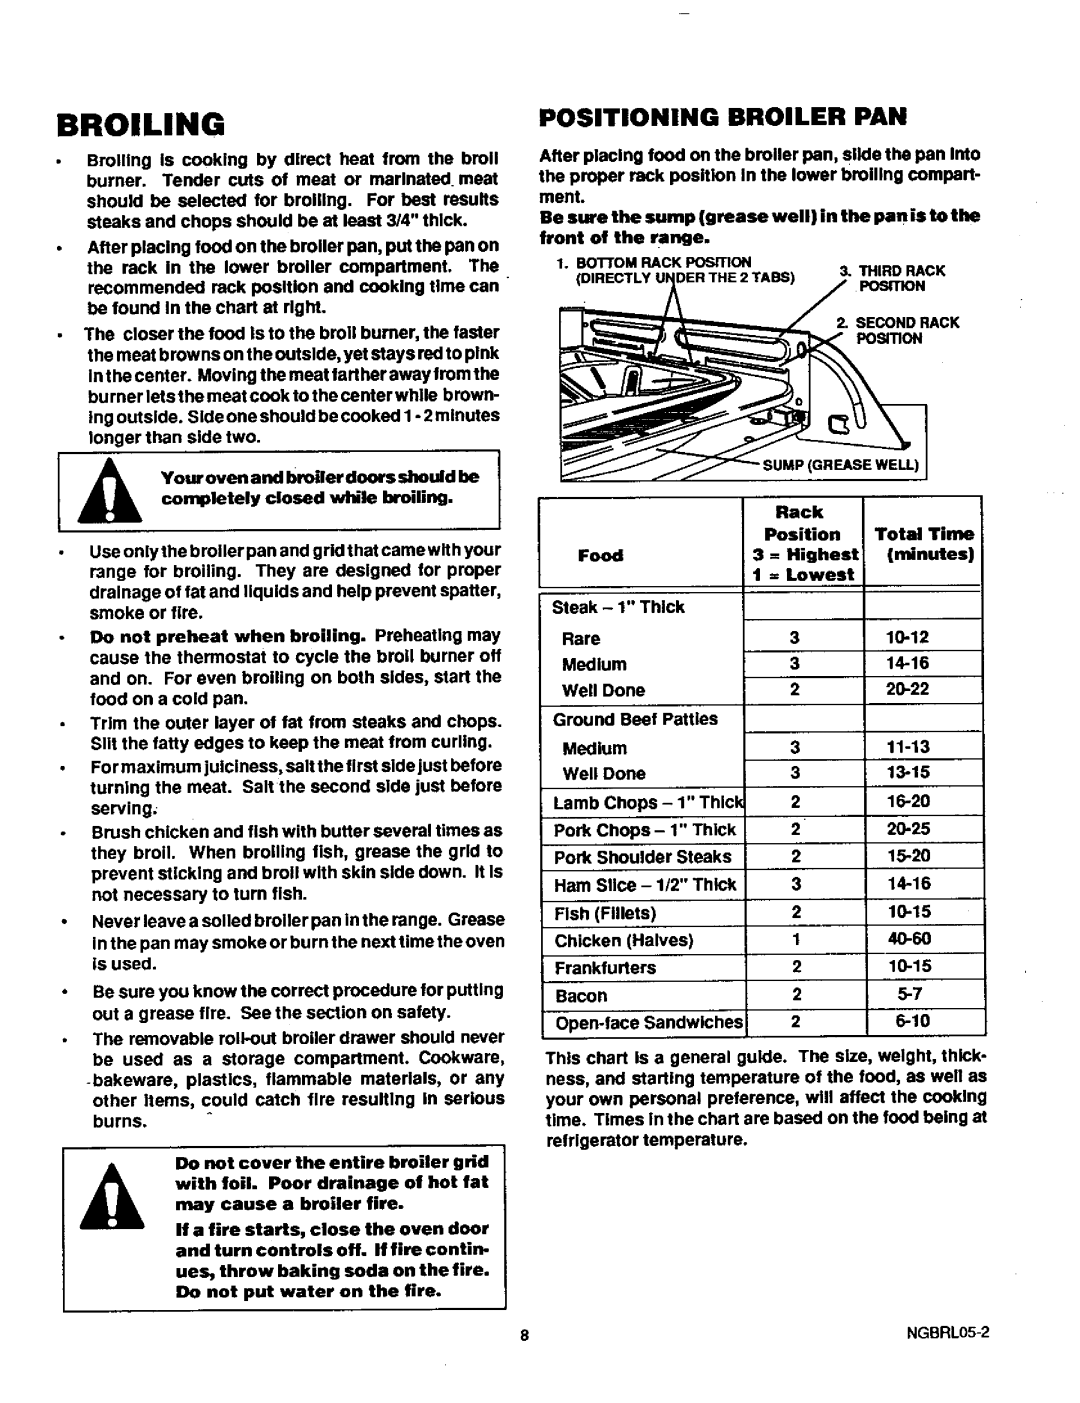
After piecing food on the broiler pan, put the pan on the rack In the lower broiler compartment. The recommended rack position and cooking time can be found In the chart at dght.

The closer the food Is to the broil burner, the faster the meat browns on the outside, yet stays red to pink Inthecenter. Moving the meat fart her away from the burner lets the meat cook to the center white brown- Ing outside. Side one should be cooked I - 2 minutes longer than side two.

]

completely closed while broiling.

I

Your ovenand broiler doors should be !

Use only the broiler pan and grid that came with your range for broiling. They are designed for proper

drainage of fat and liquids and help prevent spatter, smoke or fire.

Do not preheat when broiling. Preheating may cause the thermostat to cycle the broil burner off and on. For even broiling on both sides, start the food on a cold pan.

Trim the outer layer of fat from steaks and chops. Slit the fatty edges to keep the meat from curling.

For maximum juiciness, salt the first side just before turning the meat. Salt the second side just before serving;

Brush chicken and fish with butter several times as they broil. When broiling fish, grease the grid to prevent sticking and broil with skin side down. It Is not necessary to turn fish.

Never leave a soiled broiler pan In the range. Grease

in t he pan may smoke or burn t he next time the oven is used.

Be sure you know the correct procedure for putting out a grease fire. See the section on safety.

The removable roll-out broiler drawer should never be used as a storage compartment. Cookware, -bakeware,plastics, flammable materials, or any other Items, could catch fire resulting in serious

burns.

Do not cover the entire broiler grid with foil. Poor drainage of hot fat may cause a broiler fire.

if a fire starts, close the oven door and turn controls off. If fire contin- ues, throw baking soda on the fire. Do not put water on the fire.

POSITIONING BROILER PAN

After placing food on the broiler pan, slide the pan Into the proper rack position In the lower broiling compart-

ment.

Be sure the sump (grease wel I) in the pan is to the

front

of the

range.


1.

BOTTOM

RACK PORTION

3. THIRD RACK


PO_qlON


2. SECOND RACK


POSmON

(GREASE WELL)


Rack


PosiUon

Total Time

Food

3 = Highest

(minutes)


1 = Lowest


Steak - 1" Thick


Rare

3

10-12

Medium

3

14-16

Well Done

2

20-22

Ground Beef Patties


Medium

3

11-13

Well Done

3

13-15

Lamb Chops - 1" Thlcb

2

16-20

Pork Chops - 1" Thick

2

20.25


Pork Shoulder Steaks

2

15-20

Ham Slice - 1/2" Thick

3

14-16

Fish (Fillets)

2

10.15

Chicken (Halves)

1

40-60

Frankfurters

2

10.15

Bacon

2

5-7

Open-face Sandwiches

2

6-10


This chart is a general guide. The size, weight, thick- ness, and starting temperature of the food, as well as your own personal preference, witl affect the cooking time. Times in the chart are based on the food being at refrigerator temperature.

8

NGBRL05-2

Page 9
Image 9
Sears 71381 warranty Broiling

71381 specifications

Sears 71381 is a remarkable product that has captured the attention of consumers and technology enthusiasts alike. As part of Sears’ extensive catalog, this model stands out due to its innovative features, efficient performance, and user-friendly design.

At its core, the Sears 71381 is designed with a focus on versatility and convenience. It incorporates a powerful motor that ensures efficient operation, making it suitable for a variety of tasks. Whether you’re looking to tackle household chores or engage in more complex projects, this model can easily adapt to your needs. Its robust construction means that it is built to last, ensuring that consumers can rely on it for years to come.

One of the key features of the Sears 71381 is its advanced technology integration. Equipped with smart capabilities, it can enhance user experience, allowing for seamless operation. For instance, it may include options for automation or connectivity, making it possible to control the device remotely or through a dedicated application. This level of integration significantly elevates its functionality, appealing to tech-savvy users.

Another notable characteristic of the Sears 71381 is its ergonomic design. The model has been carefully crafted to ensure ease of use, featuring comfortable handles and intuitive controls. This attention to design detail means that even users who may be less experienced can operate the device with confidence. Furthermore, the compact size and lightweight nature make it easy to move around and store when not in use.

In terms of performance, the Sears 71381 does not disappoint. It delivers consistent results, ensuring that tasks are completed efficiently. The product is also designed with energy efficiency in mind, which can contribute to lower utility bills while remaining environmentally friendly.

Overall, the Sears 71381 is a standout model that combines power, technology, and thoughtful design. Its advanced features and ease of use make it a top choice for consumers looking to enhance their productivity in various tasks. Whether you are a seasoned professional or a casual user, the Sears 71381 is sure to meet and exceed your expectations, proving that it is a valuable addition to any home or workspace.