CE AND ADJUSTMENTS

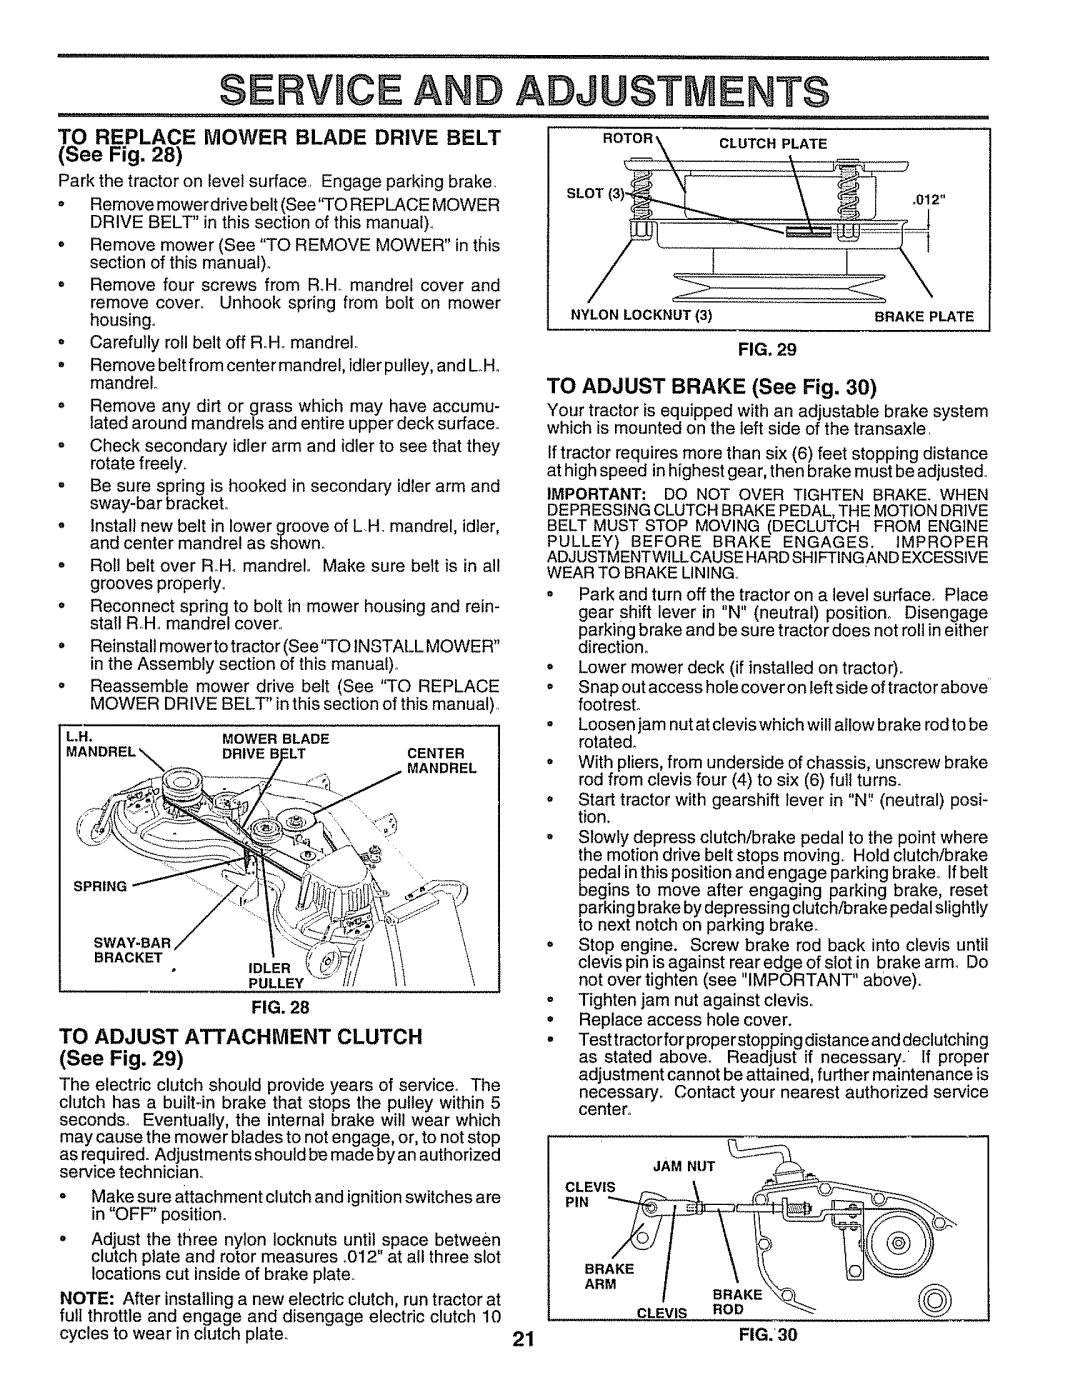
TO REPLACE MOWER BLADE DRIVE BELT

(See Fig. 28)

Park the tractor on level surface_ Engage parking brake.

oRemove mower drive belt (See'q'OREPLACE MOWER DRIVE BELT" in this section of this manual).

. Remove mower (See "TO REMOVE MOWER" in this section of this manual).

. Remove four screws from Roll. mandrel cover and

remove cover° Unhook spring from bolt on mower housing°

°Carefully roll belt off R.H. mandrel,.

°Remove belt from center mandrel, idler pulley, and L.Ho mandrel

NYLON LOCKNUT (3)

BRAKE PLATE

FIG, 29

TO ADJUST BRAKE (See Fig. 30)

°

Remove

any dirt or grass which may have accumu-

Your

tractor is equipped

with an

adjustable

brake system


lated around mandrels and entire upper deck surface°

which

is mounted

on the left side of the transaxle,


°

Check

secondary

idler

arm and idler to see that they

Iftractor requires more than six (6) feet stopping distance


rotate

freely,,


at high speed in highest gear, then brake must be adjusted,

-

Be sure

spring is hooked in secondary idler arm

and

IMPORTANT: DO NOT OVER TIGHTEN BRAKE. WHEN


sway-bar

bracket°


DEPRESSING CLUTCH BRAKE PEDAL, THE MOTION DRIVE

°

Install new belt in lower

groove

of L.H. mandrel,

idler,

BELT MUST STOP

MOVING (DECLUTCH

FROM ENGINE


and center

mandrel as shown.


PULLEY)

BEFORE

BRAKE

ENGAGES.

iMPROPER

°

Roll belt

over RoHomandrel.

Make sure belt is in all

ADJUSTMENTWILLCAUSE HARDSHIFTINGAND EXCESSIVE

WEAR TO BRAKE LINING,,


grooves

properly°


o

Park and turn off the tractor


on a level

surface.

Place

Reconnect

spring

to bolt in

mower

housing and

rein-


gear shift lever in "N" (neutral) position° Disengage


stall RoHomandrel coven


parking brake and be sure tractor does not roll in either


°

Reinstall

mower to tractor (See"TO

INSTALL MOWER"


direction°


in the Assembly section

of this

manual).


°

Lower

mower deck

(if installed on tractor),,


o

Reassemble

mower drive belt

(See

"TO REPLACE

°

Snap out access hole cover on left side of tractor

above"


MOWER

DRIVE

BELT"

in this section

of this manual),,


footrest..


L,H,


MOWER

BLADE


Loosen jam nut at clevis which will allow brake

rod to be


CENTER


rotated.


DRIVE

_LT


With pliers, from underside

of chassis,

unscrew

brake


MANDREL


rod from

clevis

four (4) to six (6)

full turns.


o

Start tractor

with gearshift

lever

in "N';(neutral)

posi-


tion.


°

Slowly

depress

clutch/brake

pedal to the point where


the motion drive belt stops moving,, Hold clutch/brake

SPRING


pedal inthis position and engage parking brake., If belt


begins to move after engaging

parking brake,

reset


parking brake by depressing clutch/brake pedal slightly


to next notch on parking brake.


SWAY-BAR,/


.

Stop engine.

Screw brake

rod

back

into clevis until


BRACKET


clevis pin is against rear edge of slot in brake arm_ Do


PULLEY


not over tighten

(see "IMPORTANT" aboVe),,


FIG. 28


°

Tighten jam nut against clevis,,


TO ADJUST

ATTACHMENT


CLUTCH


°

Replace

access

hole cover.


°

Test tractor for properstopping

distance

and declutching

(See Fig. 29)


as stated

above.

Readjust

if necessary.

If proper

The electric clutch should provide years of service_ The


adjustment cannot be attained, further maintenance is


necessary. Contact your nearest authorized service

clutch has

a

built_in brake that stops the pulley within 5


center°


seconds,, Eventually, the internal brake will wear which


may cause the mower blades to not engage, or, to not stop


as required. Adjustments should be made by an authorized


'


JAM NUT

__


service technician,,


oMake sure attachment clutch and ignitionswitches are in "OFF" position.

° Adjust the three nylon Iocknuts until space

between


clutch plate and rotor measures ,,012"at all three slot


locations cut inside of brake plate.,

BRAKE

!

\

\k\

IOI

NOTE: After installing a new electric clutch, run tractor at

CLEVIS

ROD

"_


full throttle and engage and disengage electric clutch 10


FIG.30


cycles to wear in clutch plate.

21


Page 21
Image 21
Sears 917.25597 owner manual To Replace Mower Blade Drive Belt, To Adjust Brake See Fig, To Adjust Attachment, Clutch

917.25597 specifications

The Sears 917.25597 is a versatile and efficient lawn mower model that stands out for its reliability and ease of use. Designed for homeowners looking for a robust solution to maintain their lawns, it incorporates a range of features that enhance its performance and user experience.

One of the key features of the Sears 917.25597 is its powerful engine. Equipped with a reliable gas-powered engine, this mower provides ample power to tackle various types of grass and terrain. The engine's design ensures smooth operation, leading to a longer lifespan and less maintenance compared to smaller, less durable engines. This robust power source translates into efficient cutting, allowing users to complete their lawn-mowing chores quickly and effectively.

The cutting deck of the Sears 917.25597 is another standout feature. With a wide cutting width, typically around 21 inches, it allows for broader mowing paths, reducing the time and effort you need to spend on your lawn. The deck is made from high-quality materials designed for durability. Additionally, the mower usually features adjustable cutting height settings, allowing users to customize grass length easily according to their preferences or seasonal needs.

Another technological advancement in the Sears 917.25597 is its self-propulsion system. This feature enables the mower to move forward with minimal effort from the user, making it ideal for larger properties. The self-propelled mechanism adjusts according to your walking speed, providing a comfortable mowing experience without requiring significant physical exertion.

User-friendly design is evident throughout the mower’s structure. The handle is adjustable, ensuring comfort for users of varying heights. The easy-start ignition system takes the hassle out of traditional pull-starts, allowing for a quick and reliable startup every time.

The Sears 917.25597 also considers storage and maintenance. Many models come with a foldable handle for easy storage in garages or sheds. Additionally, its components are designed for straightforward access, making routine maintenance tasks such as oil changes and air filter replacements uncomplicated.

In summary, the Sears 917.25597 is a well-rounded lawn mower that delivers reliable power, efficient cutting capabilities, and user-friendly features. Its blend of durability and performance makes it a suitable choice for homeowners looking to maintain an attractive lawn with minimal hassle.