ENFORCER RACKMOUNT POWER SUPPLY

B. Wiring

1. Unplug terminal blocks from their sockets for easy installation.

2.Connect equipment power input cables to the screw terminals side by side in N/P pairs.

3.Screw the terminals closed. Once done, reinsert the terminal block back into its slot.

4. Select channel voltage for each terminal block with the switches on the back of the unit.

5.For each group of channels, select either 24VAC or 28VAC. Switch unused channels to OFF. Tech Tip: Group cameras with similar power-cable lengths on the same terminal block and set the 24/28 VAC switch to compensate for voltage drops. Test voltage after changing settings.

Caution: Do not set 28VAC unless voltage drops under 21.5VAC to avoid camera damage, etc.

6. Connect the unit’s power cord to a 120V outlet and switch on the unit.

7.Front-panel LEDs for channels set to 24 or 28 VAC should glow blue to show output is on.

8.Test the output at the camera end of each power cable to be sure voltage is correct.

Caution: Always test output voltage before connecting cameras or other equipment.

9.For cable management, see page 6. For example applications, see page 7.

C. Replacing the Main Fuse

Caution: Replace only with same fuse type and rating.

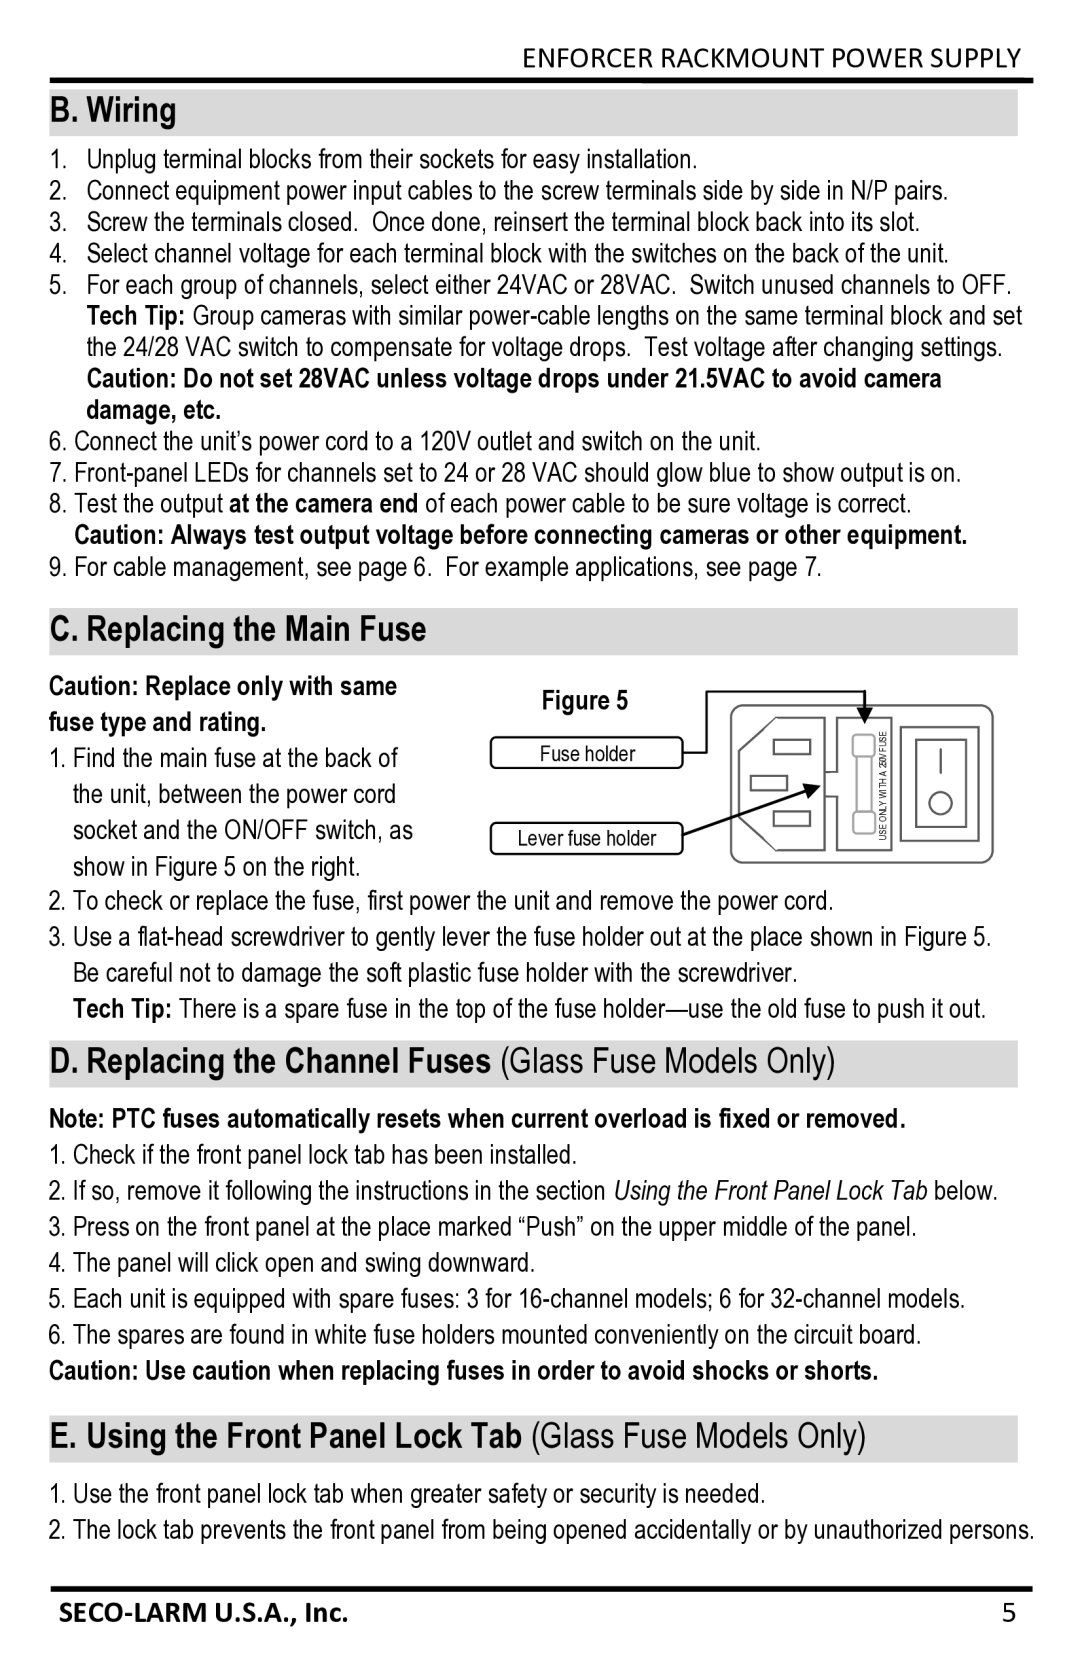
1.Find the main fuse at the back of the unit, between the power cord socket and the ON/OFF switch, as show in Figure 5 on the right.

Figure 5

Fuse holder

Lever fuse holder

USE ONLY WITH A 250V FUSE

2. To check or replace the fuse, first power the unit and remove the power cord.

3. Use a flat-head screwdriver to gently lever the fuse holder out at the place shown in Figure 5. Be careful not to damage the soft plastic fuse holder with the screwdriver.

Tech Tip: There is a spare fuse in the top of the fuse holder—use the old fuse to push it out.

D. Replacing the Channel Fuses (Glass Fuse Models Only)

Note: PTC fuses automatically resets when current overload is fixed or removed.

1. Check if the front panel lock tab has been installed.

2. If so, remove it following the instructions in the section Using the Front Panel Lock Tab below.

3.Press on the front panel at the place marked “Push” on the upper middle of the panel.

4.The panel will click open and swing downward.

5.Each unit is equipped with spare fuses: 3 for 16-channel models; 6 for 32-channel models.

6.The spares are found in white fuse holders mounted conveniently on the circuit board.

Caution: Use caution when replacing fuses in order to avoid shocks or shorts.

E. Using the Front Panel Lock Tab (Glass Fuse Models Only)

1.Use the front panel lock tab when greater safety or security is needed.

2.The lock tab prevents the front panel from being opened accidentally or by unauthorized persons.

SECO-LARM U.S.A., Inc.

5

Page 5
Image 5
SECO-LARM USA PH-A1612-PUQ manual Wiring, Replacing the Main Fuse, Replacing the Channel Fuses Glass Fuse Models Only

PH-A3224-PUQ, PH-A1612-PUQ, PH-A3224-GUQ, PH-A1612-GUQ specifications

SECO-LARM USA has established itself as a formidable player in the security industry, and among its impressive lineup of products are the PH-A1612-GUQ, PH-A3224-GUQ, PH-A1612-PUQ, and PH-A3224-PUQ access control devices. These models are specifically designed to enhance security while offering convenience and flexibility, making them ideal for both residential and commercial applications.

One of the standout features of these models is their robust access control capabilities. The PH-A1612 and PH-A3224 series integrate cutting-edge technology to manage and monitor entry points effectively. These devices support both card and key fob access, utilizing RFID technology to ensure seamless entry. This enhances security by eliminating the need for traditional keys, which can be easily lost or duplicated.

The PH-A1612-GUQ and PH-A3224-GUQ models operate on 12V DC and 24V DC respectively, catering to various installation needs. Their versatility in power supply makes them suitable for a wide range of environments. Both models are equipped with an emergency release feature, ensuring safety during emergencies while maintaining security during regular operations.

With regards to connectivity, these models come ready with built-in relay outputs which allow integration with various alarm systems. They are designed for straightforward connectivity with access control panels, enabling operators to monitor and manage their security systems more effectively. The intuitive design simplifies installation, and they come with comprehensive manuals to aid users.

Moreover, the weather-resistant housing of the PH-A1612 and PH-A3224 series ensures that they can withstand diverse environmental conditions, making them suitable for outdoor installations as well. This durability extends their lifespan and reliability, even in harsh weather.

The PH-A1612-PUQ and PH-A3224-PUQ variants introduce an additional layer of technology with their advanced user interface. Featuring LED indicators and a user-friendly keypad, these models allow for easy programming and monitoring of access levels. Users can efficiently manage access permissions, making it simple to grant or revoke access on the fly.

In summary, SECO-LARM USA's PH-A1612-GUQ, PH-A3224-GUQ, PH-A1612-PUQ, and PH-A3224-PUQ models offer a perfect blend of security, convenience, and advanced technology. Whether you are looking to enhance security at home or secure a commercial establishment, these devices provide reliable and flexible solutions tailored to meet modern security needs.