BD-HP70U
Page
English
Contents
Settings pp
Contents
What to do first
Introduction pp
Dear Sharp Customer
Additional Safety Information
Introduction
Precautions when cleaning this product
What would you like to do with this Player?
Blu-ray Disc
About Media Types
Types of Discs that Can Be Used with This Player
Discs that Cannot Be Used with This Player
About the MP3 file format
About Media Types
About the Jpeg file format
About Disc Contents
Important Information
Disc Precautions
Copyright
Energy Star Program Information
Adjust settings to suit your preference
Playing back video/picture/music content
Getting Started
Unpacking
Major Components
When you insert or remove a USB memory
Main Unit Front
10 11 12
Major Components
Remote Control Unit
Keylock function
Buttons under the cover
Video terminals/jacks on this Player
Introduction to Connections
Analog audio connection
Broadband Internet connection
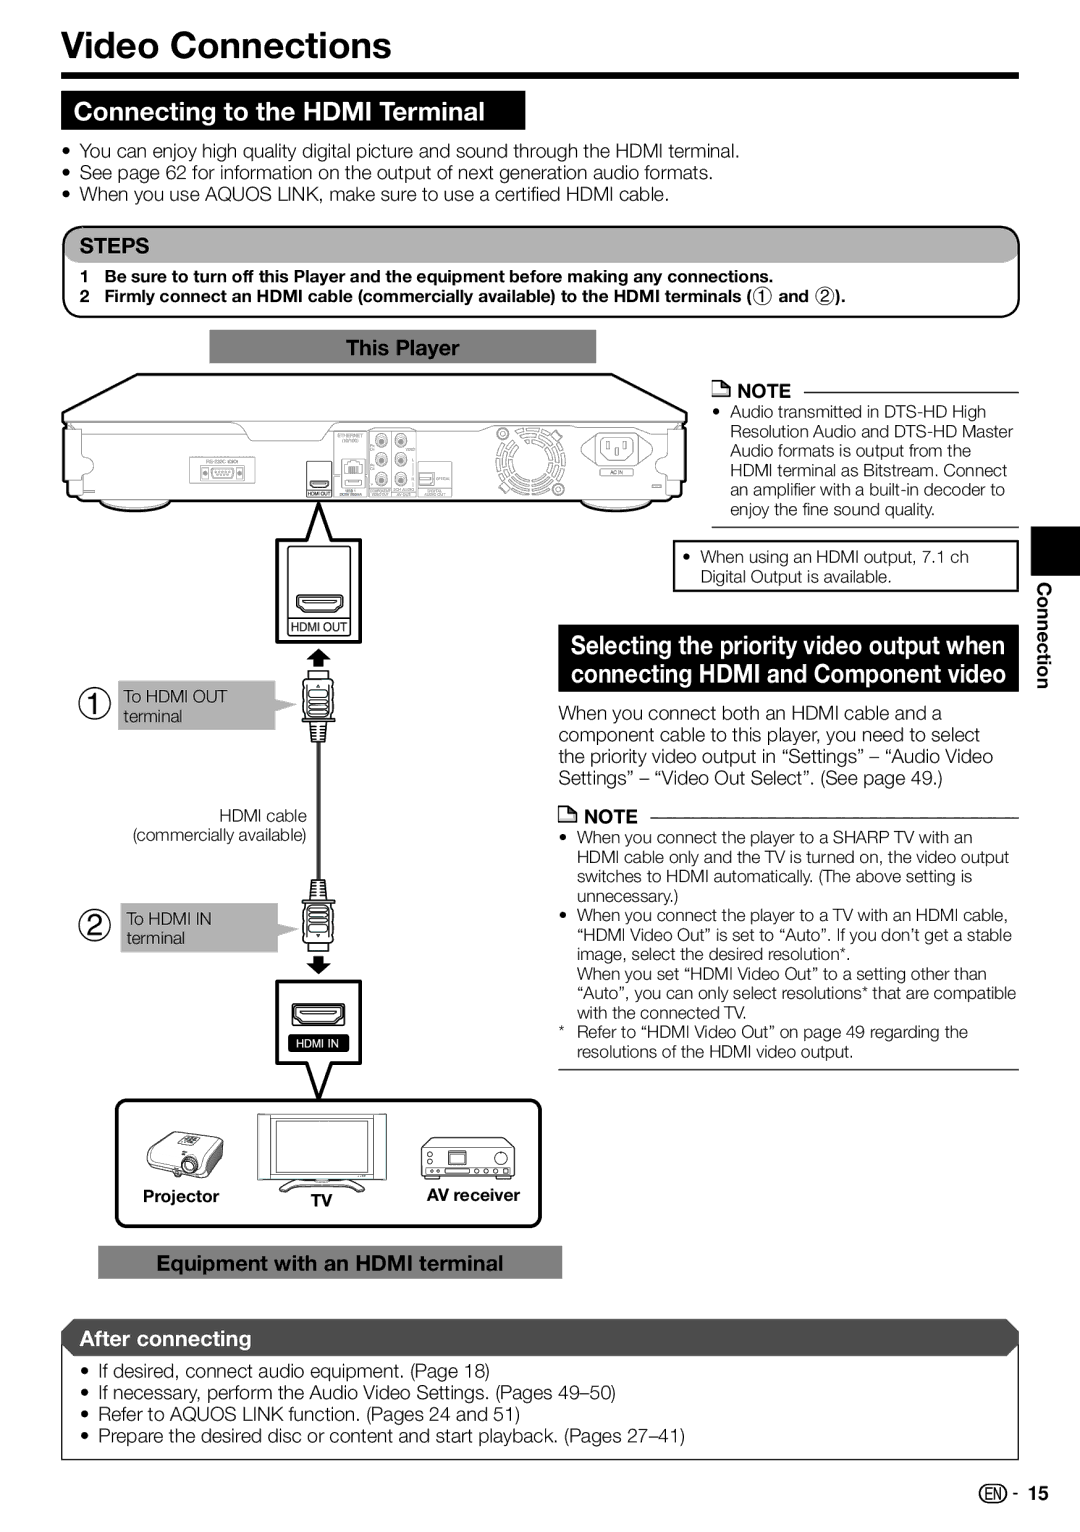
Video Connections
Connecting to the Hdmi Terminal
This Player
Equipment with an Hdmi terminal
Video Connections
Connecting to the Component Jacks
Video equipment with component jacks
AV receiver
Video equipment with a video jack
Connecting to the Video Jack
You can enjoy the images through the video jack
Yellow
To Optical Input terminal White Red
Connecting to the Digital Audio Terminal or Audio Jacks
Audio Connections
Broadband Internet Connection
Perform the communication settings. Pages
Internet Connection LAN cable
Example of a Broadband Internet Connection
Example Broadband Internet Connection
Internet Connection Wireless LAN
Than the supplied adapter will operate with this player
ModemInternet
Approximate operating range of remote control
Loading the Batteries in the Remote Control
Connecting the Power Cord
Before Starting Playback
Turning the power on
Turning the Power On
Indicators on the Player
Entering standby
Operating a Sharp TV Using the Remote Control
Language Setting
Changing the on-screen display language
TV function control
Controlling the Blu-ray disc player using Aquos Link
Using Aquos Link
Turning Off the LCD Backlight and Indications
Menu operation
RSS Reader function Quick operation
Press a/b to select e-Contents, then press d or Enter
Major functions of each button icon
Control Panel
Control Panel
Control panel appears on the TV screen
Loading a Disc
Video/Picture/Music Playback
Displaying the disc information
BD/DVD Video Playback
Using the pop-up menu
Using the disc menu
BD/DVD Menus
Start playback by selecting a title from the top menu
Virtual Package
Enjoying Bonusview or BD-LIVE
Press PinP during playback to show the 2- picture screen
To remove the secondary video, press PinP again
Playback by selecting a title
DVD-R/-RW VR format / BD-RE/-R Bdav format Playback
Load a recorded disc
Press Hstop to stop playback
Playback by selecting a Playlist
Sorting the titles
Playback from the beginning or resume playback
Video/Picture/Music Playback About Title List
Audio CD Playback
Operation procedure for the Functions menu
Playback from the beginning
Playback by selecting a track
Playing back Audio data MP3 files
Audio Data MP3 File Playback
To play another file during Playback
To skip the file during Playback
Displaying Still Images Jpeg files
Displaying Still Images Jpeg files
Playing back Slide Show
Setting slide show speed/repeat playback
To pause the playback at any time, press
To stop the playback at any time, press
Instantly Watching Movies from Netflix
Settings for watching Netflix content on your TV
Buttons which can be used C/d / Enter / d Play / Fpause
If you don’t have a Netflix account
Playing back content in the Instant Queue on your TV
Adding content to the Instant Queue
Fast Forward/Reverse
To stop the playback or go to , press a or Hstop
Press a/b to select YouTube, then press d or Enter
Playing back YouTube content
Press Enter to start playback
Press Exit to exit from the YouTube function
YouTube menu
About the YouTube main page screen
Search box
Video list
About the playback screen
011
About YouTube menu on the playback screen
Playback screen
Press LSKIP/l to select Sign In, then press Enter
Operation procedure for inputting characters
To sign in with your YouTube account
Playback Functions
Partial Repeat Playback Repeat Playback of a Specified Part
Repeat Playback of a Title or Chapter Repeat Playback
Playback Functions
Press Enter
Displaying the Audio Information
Switching Subtitles
Stereo is displayed. Audio cannot be switched
After 5 seconds
Switching the Angle
Displaying the Angle Mark
Function Control
Settings During Playback
Function control operation procedure
Functions which can be set
Settings During Playback
Enter your 4-digit password
Basic Operation for Playback Setting
When setting the password for the first time
Common operations
TV Aspect Ratio
Audio Video Settings
Video Out Select
Component Video Out
Dynamic Range Control
Secondary Audio
Audio Out
Playback Setting
Smart Settings
System
On Screen Language
Version
When selecting Cable
Communication Setup
Select Next, then press Enter
Enter your DNS address. Enter your DNS address
If selecting No Go to the next step
When selecting Wireless
Press a/b to select Complete, then press
Information on MAC addresses
Confirm your setting Access Point Security key
Press a/b to select the desired input mode 123
Operation procedure for inputting characters manually
Input character list
Press c/d to select a number/character, then press Enter
USB Memory Management
Before using the USB memory device
Auto Update from Network
Software Update Settings
Update process
Setup
Manual Update from Network
You have any questions, please call 1-800-BE Sharp
Manual Update from USB memory
Device
Now checking the data in USB memory device
During the data checking, Checking blinks
Language Code List
Country Code List
Language List
About Output of Next Generation Audio Formats
RS-232C port specifications
Power
Troubleshooting
Problem Possible causes and solutions
Basic Operation
Sound
Troubleshooting Picture
To Reset this Player
Troubleshooting Network
When the wired Internet connection is made
When the wireless Internet connection is made
Error message Possible Error Suggested Solution
On-screen Error Messages
Cannot play Disc cannot be played back with
USB Used i.e. USB 1.0/USB
Input/Output
Specifications
General
Glossary
Glossary DVD upscaling Letter Box LB 43
Infrastructure mode
DVD video pages 7
DVD+/-R pages 7
Region code
Glossary Progressive format
Resume playback
RSS
Network Service Disclaimer
Software License Notice
About Software License
Information on the Software License for This Product
Warranty Period for this Product
Valid for warranty service in the U.S. and Puerto Rico only
Additional Items Excluded from Warranty Coverage if any
Where to Obtain Service
Appendix
Accesorios
Guía Rápida en Español Spanish Quick Guide
Guía Rápida en Español Spanish Quick Guide
Power alimentación
Cable Hdmi Disponible en el comercio
Amarillo Blanco Rojo
Función de reproducción con reanudación
Comenzando
Para parar la reproducción
Utilización del menú emergente BD Vídeo
Uso del menú del disco DVD Vídeo
Pulse TOP MENU/TITLE List
Pulse POP-UP Menu durante la reproducción
Memo
Page
Sharp Electronics Corporation