Manuals
/
Sharp
/
Household Appliance
/
Air Conditioner
Sharp
CV-P13LJ Installation And Removal Of Exhaust Hose, Installation of the exhaust hose, E-11
Models:
CV-P10LJ
CV-P13LJ
1
12
32
32
Download
32 pages
14.76 Kb
9
10
11
12
13
14
15
16
Specification
Install
ON TIMER Button
Warranty
Maintenance
Keep the filter clean
er Remote control hook
Press the POWER button again
Before Calling For Service
To Cancel
Page 12
Image 12
Page 11
Page 13
Page 12
Image 12
Page 11
Page 13
Contents
CV-P10LJ CV-P13LJ
PORTABLE TYPE ROOM AIR CONDITIONER
EN GLI SH ES PA ÑO L
CONTENTS
USAGE CAUTIONS
NOTES ON OPERATION
PRECAUTIONS
LOCATION
Keep the filter clean
Turn off the air conditioner when no one is home
SUGGESTED TOOLS FOR WINDOW PANEL INSTALLATION
INCLUDED
3. Knife or scissors
PART NAMES
FRONT VIEW REAR VIEW
33 Horizontal louvers 44 POWER Button
55 Remote control signal receiver window
REMOTE CONTROL
REMOTE CONTROL DISPLAY
1 1 Transmitter 2 Display 3 POWER Button
79 ON TIMER Button
INSTALL WINDOW PANEL
Installation in a double-hungsash window
Adjustment panel 24~36.8 Extension panel 36.8~48
Foam seal A adhesive type Bracket
Installation in a sliding sash window
INSTALL WINDOW PANEL
E-10
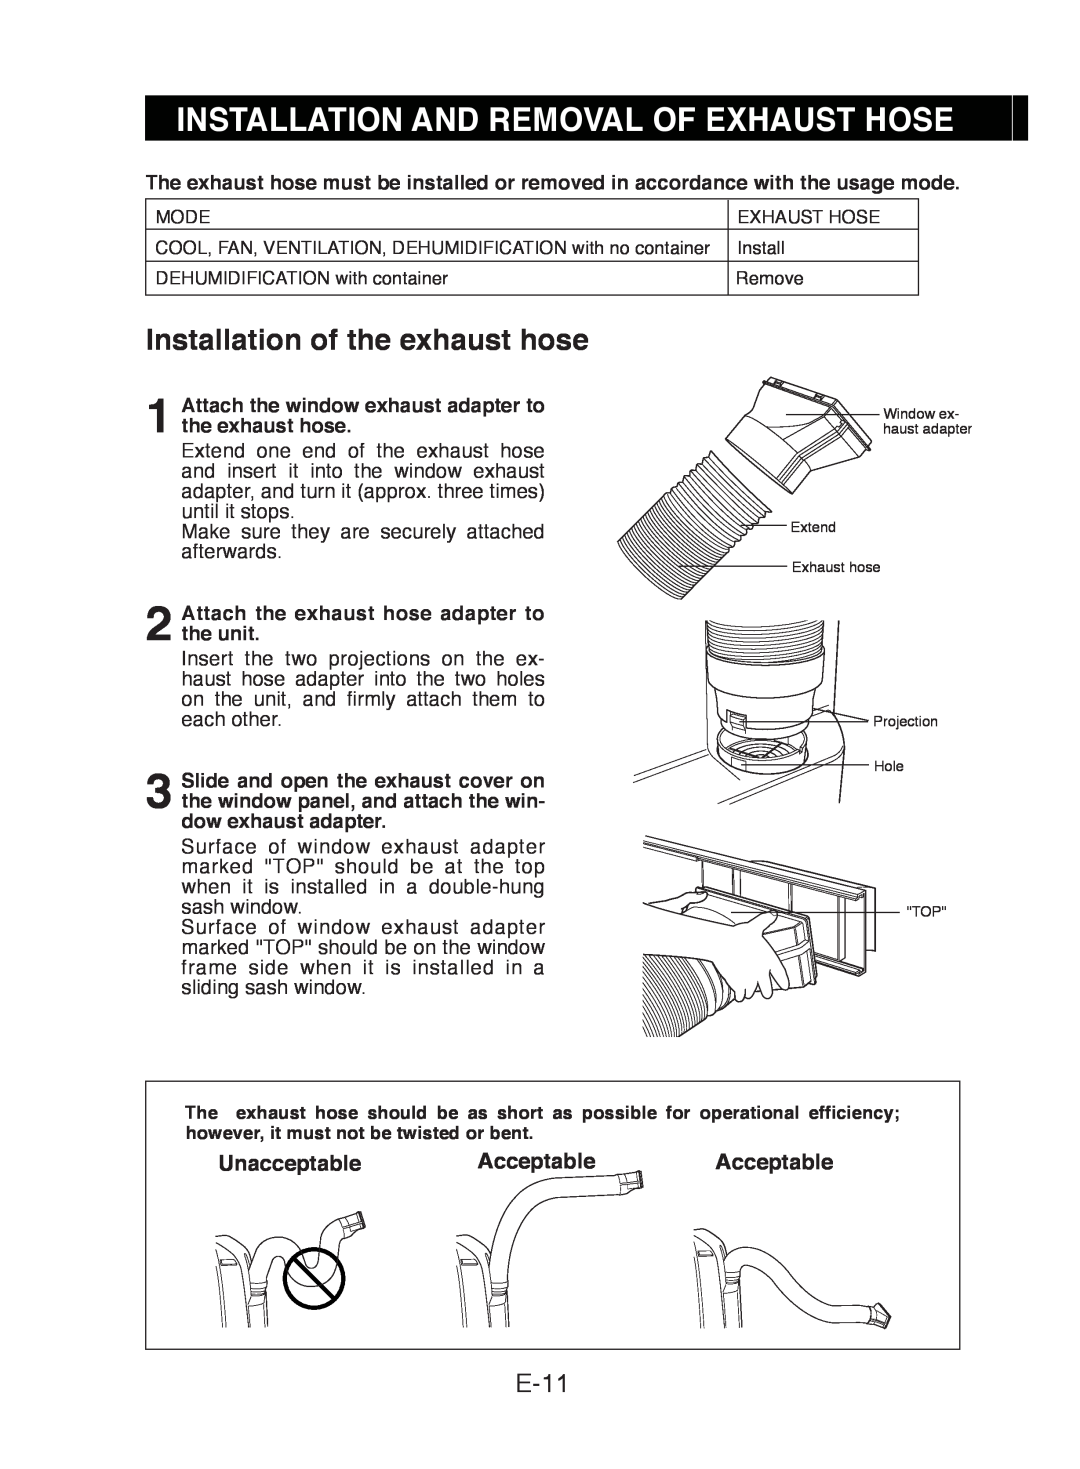
INSTALLATION AND REMOVAL OF EXHAUST HOSE
Installation of the exhaust hose
E-11
Unacceptable Acceptable Acceptable
Removal of the exhaust hose
E-12
PUSH Projection
PRE-OPERATIONCHECKS
E-13
LOADING BATTERIES Use two AAA R03 batteries
HOW TO USE THE REMOTE CONTROL
E-14
COOL MODE
DEHUMIDIFICATION MODE
E-15
2 Press the POWER button to start opera- tion
E-16
TO TURN OFF Press the POWER button again
TO TURN OFF Press the POWER button again
Press the POWER button to start operation
TO CHANGE AIR FLOW DIRECTION
UP / DOWN AIR FLOW DIRECTION
LEFT / RIGHT AIR FLOW DIRECTION
E-17
PLASMACLUSTER OPERATION
E-18
TO CANCEL
Press the PLASMACLUSTER button during
MEGA COOL OPERATION
SLEEP OPERATION
E-19
TO CANCEL
TIMER OPERATION
ON TIMER
OFF TIMER
E-20
MAIN UNIT OPERATION
DRAINAGE
E-21
Press the POWER button on the unit
MAINTENANCE
CLEANING THE FILTER
CLEANING THE UNIT AND THE REMOTE CONTROL
MAINTENANCE AFTER AIR CONDITIONER SEASON
BEFORE CALLING FOR SERVICE
E-23
TIMER DOES NOT WORK PROPERLY
AIR CONDITIONER DOES NOT OPERATE AT ALL
E-24
Technical Specifications
E-25
Compressor
Evaporator
Condenser
E-26
Technical Specifications
E-27
Compressor
Evaporator
Condenser
WARRANTY
Consumer Electronic Products
Congratulations on Your Purchase
DO NOT RETURN THIS DOCUMENT TO SHARP
SHARP APPROVED SERVICE CENTRE
SHARP APPROVED SERVICE CENTRE
SHARP CUSTOMER SERVICES
1300
Page
66129905937
Top
Page
Image
Contents