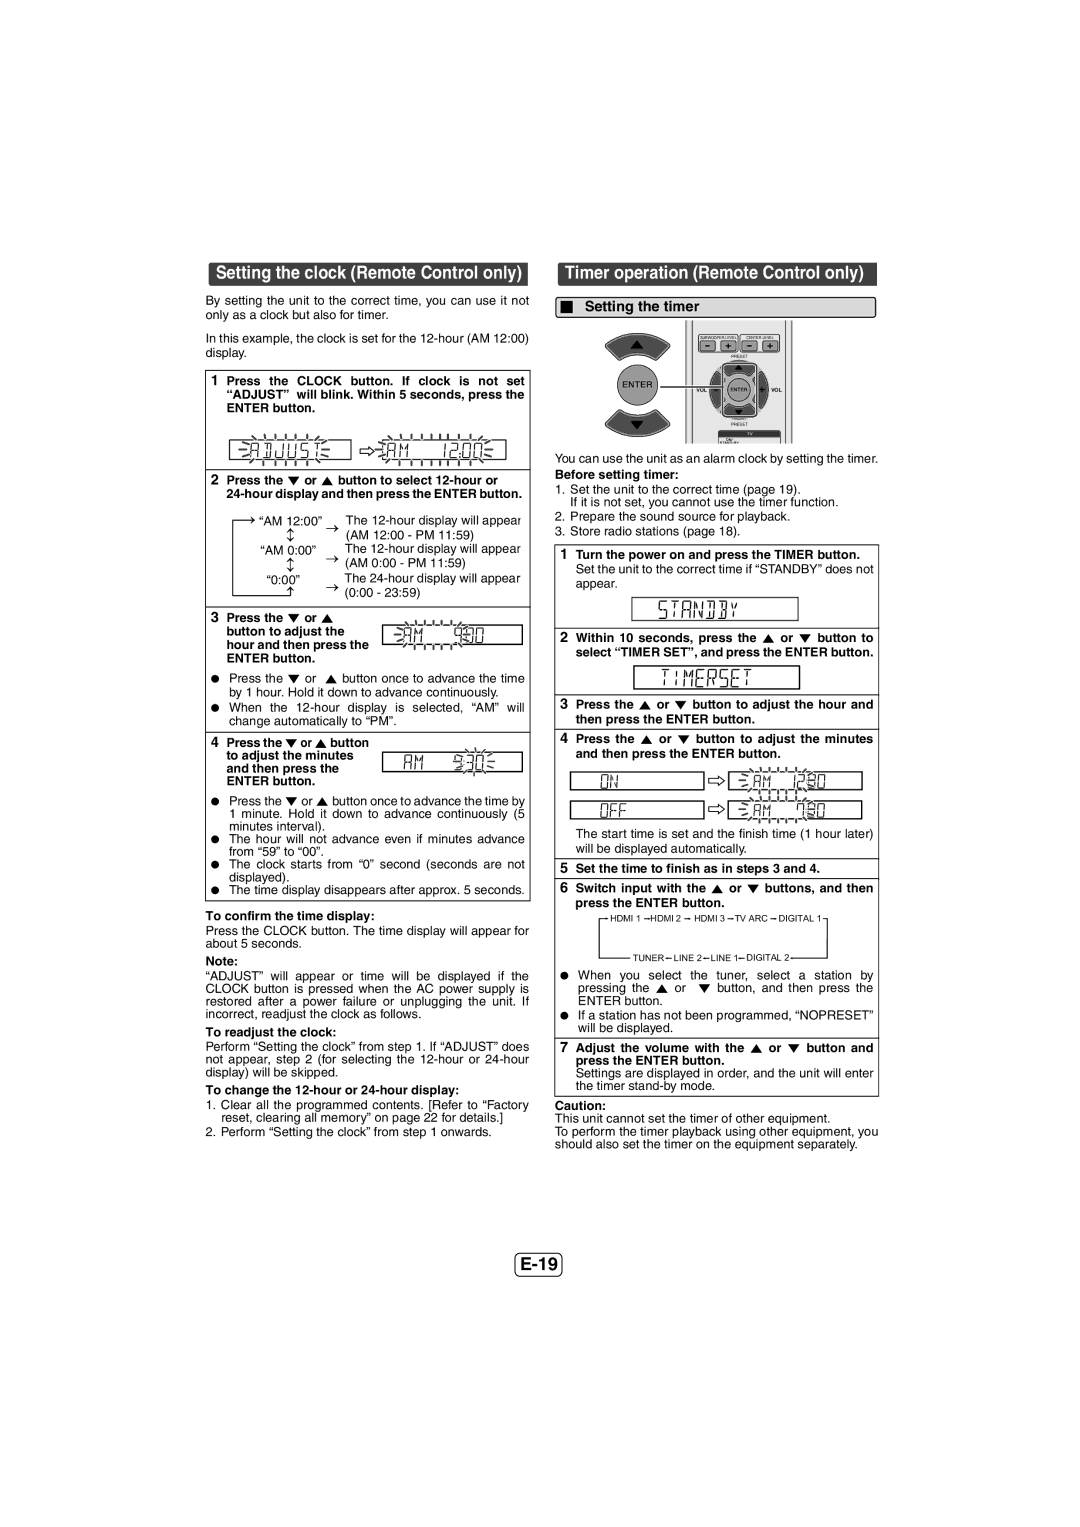
Setting the clock (Remote Control only)

By setting the unit to the correct time, you can use it not only as a clock but also for timer.

In this example, the clock is set for the 12-hour (AM 12:00) display.

1 Press the CLOCK button. If clock is not set “ADJUST” will blink. Within 5 seconds, press the ENTER button.

2Press the or button to select 12-hour or

24-hour display and then press the ENTER button.


“AM 12:00”

The 12-hour display will appear


(AM 12:00 - PM 11:59)


“AM 0:00”

The 12-hour display will appear


(AM 0:00 - PM 11:59)


“0:00”

The 24-hour display will appear


(0:00 - 23:59)


3Press the or

button to adjust the hour and then press the ENTER button.

Press the or button once to advance the time by 1 hour. Hold it down to advance continuously.

When the 12-hour display is selected, “AM” will change automatically to “PM”.

4Press the or button

to adjust the minutes and then press the ENTER button.

Press the or button once to advance the time by 1 minute. Hold it down to advance continuously (5 minutes interval).

The hour will not advance even if minutes advance from “59” to “00”.

The clock starts from “0” second (seconds are not displayed).

The time display disappears after approx. 5 seconds.

To confirm the time display:

Press the CLOCK button. The time display will appear for about 5 seconds.

Note:

“ADJUST” will appear or time will be displayed if the CLOCK button is pressed when the AC power supply is restored after a power failure or unplugging the unit. If incorrect, readjust the clock as follows.

To readjust the clock:

Perform “Setting the clock” from step 1. If “ADJUST” does not appear, step 2 (for selecting the 12-hour or 24-hour display) will be skipped.

To change the 12-hour or 24-hour display:

1.Clear all the programmed contents. [Refer to “Factory reset, clearing all memory” on page 22 for details.]

2.Perform “Setting the clock” from step 1 onwards.

Timer operation (Remote Control only)

Setting the timer

SUBWOOFER LEVEL CENTER LEVEL

PRESET

VOL

VOL

PRESET

TV

You can use the unit as an alarm clock by setting the timer.

Before setting timer:

1.Set the unit to the correct time (page 19).

If it is not set, you cannot use the timer function.

2.Prepare the sound source for playback.

3.Store radio stations (page 18).

1Turn the power on and press the TIMER button. Set the unit to the correct time if “STANDBY” does not appear.

2Within 10 seconds, press the or button to select “TIMER SET”, and press the ENTER button.

3Press the or button to adjust the hour and then press the ENTER button.

4Press the or button to adjust the minutes and then press the ENTER button.

The start time is set and the finish time (1 hour later) will be displayed automatically.

5Set the time to finish as in steps 3 and 4.

6Switch input with the or buttons, and then press the ENTER button.

HDMI 1 HDMI 2 HDMI 3 TV ARC DIGITAL 1

TUNER LINE 2 LINE 1 DIGITAL 2

When you select the tuner, select a station by

pressing the or button, and then press the ENTER button.

If a station has not been programmed, “NOPRESET” will be displayed.

7Adjust the volume with the or button and press the ENTER button.

Settings are displayed in order, and the unit will enter the timer stand-by mode.

Caution:

This unit cannot set the timer of other equipment.

To perform the timer playback using other equipment, you should also set the timer on the equipment separately.

E-19

Page 20
Image 20
Sharp HT-SB600, HTSB600 Setting the clock Remote Control only, Timer operation Remote Control only, Setting the timer

HTSB600, HT-SB600 specifications

The Sharp HT-SB600 is a sophisticated soundbar system designed to enhance your audio experience for home entertainment. This cutting-edge audio device combines sleek aesthetics with advanced technology, offering a high-quality sound that immerses users in cinematic audio.

One of the standout features of the HT-SB600 is its 2.1-channel configuration, which includes a dedicated subwoofer that delivers deep bass and rich soundscapes. The soundbar is engineered to produce audio that fills the room, making it ideal for watching movies, playing video games, or enjoying music. With a total output power of 320 watts, this system ensures powerful sound performance that can bring any scene to life.

The HT-SB600 supports various audio formats, ensuring compatibility with a wide range of content. It can decode Dolby Digital and DTS, providing surround sound for an enhanced listening experience. This allows users to enjoy their favorite movies and shows with rich, dynamic audio that captures every detail.

Equipped with Bluetooth technology, the Sharp HT-SB600 allows for wireless streaming of music directly from smartphones, tablets, or laptops. This feature adds convenience, enabling users to play their favorite tracks without the hassle of wires. Additionally, the soundbar includes an HDMI ARC port, making it easy to connect to your television and control the audio with just one remote.

For further flexibility, the HT-SB600 offers optical audio and auxiliary inputs, allowing users to connect multiple devices such as gaming consoles and DVD players. This versatility ensures that users can create a comprehensive entertainment system tailored to their preferences.

The design of the HT-SB600 is both stylish and functional. Its slim profile allows it to fit seamlessly beneath most TVs, while the front-facing speaker grille presents a modern and sleek appearance. This soundbar is not just about performance but also about enhancing the overall aesthetic of your home entertainment setup.

In conclusion, the Sharp HT-SB600 is a feature-rich soundbar that combines powerful audio performance with modern technology. Its 2.1-channel setup, Bluetooth connectivity, and multiple input options make it an excellent choice for anyone looking to elevate their home audio experience. With a stylish design and high-quality sound, the HT-SB600 stands out in the competitive soundbar market.