Trademarks
• The terms HDMI and HDMI | |
trademarks of HDMI Licensing LLC in the United States and other countries. | |
|
|
|
|
• TruSurround HD, SRS and the | symbol are trademarks of SRS Labs, Inc. |
TruSurround HD technology is incorporated under license from SRS Labs, Inc. | |
• SRS TruSurround HD™ creates an immersive, | |
rich bass, high frequency detail and clear dialog. | |
| |
| |
• Manufactured under license from Dolby Laboratories. Dolby and the | |
Laboratories. |
|
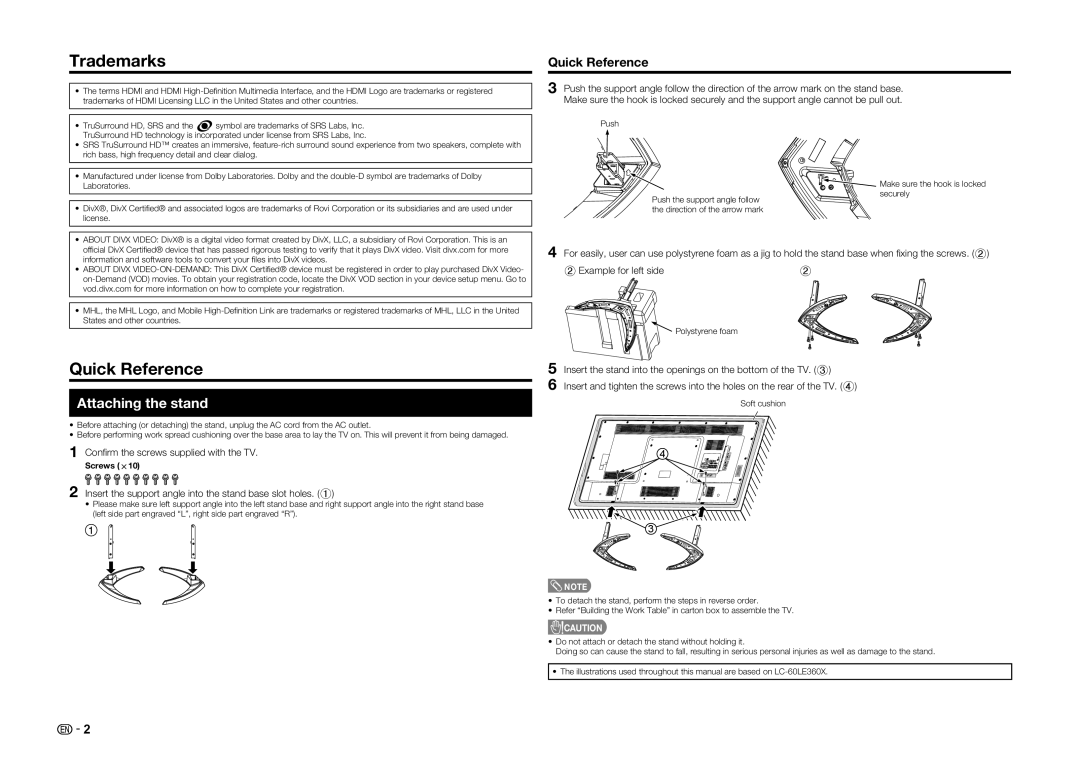
Quick Reference
3Push the support angle follow the direction of the arrow mark on the stand base. Make sure the hook is locked securely and the support angle cannot be pull out.
Push
![]()
![]()
![]() Make sure the hook is locked
Make sure the hook is locked
• DivX®, DivX Certifi ed® and associated logos are trademarks of Rovi Corporation or its subsidiaries and are used under |
license. |
• ABOUT DIVX VIDEO: DivX® is a digital video format created by DivX, LLC, a subsidiary of Rovi Corporation. This is an |
Push the support angle follow the direction of the arrow mark
securely
offi cial DivX Certifi ed® device that has passed rigorous testing to verify that it plays DivX video. Visit divx.com for more |
information and software tools to convert your fi les into DivX videos. |
• ABOUT DIVX |
vod.divx.com for more information on how to complete your registration. |
• MHL, the MHL Logo, and Mobile |
States and other countries. |
4For easily, user can use polystyrene foam as a jig to hold the stand base when fi xing the screws. (2)
2 Example for left side | 2 |
![]() Polystyrene foam
Polystyrene foam
Quick Reference
Attaching the stand
•Before attaching (or detaching) the stand, unplug the AC cord from the AC outlet.
•Before performing work spread cushioning over the base area to lay the TV on. This will prevent it from being damaged.
1Confi rm the screws supplied with the TV.
Screws (m10)
2Insert the support angle into the stand base slot holes. (1)
•Please make sure left support angle into the left stand base and right support angle into the right stand base (left side part engraved “L”, right side part engraved “R”).
5Insert the stand into the openings on the bottom of the TV. (3)
6Insert and tighten the screws into the holes on the rear of the TV. (4)
Soft cushion
4
![]() 3
3 ![]()
![]()
![]() NOTE
NOTE
•To detach the stand, perform the steps in reverse order.
•Refer “Building the Work Table” in carton box to assemble the TV.
![]() CAUTION
CAUTION
•Do not attach or detach the stand without holding it.
Doing so can cause the stand to fall, resulting in serious personal injuries as well as damage to the stand.
•The illustrations used throughout this manual are based on
![]() - 2
- 2