Réglage de l'image au moniteur et volume des haut-parleurs

Lorsque la luminosité n’est pas réglée automatique-

MENU 1 : ADJUSTMENT (RÉGLAGE)

ment


1.

Sans que le menu OSD ne soit affiché, enfoncer le

A D J U S T ME N T


bouton

ou le bouton .


[

MA N U A L

A U T O

]


C L OC K

1 4 0


[ AUTO BRIGHTNESS OFF ]

P H A S E

5


H - P O S

6 0


B R I G H T

3 1

[

]

V - P O S

5


2.

Régler au moyen du bouton

(plus sombre) ou du

1 0 2 4 x 7 6 8


V : 6 0 H z

H : 4 8 k H z


bouton (plus clair).


3.

Presser le bouton MENU.

MANUEL : Les options individuelles du menu sont


Le Menu OSD disparaîtra.


réglées manuellement.


Remarque :

AUTO :

Chaque option du menu est réglée


automatiquement.

-

Le menu OSD disparaît automatiquement quelques


secondes après la dernière commande.

Remarques :

Français

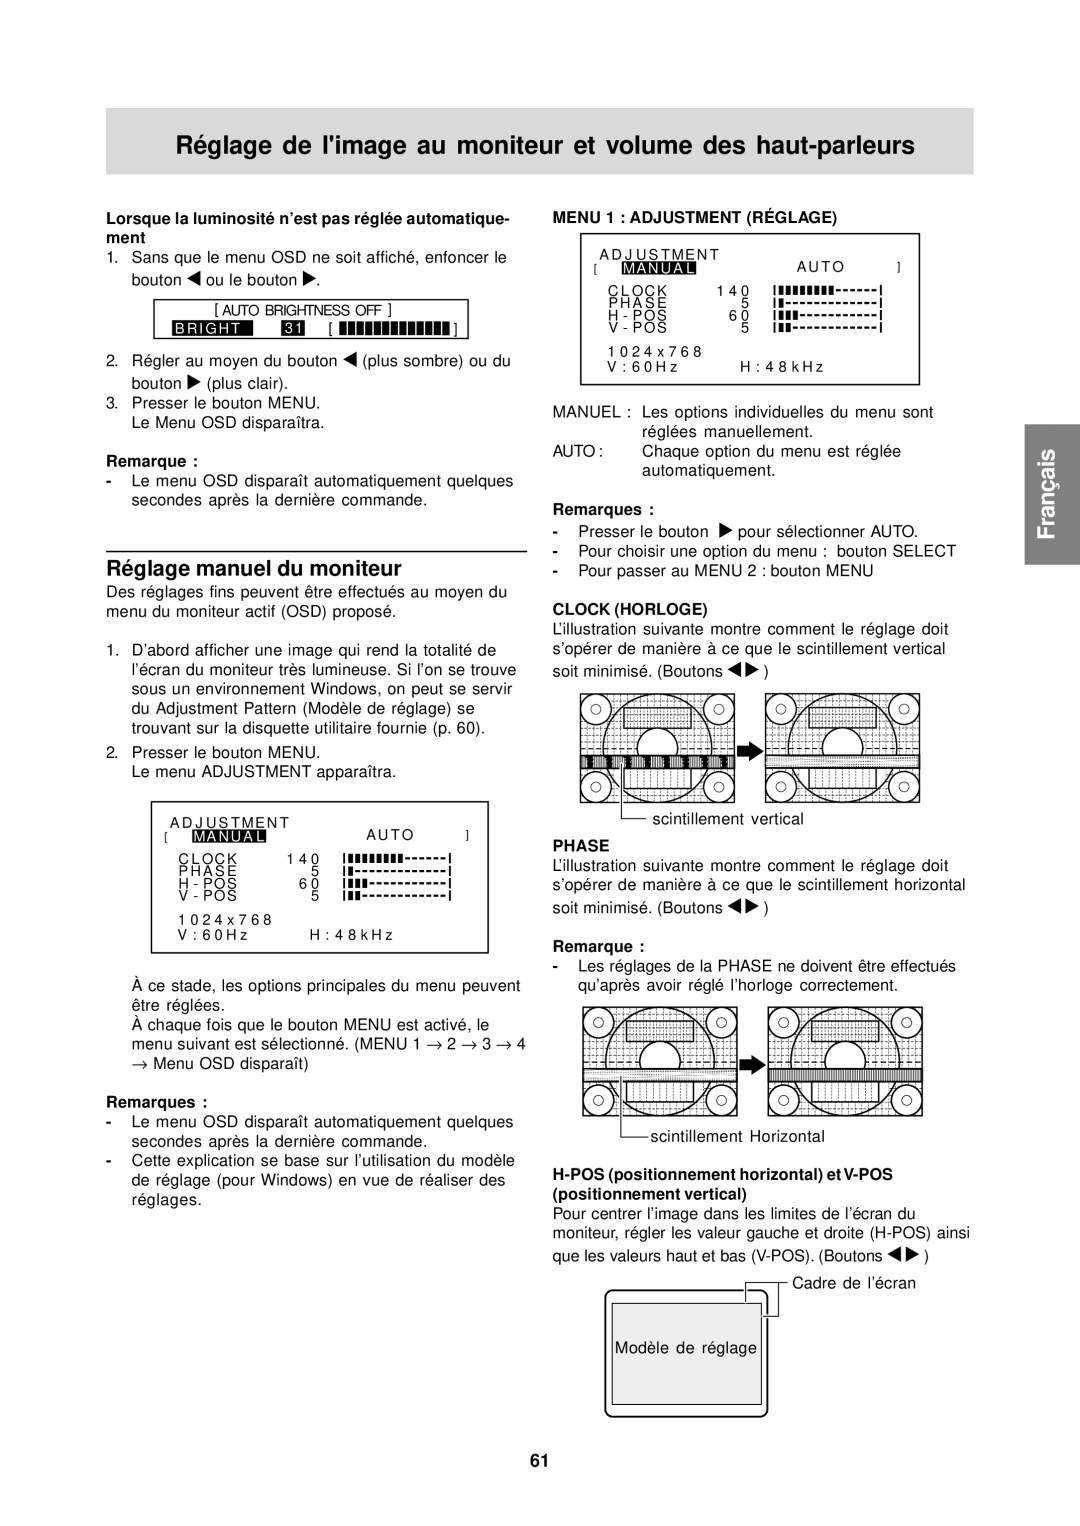
Réglage manuel du moniteur

Des réglages fins peuvent être effectués au moyen du menu du moniteur actif (OSD) proposé.

1.D’abord afficher une image qui rend la totalité de l’écran du moniteur très lumineuse. Si l’on se trouve sous un environnement Windows, on peut se servir du Adjustment Pattern (Modèle de réglage) se trouvant sur la disquette utilitaire fournie (p. 60).

2.Presser le bouton MENU.

Le menu ADJUSTMENT apparaîtra.

A D J U S T ME N T


[

MA N U A L


A U T O

]

C L OC K

1 4 0


P H A S E

5


H - P O S

6 0


V - P O S

5


1 0 2 4 x 7 6 8


V : 6 0 H z

H : 4 8 k H z


Àce stade, les options principales du menu peuvent être réglées.

Àchaque fois que le bouton MENU est activé, le

menu suivant est sélectionné. (MENU 1 2 3 4

Menu OSD disparaît)

Remarques :

-Le menu OSD disparaît automatiquement quelques secondes après la dernière commande.

-Cette explication se base sur l’utilisation du modèle de réglage (pour Windows) en vue de réaliser des réglages.

-Presser le bouton pour sélectionner AUTO.

-Pour choisir une option du menu : bouton SELECT

-Pour passer au MENU 2 : bouton MENU

CLOCK (HORLOGE)

L’illustration suivante montre comment le réglage doit s’opérer de manière à ce que le scintillement vertical

soit minimisé. (Boutons )

scintillement vertical

PHASE

L’illustration suivante montre comment le réglage doit s’opérer de manière à ce que le scintillement horizontal

soit minimisé. (Boutons )

Remarque :

-Les réglages de la PHASE ne doivent être effectués qu’après avoir réglé l’horloge correctement.

scintillement Horizontal

H-POS (positionnement horizontal) et V-POS (positionnement vertical)

Pour centrer l’image dans les limites de l’écran du moniteur, régler les valeur gauche et droite (H-POS) ainsi

que les valeurs haut et bas (V-POS). (Boutons )

Cadre de l’écran

Modèle de réglage

61

Page 61
Image 61
Sharp LL-T15S1 operation manual Réglage manuel du moniteur, Lorsque la luminosité n’est pas réglée automatique, Ment

LL-T15S1 specifications

The Sharp LL-T15S1 is a compact yet powerful display solution that suits various applications, from professional environments to home use. This 15-inch LCD monitor is distinguished by its sleek design and robust feature set, making it an appealing choice for users seeking a high-quality viewing experience in a smaller form factor.

One of the standout features of the LL-T15S1 is its impressive display technology. The monitor employs an advanced TFT LCD panel that delivers vibrant colors and sharp contrast, ensuring that images and text are clear and easily readable. With a resolution of 1024 x 768 pixels, the monitor provides a crisp and detailed picture, suitable for both multimedia and office tasks. The 4:3 aspect ratio ensures compatibility with various applications, especially those that require traditional formats.

In terms of connectivity, the LL-T15S1 offers a wide range of options, including VGA and DVI-D inputs. This versatility allows users to easily connect the monitor to a variety of devices, such as computers, laptops, and other multimedia equipment. Additionally, the monitor supports plug-and-play functionality, enabling hassle-free setup with compatible operating systems.

Another notable feature of the LL-T15S1 is its ergonomic design, which enhances user comfort. The monitor is equipped with an adjustable stand that allows users to modify the height and angle of the display for optimal viewing. This feature is particularly beneficial for prolonged use, reducing strain on the eyes and neck. The monitor also boasts a slim profile, making it easy to integrate into any workspace without taking up unnecessary space.

Energy efficiency is another characteristic that sets the Sharp LL-T15S1 apart. The monitor is designed to consume less power without compromising performance, making it an environmentally friendly choice for users who are conscious of their energy usage. Coupled with its long-lasting LED backlighting, this monitor is both cost-effective and sustainable.

In summary, the Sharp LL-T15S1 stands out as a reliable and versatile monitor that combines exceptional performance with user-friendly features. Its vibrant display technology, multiple connectivity options, ergonomic design, and energy-efficient operation make it an ideal choice for various applications. Whether in a professional setting or at home, this monitor meets the diverse needs of users looking for a high-quality viewing experience in a compact package.