Connecting Peripheral Equipment

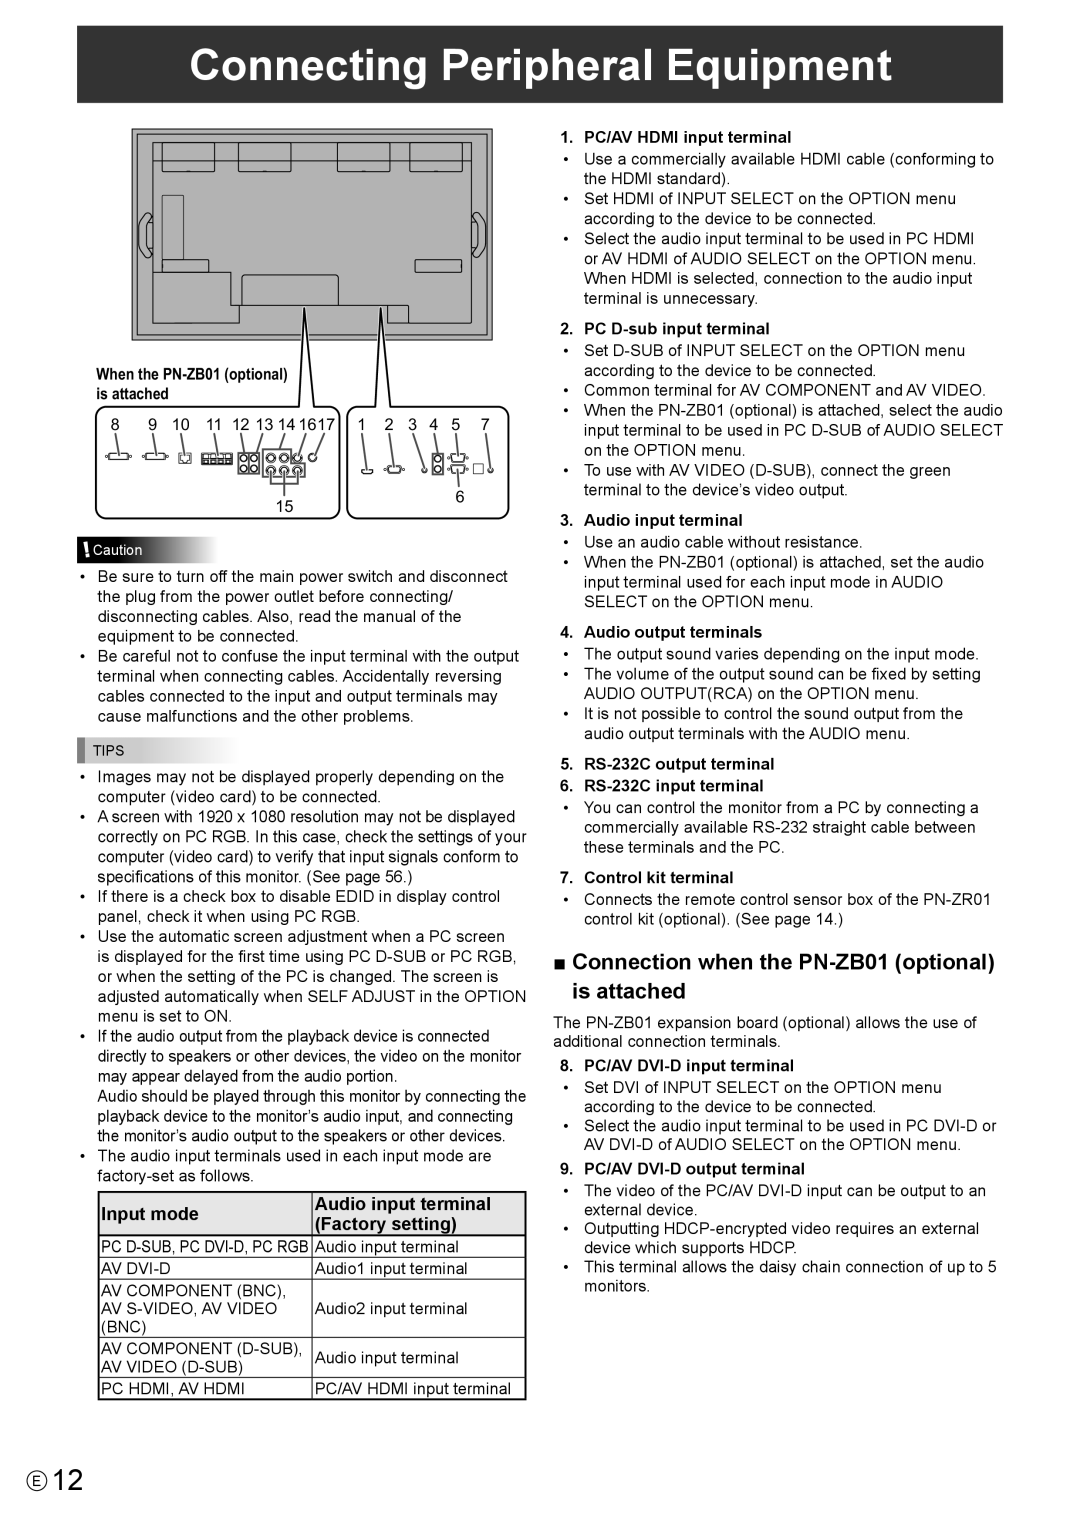
When the PN-ZB01 (optional) is attached

8

9

10

11

12 13 14 1617

1

2

3

4

5

7


156

Caution

Be sure to turn off the main power switch and disconnect the plug from the power outlet before connecting/ disconnecting cables. Also, read the manual of the equipment to be connected.

Be careful not to confuse the input terminal with the output terminal when connecting cables. Accidentally reversing cables connected to the input and output terminals may cause malfunctions and the other problems.

TIPS

Images may not be displayed properly depending on the computer (video card) to be connected.

A screen with 1920 x 1080 resolution may not be displayed correctly on PC RGB. In this case, check the settings of your computer (video card) to verify that input signals conform to specifications of this monitor. (See page 56.)

If there is a check box to disable EDID in display control panel, check it when using PC RGB.

Use the automatic screen adjustment when a PC screen is displayed for the first time using PC D-SUB or PC RGB, or when the setting of the PC is changed. The screen is adjusted automatically when SELF ADJUST in the OPTION menu is set to ON.

If the audio output from the playback device is connected directly to speakers or other devices, the video on the monitor may appear delayed from the audio portion.

Audio should be played through this monitor by connecting the playback device to the monitor’s audio input, and connecting the monitor’s audio output to the speakers or other devices.

The audio input terminals used in each input mode are factory-set as follows.

Input mode

Audio input terminal

(Factory setting)


PC D-SUB, PC DVI-D, PC RGB

Audio input terminal

AV DVI-D

Audio1 input terminal

AV component (BNC),


AV S-video, AV video

Audio2 input terminal

(BNC)


AV component (D-SUB),

Audio input terminal

AV video (D-SUB)


PC HDMI, AV HDMI

PC/AV HDMI input terminal

1. PC/AV HDMI input terminal

Use a commercially available HDMI cable (conforming to the HDMI standard).

Set HDMI of INPUT SELECT on the OPTION menu according to the device to be connected.

Select the audio input terminal to be used in PC HDMI or AV HDMI of AUDIO SELECT on the OPTION menu. When HDMI is selected, connection to the audio input terminal is unnecessary.

2. PC D-sub input terminal

Set D-SUB of INPUT SELECT on the OPTION menu according to the device to be connected.

Common terminal for AV COMPONENT and AV VIDEO.

When the PN-ZB01 (optional) is attached, select the audio input terminal to be used in PC D-SUB of AUDIO SELECT on the OPTION menu.

To use with AV VIDEO (D-SUB), connect the green terminal to the device’s video output.

3. Audio input terminal

Use an audio cable without resistance.

When the PN-ZB01 (optional) is attached, set the audio input terminal used for each input mode in AUDIO SELECT on the OPTION menu.

4. Audio output terminals

The output sound varies depending on the input mode.

The volume of the output sound can be fixed by setting AUDIO OUTPUT(RCA) on the OPTION menu.

It is not possible to control the sound output from the audio output terminals with the AUDIO menu.

5.RS-232C output terminal

6.RS-232C input terminal

You can control the monitor from a PC by connecting a commercially available RS-232 straight cable between these terminals and the PC.

7. Control kit terminal

Connects the remote control sensor box of the PN-ZR01 control kit (optional). (See page 14.)

Connection when the PN-ZB01 (optional) is attached

The PN-ZB01 expansion board (optional) allows the use of additional connection terminals.

8. PC/AV DVI-D input terminal

Set DVI of INPUT SELECT on the OPTION menu according to the device to be connected.

Select the audio input terminal to be used in PC DVI-D or AV DVI-D of AUDIO SELECT on the OPTION menu.

9. PC/AV DVI-D output terminal

The video of the PC/AV DVI-D input can be output to an external device.

Outputting HDCP-encrypted video requires an external device which supports HDCP.

This terminal allows the daisy chain connection of up to 5 monitors.

E12

Page 12
Image 12
Sharp PN-A601, PNA601 operation manual Connecting Peripheral Equipment, Connection when the PN-ZB01 optional is attached

PN-A601, PNA601 specifications

The Sharp PNA601, also known as the PN-A601, is a remarkable touchscreen display that has garnered attention in various commercial and professional environments. Designed for versatility and reliability, this model serves as an ideal solution for digital signage, interactive presentations, or as part of a collaborative workspace.

One of the standout features of the Sharp PNA601 is its impressive 60-inch diagonal screen size, which is specifically designed to capture attention while delivering vivid imagery. The display employs advanced LCD technology to ensure sharp picture quality with accurate color reproduction. The Full HD resolution of 1920 x 1080 pixels guarantees that text and images are displayed with stunning clarity, making it suitable for presentations where detail is critical.

In addition to its visual capabilities, the Sharp PNA601 is equipped with a multi-touch functionality that supports multiple touch points. This feature enables several users to interact with the display simultaneously, fostering collaboration during meetings or group presentations. The touch response is smooth and intuitive, making navigation and interaction seamless, whether for professional use or educational purposes.

The device is built with a durable and robust design that allows it to perform consistently in demanding environments. Its anti-glare glass surface minimizes reflections, ensuring that images remain visible in various lighting conditions. This durability extends to the display's long operational life, making it a cost-effective investment for businesses.

Connectivity options on the Sharp PNA601 are abundant, with multiple HDMI, VGA, and USB ports available. This variety ensures that the display can be easily connected to a range of devices, from laptops to media players, enhancing its usability in different settings. Additionally, the display supports various media formats, allowing users to showcase dynamic content with ease.

In terms of installation, the Sharp PNA601 offers flexibility with options for wall mounting or free-standing setups. This adaptability makes it suitable for different environments, whether in retail locations, conference rooms, or educational institutions.

Moreover, the Sharp PNA601 is energy-efficient, adhering to modern standards for sustainable technology. Its low power consumption while maintaining high performance showcases the manufacturer’s commitment to eco-friendly practices.

In conclusion, the Sharp PNA601/PN-A601 is a sophisticated touchscreen display that combines cutting-edge technology with practical features, making it an exceptional choice for a variety of applications. Its stunning visual capabilities, robust design, and user-friendly interface provide an unparalleled experience for anyone looking to enhance their digital presentations or interactive signage.