Turning Power On/Off

Caution

Turn on the monitor first before turning on the PC or playback device.

Turning on the main power

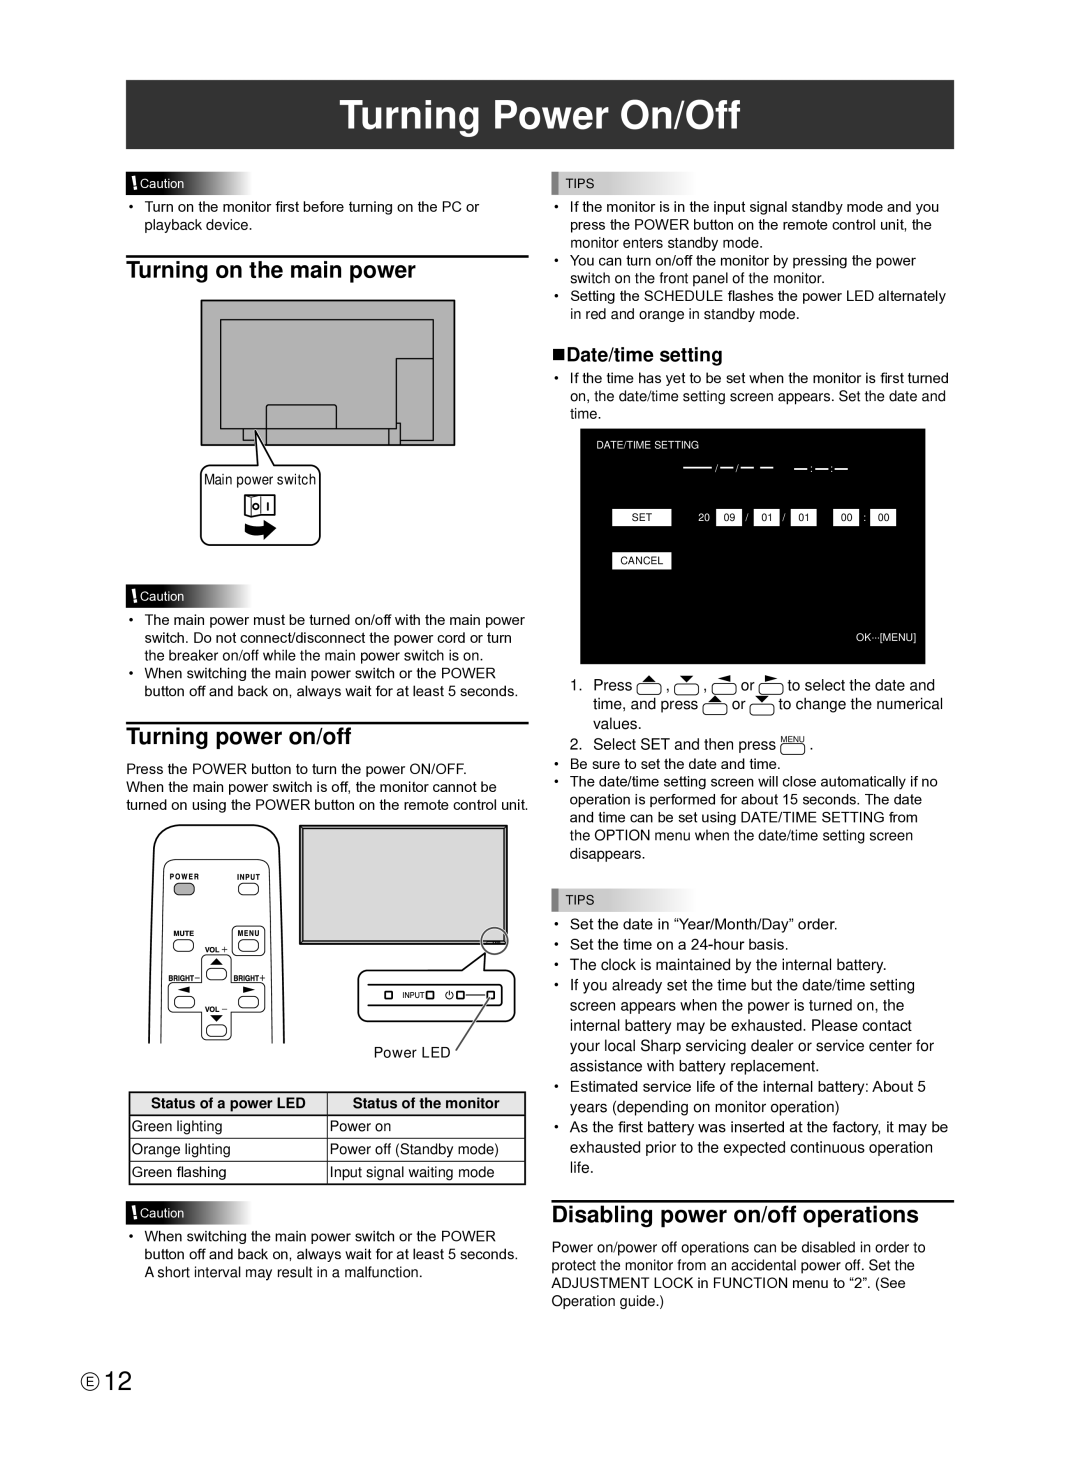
Main power switch

Caution

The main power must be turned on/off with the main power switch. Do not connect/disconnect the power cord or turn the breaker on/off while the main power switch is on.

When switching the main power switch or the POWER button off and back on, always wait for at least 5 seconds.

Turning power on/off

Press the POWER button to turn the power ON/OFF. When the main power switch is off, the monitor cannot be turned on using the POWER button on the remote control unit.


Power LED


Status of a power LED

Status of the monitor

Green lighting

Power on


Orange lighting

Power off (Standby mode)


Green flashing

Input signal waiting mode

Caution

When switching the main power switch or the POWER button off and back on, always wait for at least 5 seconds.

A short interval may result in a malfunction.

TIPS

If the monitor is in the input signal standby mode and you press the POWER button on the remote control unit, the monitor enters standby mode.

You can turn on/off the monitor by pressing the power switch on the front panel of the monitor.

Setting the SCHEDULE flashes the power LED alternately in red and orange in standby mode.

nDate/time setting

If the time has yet to be set when the monitor is first turned on, the date/time setting screen appears. Set the date and time.

DATE/TIME SETTING


/

/


: :


20


/


/


:


SET


09

01

01


00

00


CANCEL


OK···[MENU]

1.Press , , or to select the date and

time, and press or to change the numerical values.

2.Select SET and then press MENU .

Be sure to set the date and time.

The date/time setting screen will close automatically if no operation is performed for about 15 seconds. The date and time can be set using DATE/TIME SETTING from the OPTION menu when the date/time setting screen disappears.

TIPS

Set the date in “Year/Month/Day” order.

Set the time on a 24-hour basis.

The clock is maintained by the internal battery.

If you already set the time but the date/time setting screen appears when the power is turned on, the internal battery may be exhausted. Please contact your local Sharp servicing dealer or service center for assistance with battery replacement.

Estimated service life of the internal battery: About 5 years (depending on monitor operation)

As the first battery was inserted at the factory, it may be exhausted prior to the expected continuous operation life.

Disabling power on/off operations

Power on/power off operations can be disabled in order to protect the monitor from an accidental power off. Set the ADJUSTMENT LOCK in FUNCTION menu to “2”. (See Operation guide.)

E12

Page 14
Image 14
Sharp TINSE1145MPZZ(1), PNE601P Turning Power On/Off, Turning on the main power, Turning power on/off, NDate/time setting

TINSE1145MPZZ(1), PNE601P, PN-E601, PN-E521 specifications

The Sharp PNE601P and PN-E601 display models, along with the TINSE1145MPZZ(1) and PN-E521, represent a leading edge in commercial display technology, catering to businesses and institutions that require high-performance visual solutions. These displays are designed to deliver exceptional image quality, impressive durability, and advanced connectivity options, making them suitable for a range of applications, from corporate environments to public signage.

Starting with the Sharp PNE601P and PN-E601, both models are part of Sharp’s professional display lineup that emphasizes vibrant, accurate color reproduction and excellent brightness levels. They utilize advanced LCD technology, ensuring that images remain crisp and clear even in well-lit environments. With a full HD resolution, these displays provide immersive visuals that enhance any presentation or advertising content.

The TINSE1145MPZZ(1) offers unique features, including enhanced energy efficiency and a slim design that allows for seamless integration into various settings. Its lightweight construction facilitates easy installation and mounting, which can be particularly beneficial for businesses pressing for rapid deployment.

For the PN-E521 model, its standout characteristics include a robust design tailored for extended use, making it ideal for environments such as retail spaces, conference rooms, and control centers. The PN-E521 offers a wide range of input options, including HDMI, DisplayPort, and VGA, ensuring compatibility with multiple devices and setups.

All these models are equipped with advanced connectivity features, enabling cascading displays for larger installations. The incorporation of network control allows for remote management and monitoring, providing users with the flexibility to manage settings and content efficiently.

The integrated cooling system ensures that these displays maintain optimal performance while preventing overheating during intense usage periods. Furthermore, their durable construction ensures resistance to scratches and damage, extending the lifespan of the displays and reducing maintenance costs.

The Sharp PNE601P, PN-E601, TINSE1145MPZZ(1), and PN-E521 collectively enhance the visual experience, making them valuable tools for communication and marketing in technology-driven environments. Whether used for digital signage, information dissemination, or engaging presentations, these displays exemplify the pinnacle of display technology.