Page
Please Read Before Proceeding
Intellectual Property Right Information
Disclaimers
Important Health Information and Safety Precautions
Limitation of Damages
Safety Precautions for Power Supply Unit
Voice 800
Voice 1-800-35-NIOSH
Environment Restrictions
General Precautions
Never use the product in a wet location
Avoid pushing objects into product
Do not place the product with an unstable base
Contents
111
139
12
Getting Started
Top panel
Getting to Know Your Touch Phone and Accessories
Front panel
Bottom panel
Left panel Back panel
Installing the Battery and Storage Card
Accessories
Battery
To remove the back cover
Charging the Battery
Storage card
Switch to Sleep mode when not in use
Starting Up
Navigating on Your Device
Turn your device on and off
Stylus
Navigation Control
Slide
Advancing playback
Today Screen
Status Icons
3 4
Start Menu
Quick Menu
Adjusting the Volume
LED Alerts
When Connecting Your Device to a Computer
Using Phone Features
Using the Phone
Voice Call
Phone screen
Make a call
Answer a call
Call History
End a call
Speed Dial
Smart Dial
Make a call or send a text message using Smart Dial
Turn the phone function on and off
Using Phone Features
TouchFLO 3D
Using TouchFLO 3D
About TouchFLO 3D
Navigating in TouchFLO 3D
To turn TouchFLO 3D on and off
To switch between the tabs of the Home screen
Using the TouchFLO 3D Home Screen
TouchFLO 3D Home screen have the following tabs
Home
To select an item on the Home tab
To add favorite contacts
My Favorites
To choose from your favorite contacts
Messaging
Music
To play music
For example, indicates that there is a new message received
To advance forward or backward in the music
To set repeat and shuffle modes
To browse and play music in the Library
To use playlists
To check e-mail
To add an e-mail account
For more information about working with e-mails, see
For more information about using Opera Mobile, see Chapter
Browser
Photos and Videos
To set an album as a Favorite
My Applications
Weather
To add a city
On the Weather tab, touch Menu Add Location
Settings
On the Weather tab, touch Menu Settings
To view weather information
To choose download options
Finger Gestures
Finger scrolling
Finger zooming
Finger panning
Entering Text
Entering Information
Qwerty keyboard
On-screen input methods
To show or hide the Input Panel, tap the Input Panel icon
Using the Hardware Keyboard
Using the Full Qwerty
To enter text using the Full Qwerty
Tap the Input Selector arrow, then tap Full Qwerty
Using the Compact Qwerty
Using the Phone Keypad
To enter text using the Compact Qwerty
Tap the Input Selector arrow, then tap Compact Qwerty
Multitap mode
Using Multitap and T9 Modes
T9 mode
Using Numeric and Symbol Mode
Using Block Recognizer
To switch to Numeric and Symbol mode
To lock the keyboard in Numeric and Symbol mode
Using Letter Recognizer
Using Transcriber
Entering Text
Synchronizing Information With Your Computer
Using the supplied USB sync cable
Using Bluetooth
About Synchronization
Ways to synchronize
Set up synchronization in Windows Mobile Device Center
Use Windows Mobile Device Center
Setting Up ActiveSync on Windows XP
Install ActiveSync
Set up synchronization in ActiveSync
Synchronizing With Your Computer
Synchronizing via Bluetooth
Troubleshoot sync connection problem
To synchronize with a computer via Bluetooth
Change which information is synchronized
Synchronizing Music and Video
Exchanging Messages
Text Messages
Messaging
Create a new text message
Compose and send a text message
Manage text messages
To automatically resend text messages that failed delivery
To reply to a text message
MMS Messages
Create and send MMS messages
To add an audio clip to the picture and video message
To add text to an MMS message
To create a picture and video message from a template
Types of E-mail Accounts
View and reply to picture and video messages
Add an e-mail account
To view a picture and video message
Mail Setup Wizard
Set up an Internet e-mail account
To specify e-mail server settings
Tap Finish
Set up a custom domain e-mail
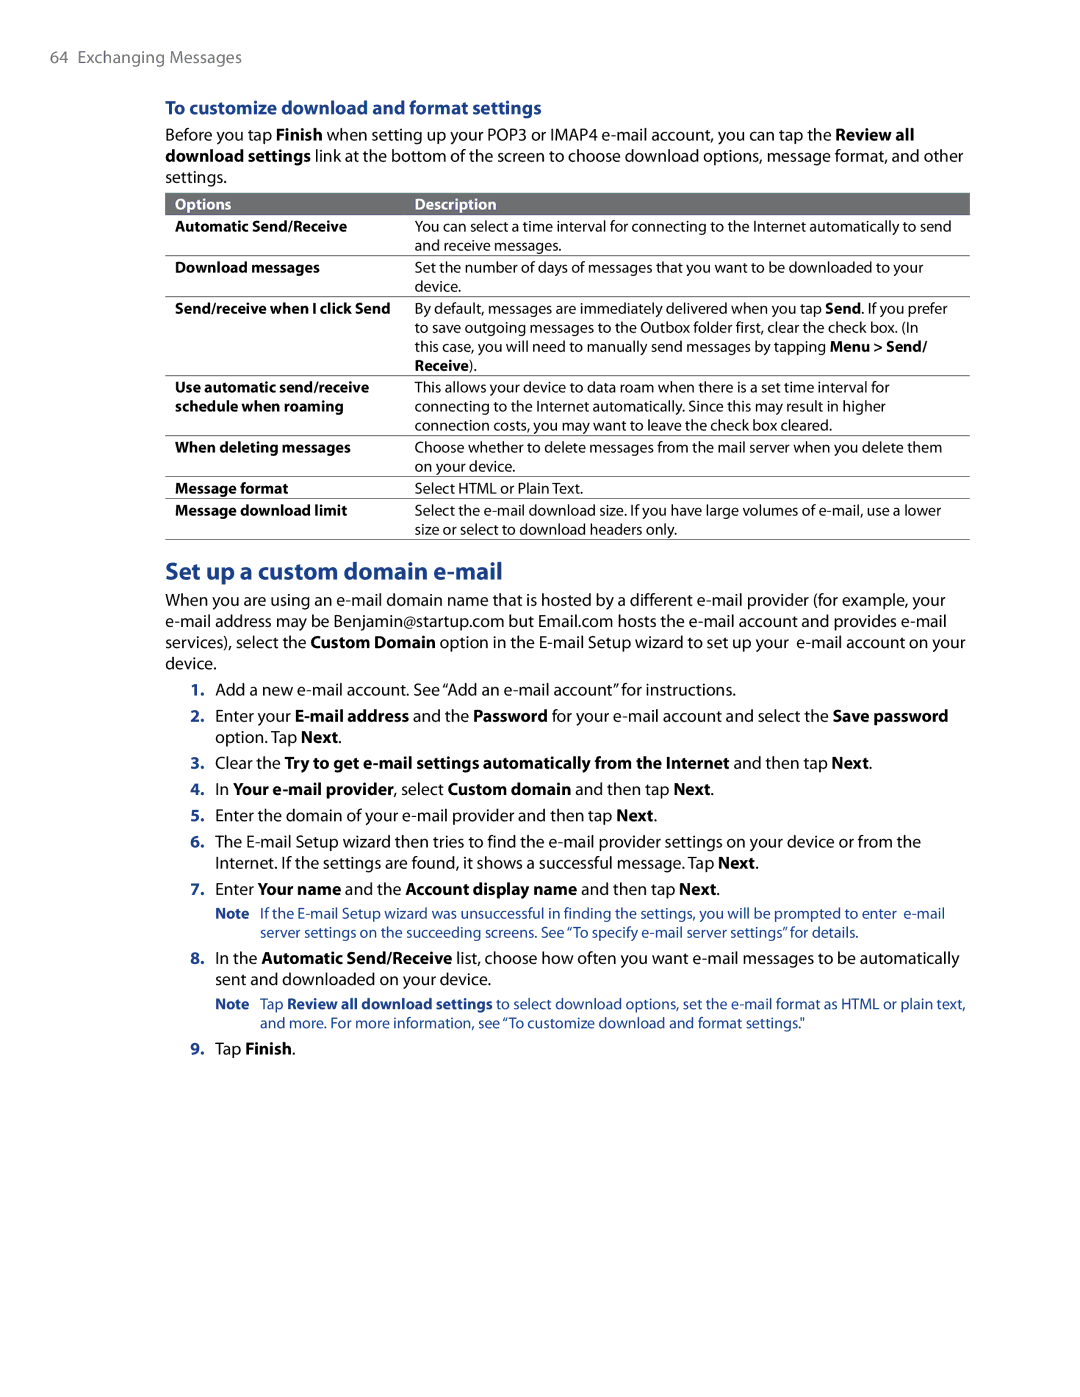
To customize download and format settings
Using E-mail
Create a new e-mail message
Compose and send an e-mail
Filter the Inbox message list
View and reply to messages
Synchronize e-mails
Customize e-mail settings
Exchanging Messages
Working With Company E-mails and Meeting Appointments
Set up an Exchange Server connection
Synchronizing with the Exchange Server
Start synchronization
Tap Next again
Working With Company E-mails
Automatic synchronization through Direct Push
Scheduled synchronization
Instant download through Fetch Mail
Search for e-mails on the Exchange Server
Flag your messages
To flag or unflag a message
Tap Search
Managing Meeting Requests
Out-of-office auto-reply
To send out-of-office auto-reply messages
To reply to a meeting request
Finding Contacts in the Company Directory
Contacts, tap Menu Company Directory
Internet
Ways of Connecting to the Internet
Wi-Fi
To turn Wi-Fi on and off
To connect to a wireless network
To check wireless network status
To save battery power while connected to a wireless network
Starting a Data Connection
Dial-up
To manually start a data connection
To disconnect active data connections
Using Opera Mobile
To open Opera Mobile
To go to a Web site
Tap Start Opera
View Web pages
Opera Mobile menu
To change the screen orientation
On the menu bar, tap to open the menu
Using VZAccess Manager
Using Your Device As a Modem Modem Link
Using Modem Link
To add your device as a modem to a Windows XP notebook
Select Search for the best drivers in these locations
Click Set up a dial-up connection then click Next
Create a modem dial-up connection
On your notebook, click Start Control Panel
Double-clickNetwork and Sharing Center
To set up a dial-up connection in a Windows XP notebook
To end the modem session
Dial up and connect to the Internet
On the Modem Link screen, tap Done or tap Menu Stop
Internet
Bluetooth
Bluetooth Modes
To turn Bluetooth on and make your device visible
Your device supports the following Bluetooth profiles
Supported Profiles
Bluetooth Partnerships
Connecting a Bluetooth Hands-free or Stereo Headset
To create a Bluetooth partnership
To accept a Bluetooth partnership
To beam information from your device to a computer
Beaming Information Using Bluetooth
Beam type of item
Bluetooth Explorer and Bluetooth File Sharing
To use Bluetooth Explorer
Printing Files via Bluetooth
To print contact information
To print a calendar appointment
To print a Jpeg file
Navigating on the Road
Guidelines and Preparation for Using GPS
Experiencing Multimedia
To change the capture mode
Taking Photos and Videos
Capture modes
To open the Camera screen
On-screen controls and indicators
Tap the screen to display the controls and indicators
Camera controls
Supported file formats
Recording indicator. Flashes when recording a video
Menu Panel
To zoom
Zooming
To zoom out
Review screen
Advanced Options
Grid marks
Viewing Photos and Videos Using Album
Select a photo or video to view
To open Album
Tap Start Programs Album
To rotate the image
View an image
To view the next or previous image
To zoom in or out of an image
To view still images as a slideshow
Using Windows Media Player Mobile
Play back video
Close Album
To open Windows Media Player Mobile
To synchronize content to your device automatically
About the controls
About the screens and menus
Synchronize video and audio files
To synchronize content manually to your device
To update the Library
Play media
To play video and audio files on your device
Troubleshooting
Using Audio Booster
Playlists
Using MP3 Trimmer
To delete a custom equalizer preset
Tap Menu Delete Preset
To trim the MP3 file
Experiencing Multimedia
Programs on your Device
Programs on your Device
Programs in the Start Menu
Programs screen
Following are programs you can find on your device
To install a program
To uninstall a program
Tap Start Settings System tab Remove Programs
Adding and Removing Programs
Adobe Reader LE
To open Adobe Reader LE
To search for text in the document
Tap Start Programs Adobe Reader LE
Calendar
Create appointments
To open the Calendar screen
To schedule an appointment
Send appointments
View appointments
To send a meeting request
Contacts
Add new contacts
To open the Contacts screen
To add a contact on your device
Organize and search contacts
Share contact information
To group similar contacts
To find a contact on your device
To access the Comm Manager
Comm Manager
Set up a printer
Open Jetcet Print
Print a file
Print a web
To use Microsoft Office Mobile
Microsoft Office Mobile
Tap Start Programs Office Mobile
When finished, tap OK to save and return to the note list
To create a note
To draw in a note
To record a voice note
Tasks
Voice Recorder
WorldCard Mobile
Capture and export business card information
On the WorldCard Mobile screen, tap Recognize
ZIP
To start ZIP on your device
To open a ZIP file and extract files
To create a new zip archive
Managing Your Device
To manage files on your device using File Explorer
Copying and Managing Files
To copy files to a storage card
Tap Start File Explorer
Personal tab
Settings on Your Device
System tab
Connections tab
Changing Basic Settings
Regional settings
Display settings
Date and time
Ringer settings
Alarms and notifications
Using Task Manager
Phone services
To access and change settings of phone services
To configure the Exit button
Protect your device with a password
To set a device password
Protecting Your Device
To close running programs from the Task Manager
Connecting to an External Display
Encrypt files on your storage card
Connect the device to an external display
Turn off the external display
Resetting Your Device
Soft reset
Hard reset
Managing Memory
Windows Update
Clear Storage
Battery Saving Tips
Appendix
Specifications
Regulatory Agency Identifications
Regulatory Notices
Federal Communication Commission Interference Statement
SAR Information
43 W/KG @1g Head 18 W/KG @1g Body
Weee Notice
RoHS Compliance
Pacemakers
Hearing Aids
When Driving
Additional Safety Information
When Using Your Device Near Other Electronic Devices
Turn Off Your Device Before Flying
Turn your device OFF where posted notices so require
Turn Off Your Device in Dangerous Areas
General Safety
Antenna Safety
Battery Safety
DOs
Adapter/Charger
Use the Correct External Power Source
DON’Ts
Appendix
Index
Jetcet PRINT
Index
ZIP