B E F O R E O P E R AT I N G

M A N U A L O P E R A T I O N

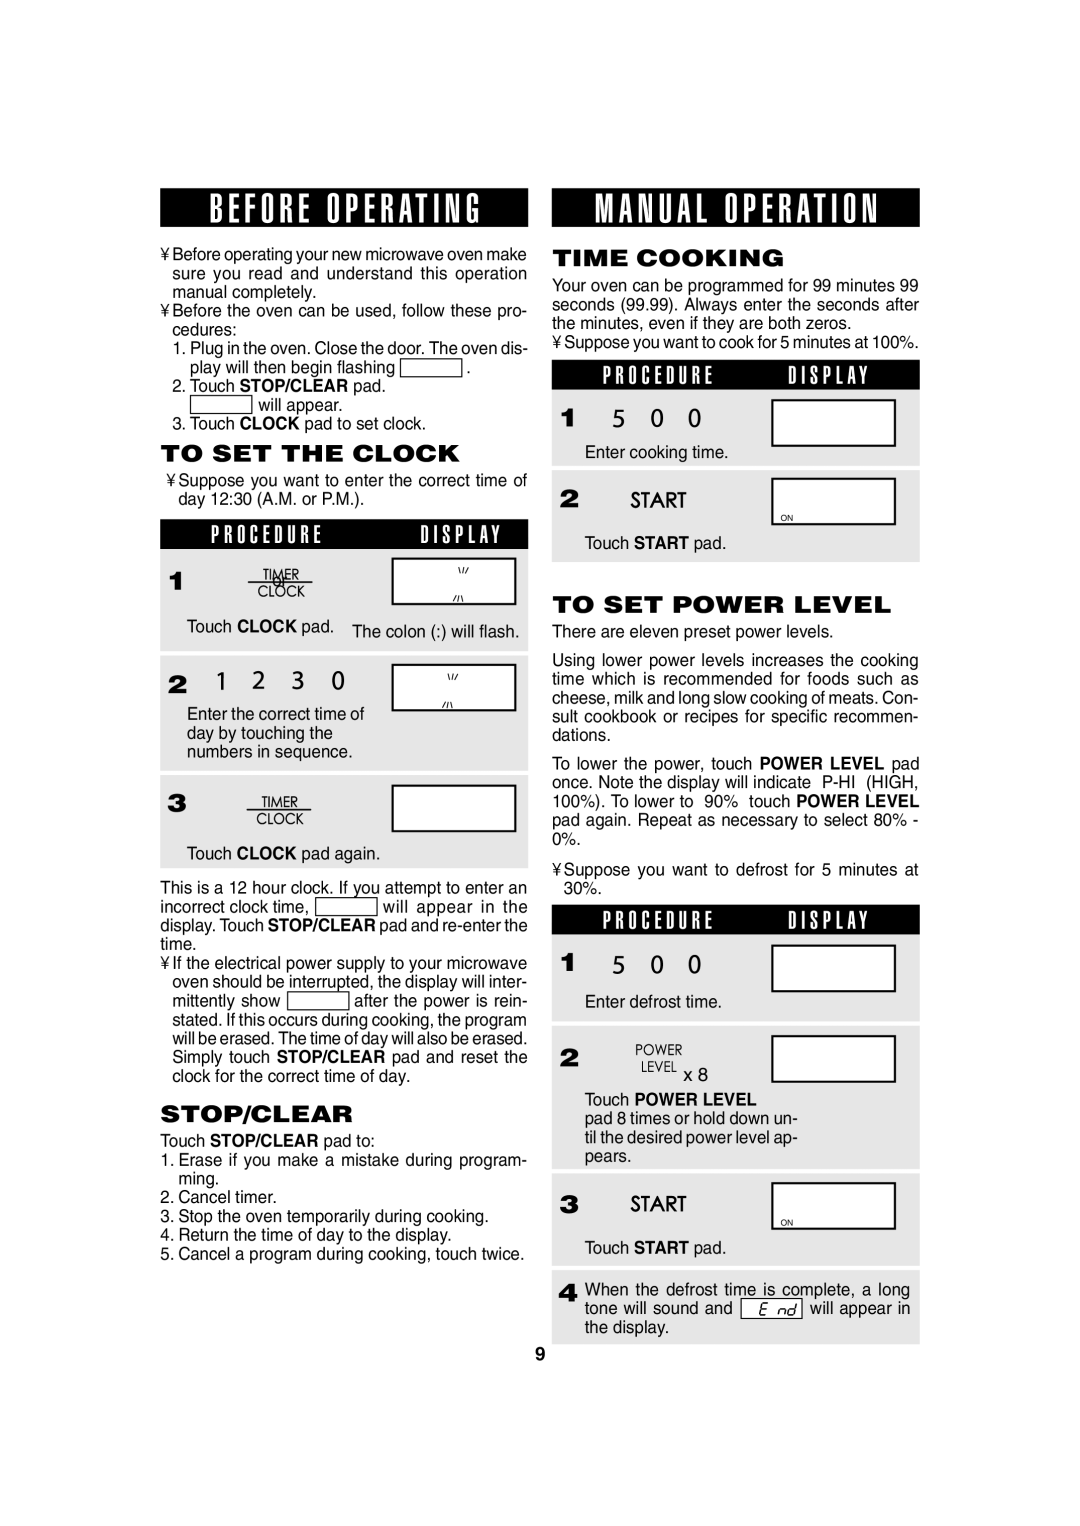
Before operating your new microwave oven make sure you read and understand this operation manual completely.

Before the oven can be used, follow these pro- cedures:

1. Plug in the oven. Close the door. The oven dis-

play will then begin flashing 88:88 .

2.Touch STOP/CLEAR pad.

:will appear.

3.Touch CLOCK pad to set clock.

TO SET THE CLOCK

Suppose you want to enter the correct time of day 12:30 (A.M. or P.M.).

P R O C E D U R ED I S P L A Y

TIME COOKING

Your oven can be programmed for 99 minutes 99 seconds (99.99). Always enter the seconds after the minutes, even if they are both zeros.

Suppose you want to cook for 5 minutes at 100%.

P R O C E D U R E

D I S P L A Y

1


5

. 0 0


Enter cooking time.


2

ON 5

. 0 0


Touch START pad.


1or

: 0

TO SET POWER LEVEL

Touch CLOCK pad.

The colon (:) will flash.

There are eleven preset power levels.


Using lower power levels increases the cooking

2


1 2 : 3 0


time which is recommended for foods such as


cheese, milk and long slow cooking of meats. Con-

Enter the correct time of


sult cookbook or recipes for specific recommen-


day by touching the


dations.


numbers in sequence.


To lower the power, touch POWER LEVEL pad


once. Note the display will indicate “P-HI” (HIGH,

3


1 2 : 3 0


100%). To lower to “90%” touch POWER LEVEL


pad again. Repeat as necessary to select 80% -

Touch CLOCK pad again.

0%.


• Suppose you want to defrost for 5 minutes at

This is a 12 hour clock. If you attempt to enter an

30%.


incorrect clock time,


EE

will appear in the


P R O C E D U R E

D I S P L A Y

display. Touch STOP/CLEAR

pad and re-enter the


time.


• If the electrical power supply to your microwave

1


5 . 0 0


oven should be interrupted, the display will inter-


mittently show

88:88


after the power is rein-


Enter defrost time.


stated. If this occurs during cooking, the program


will be erased. The time of day will also be erased.


2


P - 3 0


Simply touch STOP/CLEAR pad and reset the

x 8


clock for the correct time of day.


STOP/CLEAR


Touch POWER LEVEL


pad 8 times or hold down un-

Touch STOP/CLEAR pad to:


til the desired power level ap-

1. Erase if you make a mistake during program-


pears.


ming.


2. Cancel timer.


3


ON 5 . 0 0


3. Stop the oven temporarily during cooking.


4. Return the time of day to the display.


Touch START pad.


5. Cancel a program during cooking, touch twice.


4 When the defrost time is complete, a long


tone will sound and


will appear in

the display.

9

Page 11
Image 11
Sharp 220H, R-230H, 209H, 203H F O R E O P E R At I N G, To SET the Clock, Time Cooking, To SET Power Level, Stop/Clear

220H, 203H, 209H, R-230H specifications

The Sharp R-230H, R-209H, R-203H, and R-220H are part of a well-respected line of microwave ovens that showcase Sharp’s commitment to innovation, usability, and efficiency. Each model is designed to meet the diverse needs of households and commercial kitchens alike, ensuring that quality and performance remain paramount.

The Sharp R-230H features a sleek design, making it a suitable addition to any kitchen. It boasts a generous capacity that allows for the preparation of larger meals, accommodating various cooking needs. One of its standout features is the inverter technology, which provides a consistent cooking temperature and evenly heats food. This technology reduces cooking time and improves the results of defrosting, cooking, and reheating tasks.

Similarly, the R-209H is designed with ease of use in mind. Featuring an intuitive control panel and a range of pre-set cooking options, it simplifies meal preparation. The R-209H is particularly suited for smaller spaces, perfect for users with limited counter space. Its compact size does not compromise on power, providing efficient cooking capabilities with a quick start function that allows rapid warming.

The R-203H is another excellent option in this lineup, emphasizing user-friendly features and energy efficiency. Equipped with a grill function, this model can achieve crispy finishes and is great for browning or grilling a variety of foods. It also includes a child lock feature, prioritizing safety, and making it a family-friendly choice.

Lastly, the Sharp R-220H offers a combination of power and versatility. This model comes with multiple auto-cook settings that cater to a range of cuisines and cooking methods. Its ergonomic design further ensures accessibility in operation, with a clear display that enhances visibility.

In summary, the Sharp R-230H, R-209H, R-203H, and R-220H microwave ovens embody the brand's dedication to innovative cooking solutions. The incorporation of inverter technology, user-friendly controls, energy efficiency, and safety features make these microwaves suitable for diverse culinary environments. Each model caters to specific needs, ensuring that whether for home use or professional kitchens, there is a Sharp microwave that fits seamlessly into everyday life. With Sharp's reputation for quality, these models provide reliable performance that stands the test of time.