Manuals
/
Sharp
/
Kitchen Appliance
/
Microwave Oven
Sharp
R-330J(W), R-330J(S)
manual
Installation Instructions, Oven Diagram
Models:
R-330J(S)
R-330J(W)
1
6
43
43
Download
43 pages
43.13 Kb
3
4
5
6
7
8
9
10
Specification
Install
Charts
Alarm
Warranty
Clock Setting
Other Convenient Features
Advice
Page 6
Image 6
Page 5
Page 7
Page 6
Image 6
Page 5
Page 7
Contents
COOKBOOK
R-330JW
OPERATIONMANUAL
R-330JS
AUSTRALIA
WARRANTY
Congratulations on Your Purchase
NEW ZEALAND
CONTENTS
INTRODUCTION
a. Do not overcook food
SPECIAL NOTES AND WARNING
DON’T
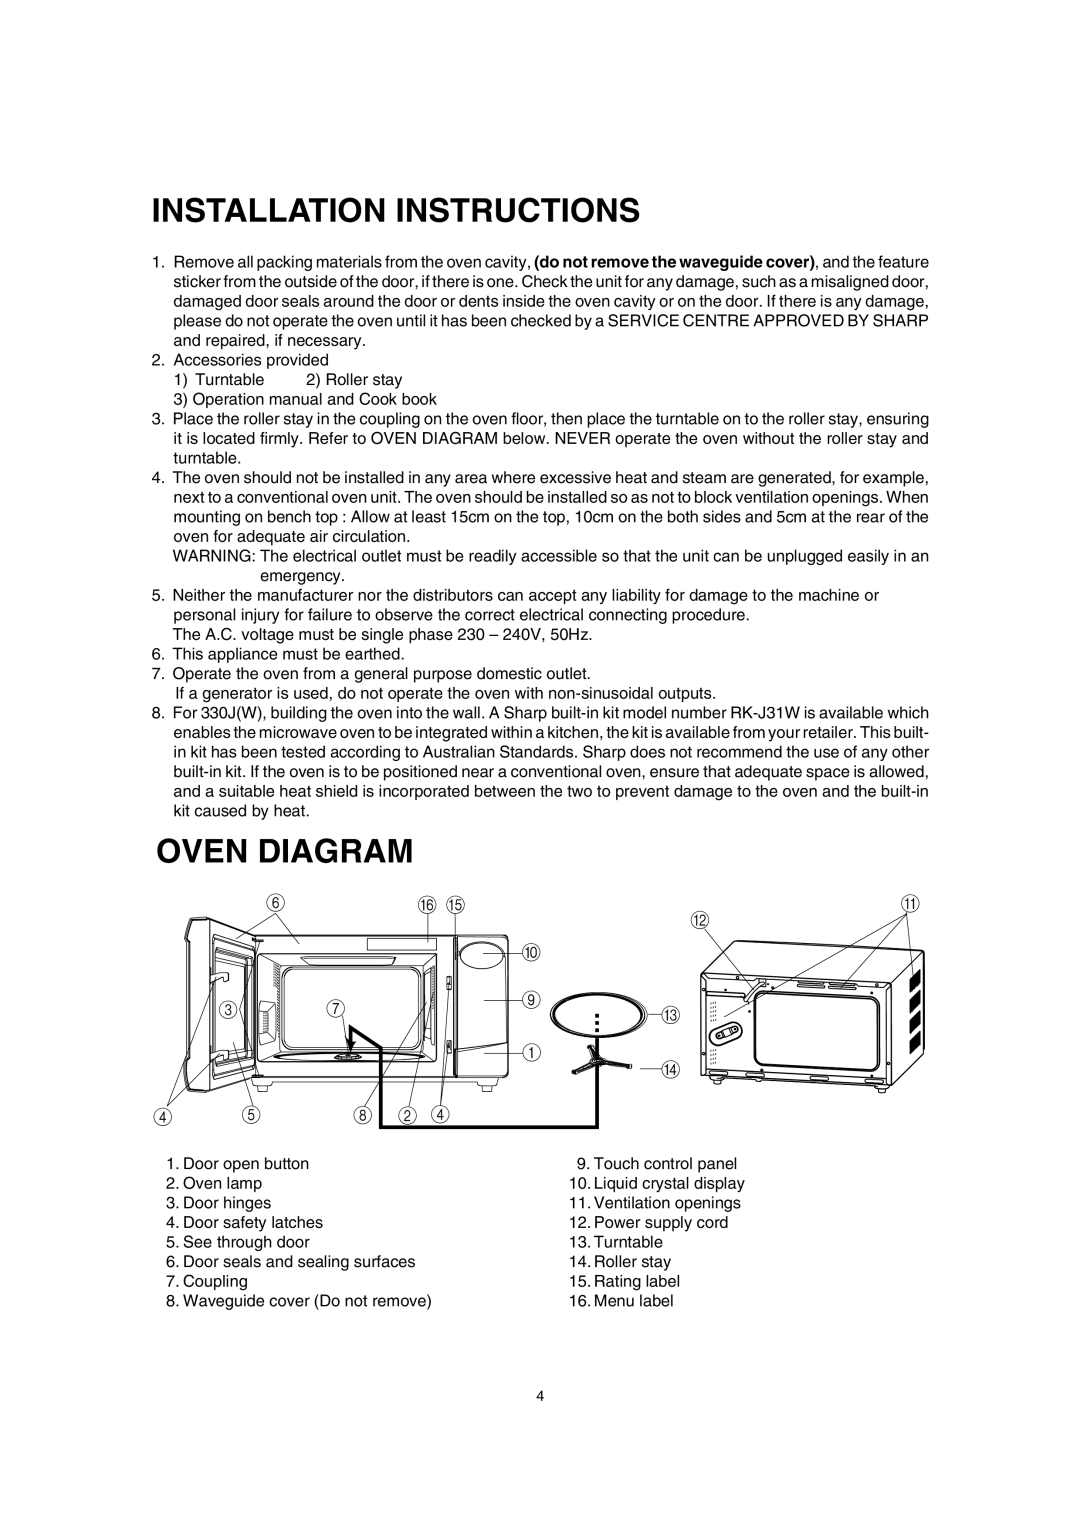
INSTALLATION INSTRUCTIONS
OVEN DIAGRAM
OPERATION OF TOUCH CONTROL PANEL
Control Panel Display
Touch Control Panel Layout
BEFORE OPERATING
Clock Setting
To Cancel a Programme During Cooking
Getting Started
MANUAL OPERATIONS
Microwave Time Cooking
Sequence Cooking
Instant Cook
Increasing Time During a Cooking Programme
AUTOMATIC OPERATIONS
Notes for Automatic Operations
Instant Action
Express Defrost
EXPRESS
DEFROST
Easy Defrost
OTHER CONVENIENT FEATURES
Less/More Setting
Child Lock
Timer
Alarm
Demonstration Mode
SPECIFICATIONS
CARE AND CLEANING
SERVICE CALL CHECK
Exterior
CONTENTS COOKING GUIDE
COOKING GUIDES
HELPFUL HINTS
COOKWARE AND UTENSIL GUIDE
Advice
Utensil
Beverage
INSTANT ACTION MENU GUIDE
Dinner Plate
Reheat Pizza
Frozen Vegetables
Jacket Potato
Rice / Pasta
Fish Fillets
EXPRESS DEFROST MENU GUIDE
Quantity
Place fish fillets on a defrost rack
Chops
EASY DEFROST MENU GUIDE
Steak
Minced Meat
LASAGNE
MEAT
INDEX
MEAT SAUCE INGREDIENTS
SHEPHERDS PIE
GOLDEN CURRY SAUSAGES
BEEF STROGANOFF
VEAL AND EGGPLANT
CHILLI CON CARNE
ITALIAN SPAGHETTI SAUCE
INDIAN CURRY LAMB
HONEY ROAST LAMB
CHICKEN PENNE SALAD
CHICKEN IN A POT
CHICKEN FILLET BURGERS
TOPPING 1 HAWAIIAN
CRUNCHY CAMEMBERT CHICKEN Serves
HONEY CHICKEN LEGS
Serves 4 SEASONED CHICKEN PARCELS
ROAST CHICKEN
SMOKED SALMON TAGLIATELLE
SEAFOOD
SEAFOOD LAKSA
CHEESY SALMON CANNELLONI Serves
CRAB MORNAY
SEAFOOD MARINARA
SESAME PRAWNS
GARLIC MUSSELS
EASY HOME-MADE RISOTTO
VEGETABLES
CAULIFLOWER AU GRATIN
SCALLOPED POTATOES
HONEY GINGERED VEGETABLES Serves
STUFFED BAKED POTATOES
PUMPKIN SALAD
POTATOES PIZZAIOLA
CHOCOLATE CAKE
DESSERTS
AUSTRALIAN FRUIT CAKE
BREAD AND BUTTER PUDDING
DEFROSTING TIMES AND TECHNIQUES FOR MEAT AND POULTRY
CHARTS
DEFROSTING FROZEN FOODS
DEFROSTING TIMES AND TECHNIQUES FOR SEAFOOD, BREAD AND PIES
breast-side down on a rack. Turn over and shield wings and
MICROWAVE OVEN ROASTING CHART
on a rack. Turn over halfway through cooking. Stand covered
legs halfway through cooking. Stand covered with foil before
FRESH VEGETABLE CHART
MICROWAVE TIME
GUIDE TO COOKING EGGS SCRAMBLED EGG GUIDE
FROZEN VEGETABLE CHART
RICE AND PASTA COOKING CHART
4 pieces
FOOD CHART
REHEATING CONVENIENCE
DEFROSTING CONVENIENCE
DEFROSTING
GLOSSARY OF TERMS
GENERAL INFORMATION
REHEATING
COMMONLY ASKED QUESTIONS AND ANSWERS
POINTS TO REMEMBER
HINTS
QUICK REFERENCE GUIDE
SHARP CORPORATION OSAKA, JAPAN
Top
Page
Image
Contents