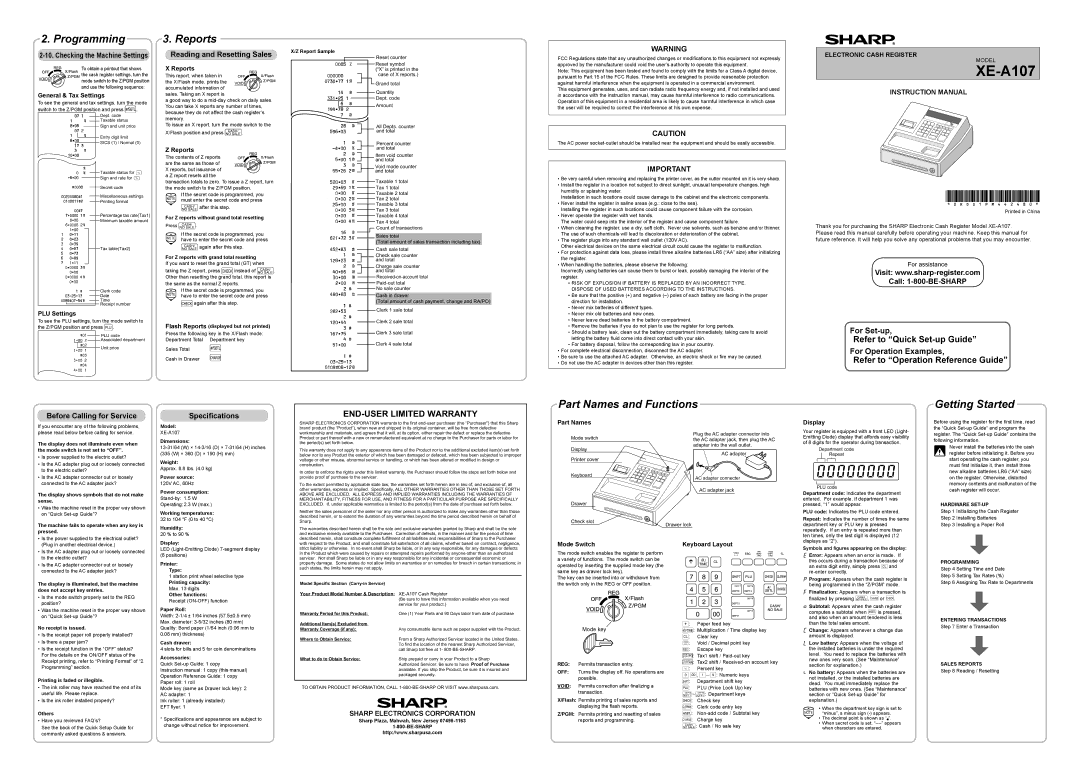
Sharp XE-A107 instruction manual Programming, Reports, Part Names and Functions, Getting Started

Models: XE-A107

1 2
Download 2 pages 34.58 Kb
Page 1
Image 1
2. Programming

2. Programming

2-10. Checking the Machine Settings

To obtain a printout that shows the cash register settings, turn the mode switch to the Z/PGM position and use the following sequence:

General & Tax Settings

To see the general and tax settings, turn the mode switch to the Z/PGM position and press u.

Dept. code

Taxable status

Sign and unit price

Entry digit limit

2-10. Checking the Machine Settings SICS (1) / Normal (0)

Taxable status for %

Sign and rate for %

Secret code

Miscellaneous settings

Printing format

Percentage tax rate(Tax1)

Minimum taxable amount

Tax table(Tax2)

Clerk code

Date

Time

Receipt number

PLU Settings

To see the PLU settings, turn the mode switch to the Z/PGM position and press p.

PLU code

Associated department

Unit price

3. Reports

Reading and Resetting Sales

X/Z Report Sample


X Reports


This report, when taken in


the X/Flash mode, prints the


accumulated information of


sales. Taking an X report is


a good way to do a mid-day check on daily sales.


You can take X reports any number of times,


because they do not affect the cash register’s


memory.


To issue an X report, turn the mode switch to the


X/Flash position and press A.


Z Reports


The contents of Z reports


are the same as those of


X reports, but issuance of


a Z report resets all the


transaction totals to zero. To issue a Z report, turn


the mode switch to the Z/PGM position.


Dmust enter the secret code and press Aafter this step.If the secret code is programmed, you

For Z reports without grand total resetting

Press A.

Dhave to enter the secret code and press Aagain after this step.If the secret code is programmed, you

For Z reports with grand total resetting

If you want to reset the grand total (GT) when

taking the Z report, press Cinstead of A. Other than resetting the grand total, this report is

the same as the normal Z reports.

Dhave to enter the secret code and press Cagain after this step.If the secret code is programmed, you

Flash Reports (displayed but not printed)

Press the following key in the X/Flash mode:

Department Total

Department key

Sales Total

u

Cash in Drawer

c

Reset counter

Reset symbol

(“X” is printed in the case of X reports.)

3. Reports Grand total

Quantity

Dept. code

Amount

All Depts. counter and total

Percent counter

MODEL and total

Item void counter

XE-A107 and total

Void mode counter

INSTRUCTION MANUAL and total

Taxable 1 total

Tax 1 total

Taxable 2 total

Tax 2 total

Taxable 3 total

Tax 3 total

Taxable 4 total

Tax 4 total

Count of transactions

Sales total

(Total amount of sales transaction including tax)

Cash sale total Check sale counter and total

Charge sale counter and total Received-on-account total Paid-out total

No sale counter

Cash in drawer

(Total amount of cash payment, change and RA/PO) Clerk 1 sale total

Clerk 2 sale total

Clerk 3 sale total

Clerk 4 sale total

WARNING

FCC Regulations state that any unauthorized changes or modifications to this equipment not expressly approved by the manufacturer could void the user’s authority to operate this equipment.

Note: This equipment has been tested and found to comply with the limits for a Class A digital device, pursuant to Part 15 of the FCC Rules. These limits are designed to provide reasonable protection against harmful interference when the equipment is operated in a commercial environment.

This equipment generates, uses, and can radiate radio frequency energy and, if not installed and used in accordance with the instruction manual, may cause harmful interference to radio communications. Operation of this equipment in a residential area is likely to cause harmful interference in which case the user will be required to correct the interference at his own expense.

CAUTION

The AC power socket-outlet should be installed near the equipment and should be easily accessible.

IMPORTANT

Be very careful when removing and replacing the printer cover, as the cutter mounted on it is very sharp.

Install the register in a location not subject to direct sunlight, unusual temperature changes, high humidity or splashing water.

Installation in such locations could cause damage to the cabinet and the electronic components.

Never install the register in saline areas (e.g.: close to the sea).

Installing the register in such locations could cause component failure with the corrosion.

Never operate the register with wet hands.

The water could seep into the interior of the register and cause component failure.

When cleaning the register, use a dry, soft cloth. Never use solvents, such as benzine and/or thinner. The use of such chemicals will lead to discoloration or deterioration of the cabinet.

The register plugs into any standard wall outlet (120V AC).

Other electrical devices on the same electrical circuit could cause the register to malfunction.

For protection against data loss, please install three alkaline batteries LR6 (“AA” size) after initializing the register.

When handling the batteries, please observe the following:

Incorrectly using batteries can cause them to burst or leak, possibly damaging the interior of the register.

RISK OF EXPLOSION IF BATTERY IS REPLACED BY AN INCORRECT TYPE. DISPOSE OF USED BATTERIES ACCORDING TO THE INSTRUCTIONS.

Be sure that the positive (+) and negative (–) poles of each battery are facing in the proper direction for installation.

Never mix batteries of different types.

Never mix old batteries and new ones.

Never leave dead batteries in the battery compartment.

Remove the batteries if you do not plan to use the register for long periods.

Should a battery leak, clean out the battery compartment immediately, taking care to avoid letting the battery fluid come into direct contact with your skin.

For battery disposal, follow the corresponding law in your country.

For complete electrical disconnection, disconnect the AC adapter.

Be sure to use the attached AC adapter. Otherwise, an electric shock or fire may be caused.

Do not use the AC adapter in devices other than this register.

ELECTRONIC CASH REGISTER

MODEL

XE-A107

INSTRUCTION MANUAL

Printed in China

Thank you for purchasing the SHARP Electronic Cash Register Model XE-A107. Please read this manual carefully before operating your machine. Keep this manual for future reference. It will help you solve any operational problems that you may encounter.

For assistance

Visit: www.sharp-register.com

Call: 1-800-BE-SHARP

For Set-up,

Refer to “Quick Set-up Guide”

For Operation Examples,

Refer to “Operation Reference Guide”

Before Calling for Service

Specifications

END-USER LIMITED WARRANTY

Part Names and Functions

Getting Started

If you encounter any of the following problems, please read below before calling for service.

The display does not illuminate even when the mode switch is not set to “OFF”.

Is power supplied to the electric outlet?

Is the AC adapter plug out or loosely connected to the electric outlet?

Is the AC adapter connector out or loosely connected to the AC adapter jack?

The display shows symbols that do not make sense.

Was the machine reset in the proper way shown on “Quick Set-up Guide”?

The machine fails to operate when any key is pressed.

• Is the power supplied to the electrical outlet?

Model:

XE-A107

Dimensions:

13-31/64 (W) × 14-3/16 (D) × 7-31/64 (H) inches (335 (W) × 360 (D) × 190 (H) mm)

Weight:

Approx. 8.8 lbs. (4.0 kg)

Power source:

120V AC, 60Hz

Power consumption: Stand-by: 1.5 W Operating: 2.3 W (max.)

Working temperatures: 32 to 104 °F (0 to 40 ºC)

Humidity:

20 % to 90 %

SHARP ELECTRONICS CORPORATION warrants to the first end-user purchaser (the “Purchaser”) that this Sharp brand product (the “Product”), when new and shipped in its original container, will be free from defective workmanship and materials, and agrees that it will, at its option, either repair the defect or replace the defective Product or part thereof with a new or remanufactured equivalent at no charge to the Purchaser for parts or labor for the period(s) set forth below.

This warranty does not apply to any appearance items of the Product nor to the additional excluded item(s) set forth below nor to any Product the exterior of which has been damaged or defaced, which has been subjected to improper voltage or other misuse, abnormal service or handling, or which has been altered or modified in design or construction.

In order to enforce the rights under this limited warranty, the Purchaser should follow the steps set forth below and provide proof of purchase to the servicer.

To the extent permitted by applicable state law, the warranties set forth herein are in lieu of, and exclusive of, all other warranties, express or implied. Specifically, ALL OTHER WARRANTIES OTHER THAN THOSE SET FORTH ABOVE ARE EXCLUDED. ALL EXPRESS AND IMPLIED WARRANTIES INCLUDING THE WARRANTIES OF MERCHANTABILITY, FITNESS FOR USE, AND FITNESS FOR A PARTICULAR PURPOSE ARE SPECIFICALLY EXCLUDED. If, under applicable warranties is limited to the period(s) from the date of purchase set forth below.

Neither the sales personnel of the seller nor any other person is authorized to make any warranties other than those described herein, or to extend the duration of any warranties beyond the time period described herein on behalf of Sharp.

The warranties described herein shall be the sole and exclusive warranties granted by Sharp and shall be the sole and exclusive remedy available to the Purchaser. Correction of defects, in the manner and for the period of time described herein, shall constitute complete fulfillment of all liabilities and responsibilities of Sharp to the Purchaser

Part Names

Mode switch

Display

Printer cover

Keyboard

Drawer

Check slot

Plug the AC adapter connector into the AC adapter jack, then plug the AC adapter into the wall outlet.

AC adapter

AC adapter connecter

AC adapter jack

Drawer lock

Display

Your register is equipped with a front LED (Light- Emitting Diode) display that affords easy visibility of 8 digits for the operator during transaction.

Department code

Repeat

PLU code

Department code: Indicates the department entered. For example, if department 1 was pressed, “1” would appear.

PLU code: Indicates the PLU code entered.

Repeat: Indicates the number of times the same department key or PLU key is pressed repeatedly. If an entry is repeated more than ten times, only the last digit is displayed (12

Before using the register for the first time, read the “Quick Set-up Guide” and program the register. The “Quick Set-up Guide” contains the following information.

CNever install the batteries into the cash register before initializing it. Before you start operating the cash register, you must first initialize it, then install three new alkaline batteries LR6 (“AA” size) on the register. Otherwise, distorted memory contents and malfunction of the cash register will occur.

HARDWARE SET-UP

Step 1 Initializing the Cash Register Step 2 Installing Batteries

Step 3 Installing a Paper Roll

(Plug in another electrical device.)

• Is the AC adapter plug out or loosely connected

to the electric outlet?

• Is the AC adapter connector out or loosely

connected to the AC adapter jack?

The display is illuminated, but the machine does not accept key entries.

Is the mode switch properly set to the REG position?

Was the machine reset in the proper way shown on “Quick Set-up Guide”?

Display:

LED (Light-Emitting Diode) 7-segment display (8 positions)

Printer:

Type:

1 station print wheel selective type

Printing capacity:

Max. 13 digits

Other functions:

Receipt (ON-OFF) function

Paper Roll:

Width: 2-1/4 ± 1/64 inches (57.5±0.5 mm)

with respect to the Product, and shall constitute full satisfaction of all claims, whether based on contract, negligence, strict liability or otherwise. In no event shall Sharp be liable, or in any way responsible, for any damages or defects in the Product which were caused by repairs or attempted repairs performed by anyone other than an authorized servicer. Nor shall Sharp be liable or in any way responsible for any incidental or consequential economic or property damage. Some states do not allow limits on warranties or on remedies for breach in certain transactions; in such states, the limits herein may not apply.

Model Specific Section (Carry-in Service)

Your Product Model Number & Description:XE-A107 Cash Register


(Be sure to have this information available when you need


service for your product.)

Warranty Period for this Product:

One (1) Year Parts and 90 Days labor from date of purchase

Mode Switch

Keyboard Layout

The mode switch enables the register to perform a variety of functions. The mode switch can be operated by inserting the supplied mode key (the same key as drawer lock key).

The key can be inserted into or withdrawn from the switch only in the REG or OFF position.

displays as “2”).

Symbols and figures appearing on the display:

Error: Appears when an error is made. If this occurs during a transaction because of an extra digit entry, simply press l and re-enter correctly.

For assistanceFor Set-up,Refer to “Quick Set-up Guide” Program: Appears when the cash register is being programmed in the “Z/PGM” mode.

Finalization: Appears when a transaction is finalized by pressing A, c or C.

Subtotal: Appears when the cash register computes a subtotal when u is pressed, and also when an amount tendered is less

PROGRAMMING

Step 4 Setting Time and Date

Step 5 Setting Tax Rates (%)

Step 6 Assigning Tax Rate to Departments

No receipt is issued.

Is the receipt paper roll properly installed?

Is there a paper jam?

Is the receipt function in the “OFF” status? For the details on the ON/OFF status of the Receipt printing, refer to “Printing Format” of “2. Programming” section.

Printing is faded or illegible.

The ink roller may have reached the end of its useful life. Please replace.

Is the ink roller installed properly?

Others

Have you reviewed FAQ’s?

See the back of the Quick Setup Guide for commonly asked questions & answers.

Max. diameter: 3-5/32 inches (80 mm)

Quality: Bond paper (1/64 inch (0.06 mm to 0.08 mm) thickness)

Cash drawer:

4 slots for bills and 5 for coin denominations

Accessories:

Quick Set-up Guide: 1 copy

Instruction manual: 1 copy (this manual)

Operation Reference Guide: 1 copy

Paper roll: 1 roll

Mode key (same as Drawer lock key): 2

AC adapter: 1

Ink roller: 1 (already installed)

EFT flyer: 1

*Specifications and appearance are subject to change without notice for improvement.

Additional Item(s) Excluded from


Warranty Coverage (if any):

Any consumable items such as paper supplied with the Product.

Where to Obtain Service:

From a Sharp Authorized Servicer located in the United States.


To find the location of the nearest Sharp Authorized Servicer,


call Sharp toll free at 1- 800-BE-SHARP.

What to do to Obtain Service:

Ship prepaid or carry in your Product to a Sharp


Authorized Servicer. Be sure to have Proof of Purchase


available. If you ship the Product, be sure it is insured and


packaged securely.

TO OBTAIN PRODUCT INFORMATION, CALL 1-800-BE-SHARP OR VISIT www.sharpusa.com.

SHARP ELECTRONICS CORPORATION

Sharp Plaza, Mahwah, New Jersey 07495-1163

1-800-BE-SHARP

http://www.sharpusa.com

Mode key

REG: Permits transaction entry.

OFF: Turns the display off. No operations are possible.

VOID: Permits correction after finalizing a transaction.

X/Flash: Permits printing of sales reports and displaying the flash reports.

Z/PGM: Permits printing and resetting of sales reports and programming.

F: Paper feed key

Q: Multiplication / Time display key

l: Clear key

v: Void / Decimal point key

G: Escape key

T: Tax1 shift / Paid-out key

U: Tax2 shift / Received-on account key

%: Percent key

0:, 1 9: Numeric keys

H: Department shift key

p: PLU (Price Look Up) key

!$: Department keys

C: Check key

L: Clerk code entry key

u: Non-add code / Subtotal key

c: Charge key

A: Cash / No sale key

than the total sales amount.

Change: Appears whenever a change due amount is displayed.

Low battery: Appears when the voltage of the installed batteries is under the required level. You need to replace the batteries with new ones very soon. (See “Maintenance” section for explanation.)

No battery: Appears when the batteries are not installed, or the installed batteries are dead. You must immediately replace the batteries with new ones. (See “Maintenance” section or “Quick Set-up Guide” for explanation.)

D“minus”, a minus sign (-) appears.

The decimal point is shown as “For Operation Examples,”.

When secret code is set, “----” appears when characters are entered.• When the department key sign is set to

ENTERING TRANSACTIONS

Step 7 Enter a Transaction

SALES REPORTS

Step 8 Reading / Resetting

Page 1
Image 1
Sharp XE-A107 instruction manual Programming, Reports, Part Names and Functions, Getting Started, For Set-up, Model