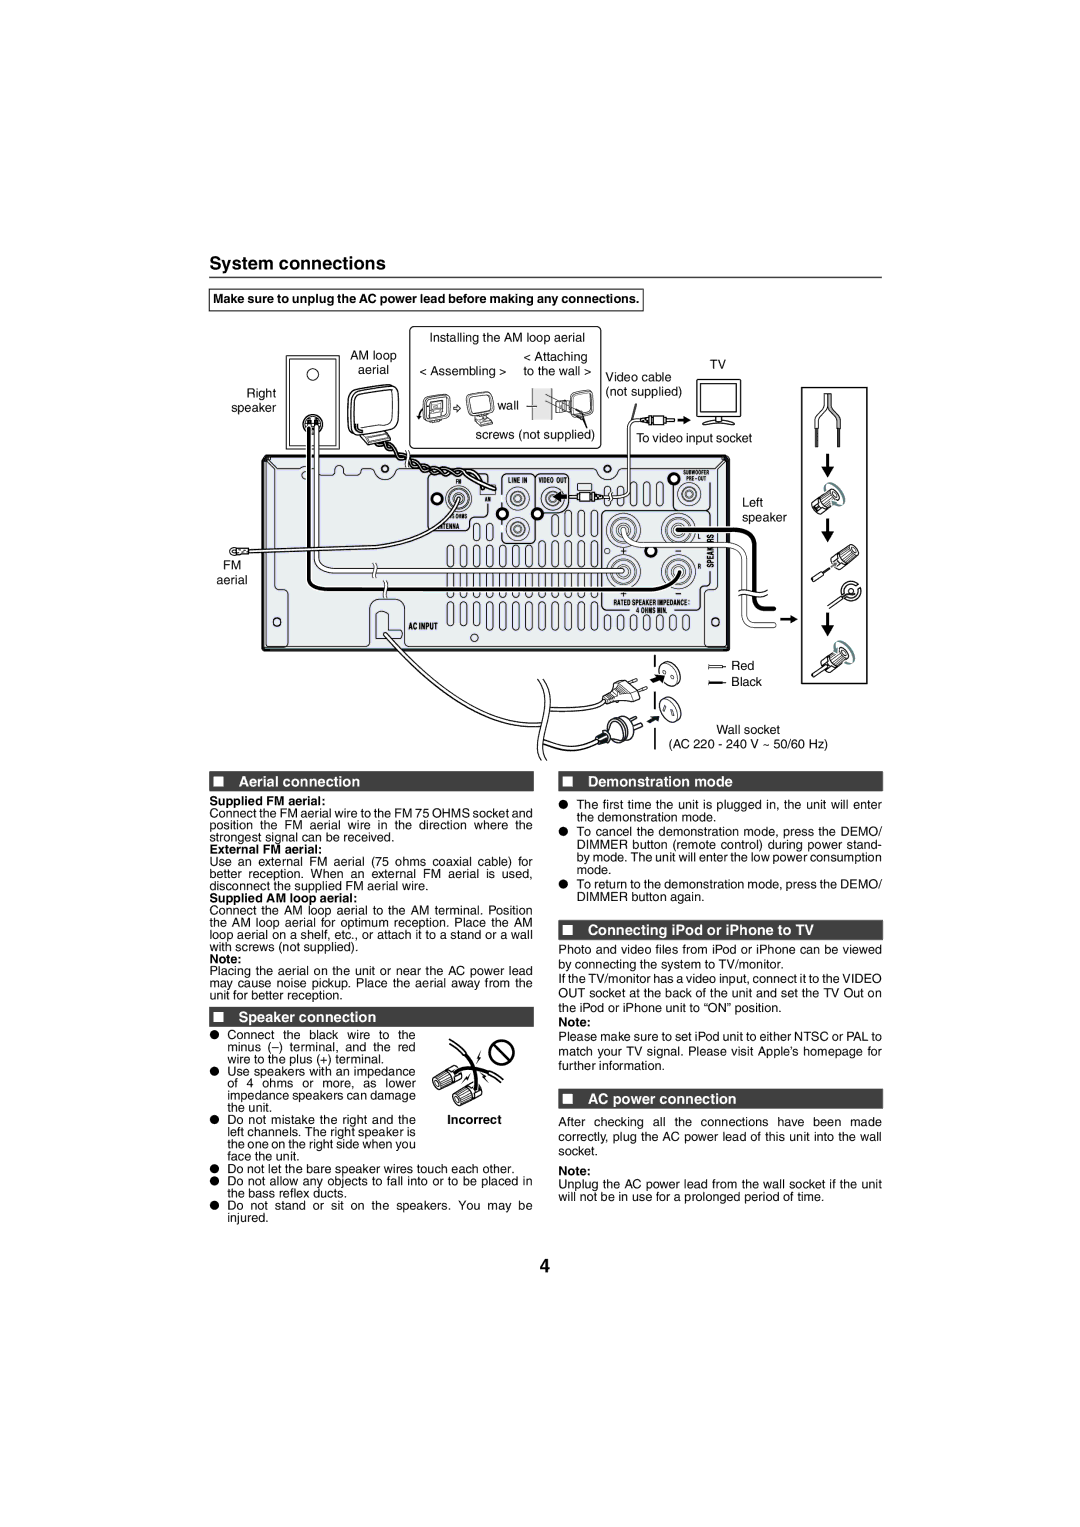
System connections

Make sure to unplug the AC power lead before making any connections.


Installing the AM loop aerial


AM loop


< Attaching

TV

aerial

< Assembling >

to the wall >

Video cable


Right

wall

speaker

(not supplied)

screws (not supplied)

To video input socket

Left speaker

FM

aerial

Red

Black

Wall socket

(AC 220 - 240 V ~ 50/60 Hz)

Aerial connection

Supplied FM aerial:

Connect the FM aerial wire to the FM 75 OHMS socket and position the FM aerial wire in the direction where the strongest signal can be received.

External FM aerial:

Use an external FM aerial (75 ohms coaxial cable) for better reception. When an external FM aerial is used, disconnect the supplied FM aerial wire.

Supplied AM loop aerial:

Connect the AM loop aerial to the AM terminal. Position the AM loop aerial for optimum reception. Place the AM loop aerial on a shelf, etc., or attach it to a stand or a wall with screws (not supplied).

Note:

Placing the aerial on the unit or near the AC power lead may cause noise pickup. Place the aerial away from the unit for better reception.

Speaker connection

Connect the black wire to the minus (–) terminal, and the red wire to the plus (+) terminal.

Use speakers with an impedance


of 4 ohms or more, as lower


impedance speakers can damage


the unit.

Incorrect

Do not mistake the right and the

left channels. The right speaker is


the one on the right side when you


face the unit.


Do not let the bare speaker wires touch each other.

Do not allow any objects to fall into or to be placed in the bass reflex ducts.

Do not stand or sit on the speakers. You may be injured.

Demonstration mode

The first time the unit is plugged in, the unit will enter the demonstration mode.

To cancel the demonstration mode, press the DEMO/ DIMMER button (remote control) during power stand- by mode. The unit will enter the low power consumption mode.

To return to the demonstration mode, press the DEMO/ DIMMER button again.

Connecting iPod or iPhone to TV

Photo and video files from iPod or iPhone can be viewed by connecting the system to TV/monitor.

If the TV/monitor has a video input, connect it to the VIDEO OUT socket at the back of the unit and set the TV Out on the iPod or iPhone unit to “ON” position.

Note:

Please make sure to set iPod unit to either NTSC or PAL to match your TV signal. Please visit Apple’s homepage for further information.

AC power connection

After checking all the connections have been made correctly, plug the AC power lead of this unit into the wall socket.

Note:

Unplug the AC power lead from the wall socket if the unit will not be in use for a prolonged period of time.

4

Page 5
Image 5
Sharp XL-HF200PH(S), XL-HF200PH(BK) operation manual System connections

XL-HF200PH(BK), XL-HF200PH(S) specifications

The Sharp XL-HF200PH(S) and XL-HF200PH(BK) are sophisticated hi-fi audio systems designed to deliver exceptional sound quality and modern functionality, making them perfect for both casual listeners and audiophiles alike.

One of the standout features of the XL-HF200 series is its powerful audio performance. The system is equipped with a high-output amplifier that ensures clear and dynamic sound across a wide range of frequencies. This is complemented by well-engineered speakers that produce rich bass, crisp midrange, and detailed highs, making it suitable for various music genres.

The design of the XL-HF200PH(S) and XL-HF200PH(BK) models is both elegant and functional. The sleek, compact design allows for easy integration into any living space, whether you're placing it on a shelf or setting it up as part of an entertainment center. The two color options—silver (S) and black (BK)—provide versatility to match your home décor.

In terms of connectivity, the XL-HF200 series excels with multiple options available. It features Bluetooth technology, allowing users to wirelessly stream music from smartphones, tablets, or computers. In addition, there are USB and AUX inputs for connecting various devices, as well as support for CD playback and FM/AM radio. This range of connectivity options ensures that users can enjoy their favorite audio content in a manner that suits their listening preferences.

Users will also find added convenience in the intuitive control interface. The system comes with a remote control that allows for easy operation from a distance. The built-in LCD display provides clear information on playback, making navigation user-friendly.

Moreover, the XL-HF200PH(S) and XL-HF200PH(BK) are designed with energy efficiency in mind, contributing to lower energy consumption without sacrificing performance. The systems adhere to environmental standards, making them a responsible choice for consumers looking to reduce their carbon footprint.

Overall, the Sharp XL-HF200PH(S) and XL-HF200PH(BK) are feature-rich audio systems that combine quality sound, stylish design, and versatile connectivity, catering to a wide range of listening needs. Whether you're enjoying a cozy night in or hosting a gathering, these systems are sure to enhance your audio experience significantly.