Assembly and Adjustments
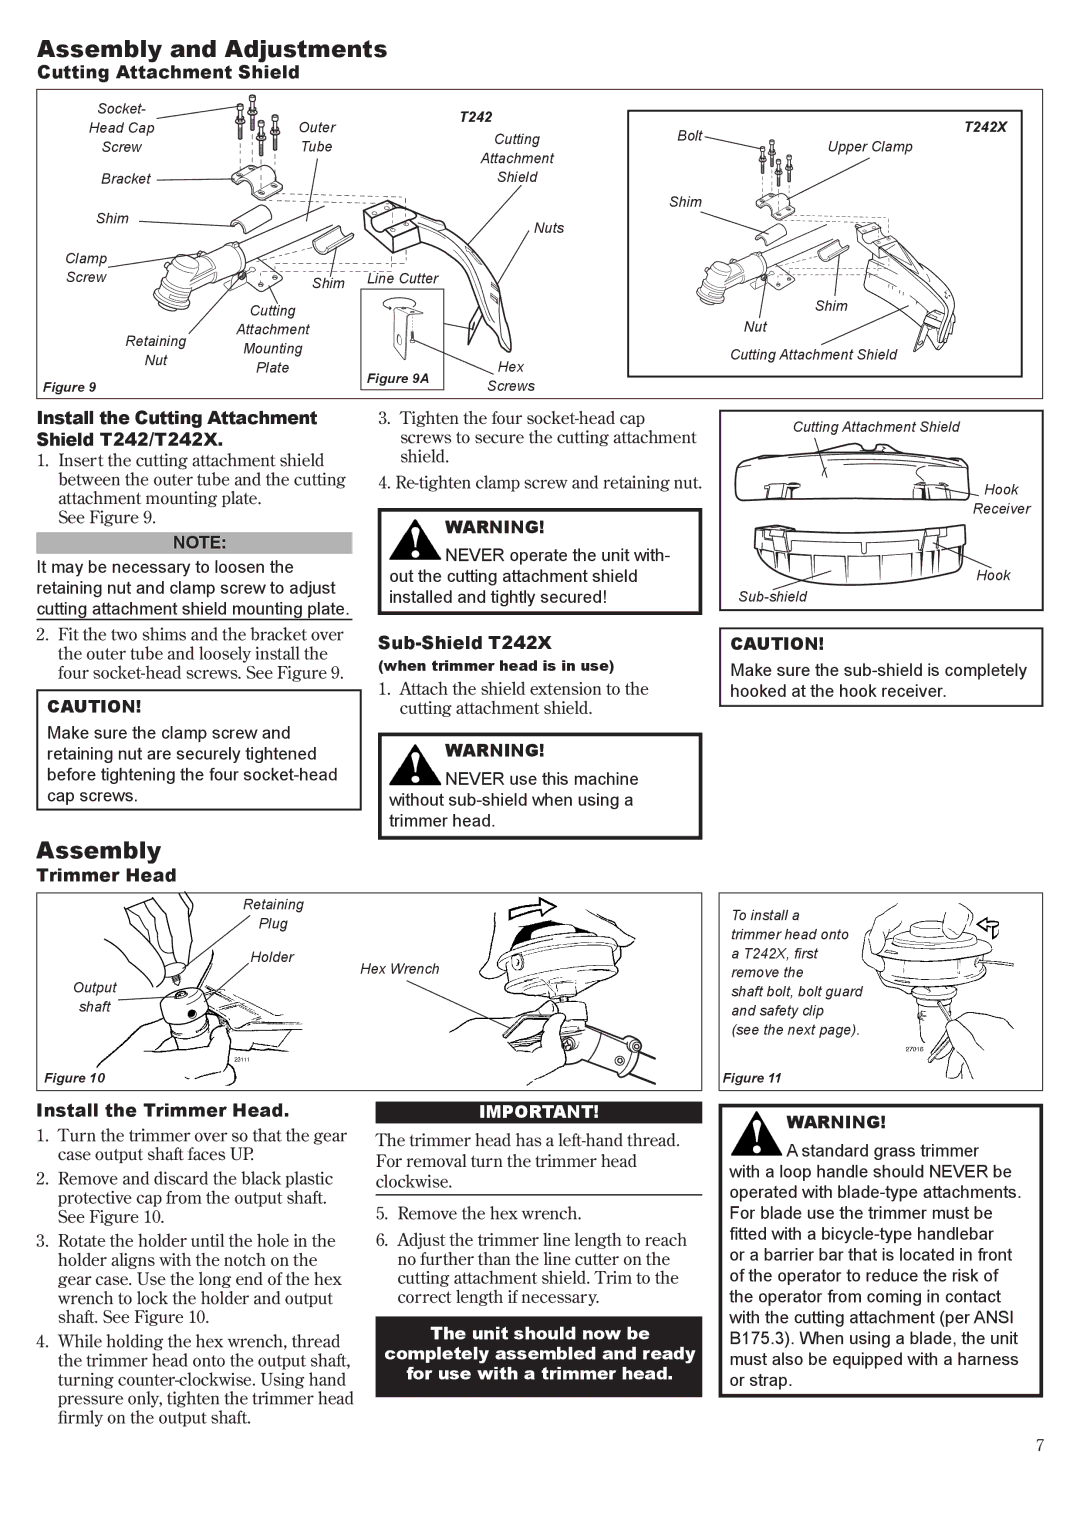
Cutting Attachment Shield
Socket- | Outer |
| T242 |
|
| T242X |
Head Cap |
|
| Bolt | |||
|
| Cutting | ||||
Screw | Tube |
|
| Upper Clamp | ||
| Attachment |
| ||||
|
|
|
|
| ||
Bracket |
|
|
| Shield |
|
|
Shim |
|
|
|
| Shim |
|
|
|
| Nuts |
|
| |
|
|
|
|
|
| |
Clamp |
|
|
|
|
|
|
Screw | Shim | Line Cutter |
|
|
|
|
|
|
|
|
|
| |
| Cutting |
|
|
|
| Shim |
Retaining | Attachment |
|
|
|
| Nut |
Mounting |
|
|
|
| Cutting Attachment Shield | |
Nut |
| 26013 | Hex |
| ||
Plate |
|
| ||||
Figure 9A |
|
|
| |||
|
|
|
| |||
Figure 9 |
| Screws |
|
| ||
|
|
|
| |||
Install the Cutting Attachment Shield T242/T242X.
1.Insert the cutting attachment shield between the outer tube and the cutting attachment mounting plate.
See Figure 9.
NOTE:
It may be necessary to loosen the retaining nut and clamp screw to adjust cutting attachment shield mounting plate.
3.Tighten the four
4.
WARNING!
NEVER operate the unit with- out the cutting attachment shield installed and tightly secured!
Cutting Attachment Shield
![]()
![]()
![]()
![]() Hook
Hook
Receiver
Hook
2.Fit the two shims and the bracket over the outer tube and loosely install the four
CAUTION!
Make sure the clamp screw and retaining nut are securely tightened before tightening the four
Assembly
Trimmer Head
Sub-Shield T242X
(when trimmer head is in use)
1.Attach the shield extension to the cutting attachment shield.
WARNING!
NEVER use this machine without
CAUTION!
Make sure the
RetainingTo install a
Plug
Holder
Output
shaft
Figure 10
Hex Wrench
trimmer head onto a T242X, first remove the
shaft bolt, bolt guard and safety clip (see the next page).
Figure 11
Install the Trimmer Head. |
|
IMPORTANT! |
WARNING!
1.Turn the trimmer over so that the gear case output shaft faces UP.
2.Remove and discard the black plastic protective cap from the output shaft. See Figure 10.
3.Rotate the holder until the hole in the holder aligns with the notch on the gear case. Use the long end of the hex wrench to lock the holder and output shaft. See Figure 10.
4.While holding the hex wrench, thread the trimmer head onto the output shaft, turning
The trimmer head has a
5.Remove the hex wrench.
6.Adjust the trimmer line length to reach no further than the line cutter on the cutting attachment shield. Trim to the correct length if necessary.
The unit should now be
completely assembled and ready
for use with a trimmer head.
A standard grass trimmer with a loop handle should NEVER be operated with