ENGLISH

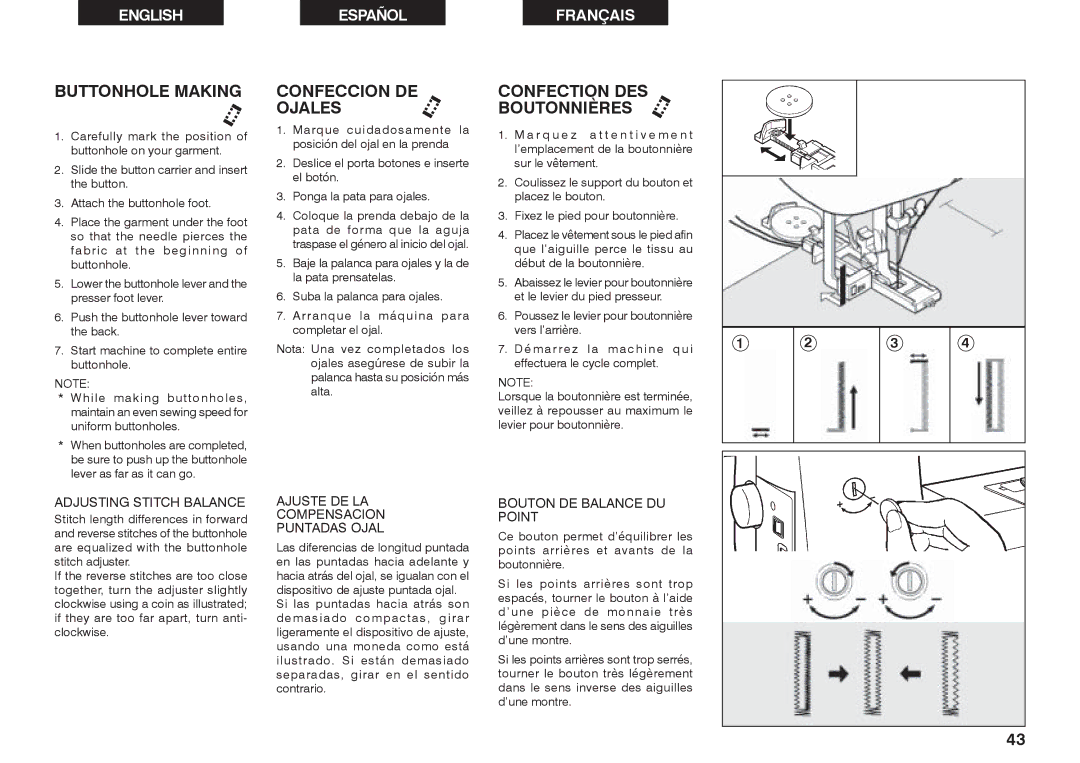
BUTTONHOLE MAKING

1.Carefully mark the position of buttonhole on your garment.

2.Slide the button carrier and insert the button.

3.Attach the buttonhole foot.

4.Place the garment under the foot so that the needle pierces the fabric at the beginning of buttonhole.

5.Lower the buttonhole lever and the presser foot lever.

6.Push the buttonhole lever toward the back.

7.Start machine to complete entire buttonhole.

NOTE:

*While making buttonholes, maintain an even sewing speed for uniform buttonholes.

*When buttonholes are completed, be sure to push up the buttonhole lever as far as it can go.

ADJUSTING STITCH BALANCE

Stitch length differences in forward and reverse stitches of the buttonhole are equalized with the buttonhole stitch adjuster.

If the reverse stitches are too close together, turn the adjuster slightly clockwise using a coin as illustrated; if they are too far apart, turn anti- clockwise.

ESPAÑOL

CONFECCION DE

OJALES

1.Marque cuidadosamente la posición del ojal en la prenda

2.Deslice el porta botones e inserte el botón.

3.Ponga la pata para ojales.

4.Coloque la prenda debajo de la pata de forma que la aguja traspase el género al inicio del ojal.

5.Baje la palanca para ojales y la de la pata prensatelas.

6.Suba la palanca para ojales.

7.Arranque la máquina para completar el ojal.

Nota: Una vez completados los ojales asegúrese de subir la palanca hasta su posición más alta.

AJUSTE DE LA

COMPENSACION

PUNTADAS OJAL

Las diferencias de longitud puntada en las puntadas hacia adelante y hacia atrás del ojal, se igualan con el dispositivo de ajuste puntada ojal.

Si las puntadas hacia atrás son demasiado compactas, girar ligeramente el dispositivo de ajuste, usando una moneda como está ilustrado. Si están demasiado separadas, girar en el sentido contrario.

FRANÇAIS

CONFECTION DES BOUTONNIÈRES

1.M a r q u e z a t t e n t i v e m e n t l’emplacement de la boutonnière sur le vêtement.

2.Coulissez le support du bouton et placez le bouton.

3.Fixez le pied pour boutonnière.

4.Placez le vêtement sous le pied afin que l’aiguille perce le tissu au début de la boutonnière.

5.Abaissez le levier pour boutonnière et le levier du pied presseur.

6.Poussez le levier pour boutonnière vers l’arrière.

7. D é m a r r e z l a m a c h i n e q u i effectuera le cycle complet.

NOTE:

Lorsque la boutonnière est terminée, veillez à repousser au maximum le levier pour boutonnière.

BOUTON DE BALANCE DU POINT

Ce bouton permet d’équilibrer les points arrières et avants de la boutonnière.

Si les points arrières sont trop espacés, tourner le bouton à l’aide d’une pièce de monnaie très légèrement dans le sens des aiguilles d’une montre.

Si les points arrières sont trop serrés, tourner le bouton très légèrement dans le sens inverse des aiguilles d’une montre.

1

2

3

4

43

Page 44
Image 44
Singer 2662 instruction manual Buttonhole Making, Confeccion DE Ojales, Confection DES Boutonnières

2662 specifications

The Singer 2662 sewing machine is a versatile and reliable option that caters to both beginners and experienced sewers alike. Renowned for its user-friendly features and robust performance, the Singer 2662 is an ideal choice for anyone looking to explore the world of sewing, crafting, and creating.

One of the standout features of the Singer 2662 is its easy-to-use automatic needle threader, which significantly simplifies the process of threading the machine. This feature helps users save time and reduces frustration, making it particularly useful for those who are just starting their sewing journey. Additionally, the top drop-in bobbin system allows for quick and easy bobbin changes, minimizing any potential downtime during projects.

The Singer 2662 boasts a versatile selection of 23 stitch options, which include basic stitches, decorative stitches, and stretch stitches. This wide array of stitches enables sewists to take on various projects, from simple repairs to more complex creations like garments and home decor. The machine’s adjustable stitch length and width further enhance creativity, allowing users to customize their sewing experience according to their project needs.

Portability is another significant characteristic of the Singer 2662. Weighing in at a manageable size, it is easy to transport to sewing classes or craft fairs, making it perfect for those who enjoy sewing on the go. The machine is also designed with a built-in carrying handle for added convenience.

Moreover, the Singer 2662 features a powerful motor that can handle multiple layers of fabric, ensuring consistent stitching quality across various materials. Whether you’re working with delicate fabrics or thicker materials like denim, the Singer 2662 maintains a steady performance, giving users confidence in their stitching.

Additional characteristics include a strong metal frame that provides durability and stability, ensuring that the machine can withstand regular use. The clear front cover makes it easy to monitor the bobbin thread supply, helping users stay on track with their sewing tasks.

In summary, the Singer 2662 sewing machine combines practicality with versatility, making it a compelling choice for anyone looking to explore their sewing capabilities. With features such as an automatic needle threader, an impressive range of stitch options, and a reliable motor, the Singer 2662 presents a solid foundation for countless sewing projects. Whether you're a novice or a seasoned expert, this machine is sure to meet and exceed your creative aspirations.