INSTALLATION
INSTRUCTIONS,’
KIT PARTS
REAR LlFT KIT
MFG. NO. 1691765
c. Remove the tunnel cover (B) by removing two
screws at rear and loosening left front screw.
d. Remove upper side panel (C) by removing three screws. Retain the hood catch for reassembly.
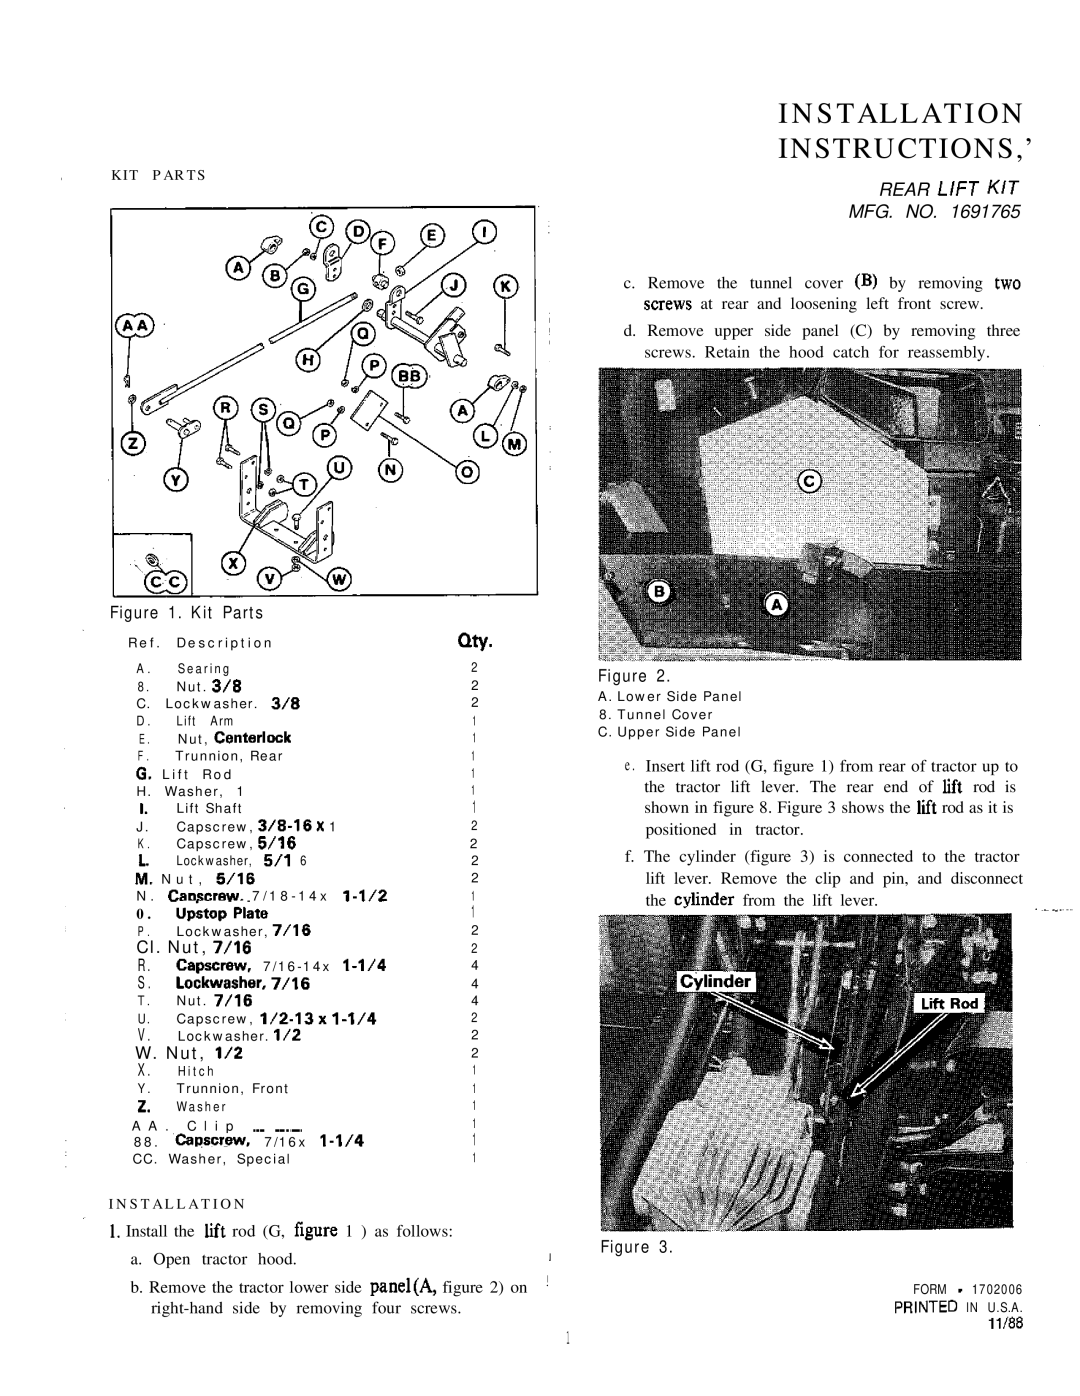
Figure 1. Kit Parts
Ref. | Description |
|
| QW | |||
A . | Searing |
|
|
|
| 2 | |
8. | Nut. 3/a |
|
|
| 2 | ||
C. | Lockwasher. | 3/E |
|
| 2 | ||
D . | Lift | Arm |
|
|
|
| 1 |
E . | Nut, Centerlock |
|
| 1 | |||
F . | Trunnion, Rear |
|
| 1 | |||
0. | Lift Rod |
|
|
|
| 1 | |
H. | Washer, | 1 |
|
|
| 1 | |
I. | Lift Shaft |
|
|
| 1 | ||
J. | Capscrew, | x 1 | 2 | ||||
K . | Capscrew, 6/16 |
|
| 2 | |||
1. | Lockwasher, | 5/l 6 |
|
| 2 | ||
PA. | N u t , | 5/16 |
|
|
| 2 | |
N . | Caoscrew. 7 / 1 8 - 1 4 x | 1 | |||||
0 . | upstop Plate |
|
| 1 | |||
P . | Lockwasher, 7/16 |
|
| 2 | |||
Cl. Nut, 7/16 |
|
|
| 2 | |||
R. | Capscrew, | 4 | |||||
S . | Lockwasher. | 7/18 |
|
| 4 | ||
T . | Nut. 7/16 |
|
|
| 4 | ||
U. | Capscrew, | 2 | |||||
V. | Lockwasher. l/2 |
|
| 2 | |||
W. Nut, l/2 |
|
|
| 2 | |||
X. | Hitch |
|
|
|
| 1 | |
Y. | Trunnion, Front |
|
| 1 | |||
2. | Washer |
|
|
|
| 1 | |
A A | . C | l i p | ~~~ | ~~~~~ |
|
| 1 |
88. | Capscrew, | 7/16x | 1 | ||||
CC. | Washer, | Special |
|
| 1 | ||
INSTALLATION
Figure 2.
A. Lower Side Panel
8. Tunnel Cover
C. Upper Side Panel
e . Insert lift rod (G, figure 1) from rear of tractor up to the tractor lift lever. The rear end of lift rod is shown in figure 8. Figure 3 shows the lit rod as it is positioned in tractor.
f. The cylinder (figure 3) is connected to the tractor lift lever. Remove the clip and pin, and disconnect the cvlinder from the lift lever.
1. Install the lit rod (G, figure 1 ) as follows:
a. Open tractor hood.
1Figure 3.
b. Remove the tractor lower side panel(A, figure 2) on ![]() !
!
1
FORM - 1702006
PR,NTED IN U.S.A.
..-
,I/88
