Diagram 1
A
5
| SONAMP CINEMA 260 | 4 | |
2 | 3 | ||
|
6
|
|
|
|
| 180˚ |
|
POWER | ACTIVE | A.C. ON | 50 | 250 | 0˚ |
|
FREQUENCY | PHASE | LEVEL | ||||
|
|
| 1 |
|
|
|
| 180˚ |
|
|
|
|
|
|
|
|
|
| |
| B |
|
|
| 50 | 250 |
| 0˚ |
|
|
|
|
| FREQUENCY |
| PHASE | LEVEL | ||
|
|
| WARNING: HAZARDOUS ENERGY, MAKE PROPER SPEAKER |
|
|
|
|
| |
| AUTO ON | CONNECTIONS; SEE OWNERS MANUAL BEFORE USING |
|
|
|
| SONAMP | ||
4 | DISCONNECT SUPPLY CORD BEFORE CHANGING FUSE | CAUTION |
|
|
| ||||
OFF | ON | ATTENTION: DEBRANCHER AVANT DE REMPLACER LE FUSIBLE | RISK OF ELECTRIC SHOCK |
|
|
| CINEMA 260 | ||
ATTENTION: VOIR LE CAHIER D' INSTRUCTION |
| DO NOT OPEN |
| SERIAL NO. |
| ||||
|
|
|
|
|
| FUSE | |||
|
|
| ATTENTION:UTILISER UN FUSIBLE DE RECHANGE DE MEME TYPE AVIS:RISQUE DE CHOC |
| SAN CLEMENTE, CA 92673 | ||||
|
|
| SPEAKER |
| 250V T3.15A | ||||
| LINE | LINE |
|
| + | L - | - | R + |
|
| IN | OUT |
|
|
|
|
|
|
|
| L |
|
|
|
|
|
|
| 230V~/50Hz |
|
|
|
|
|
|
|
|
| |
| R |
|
|
|
| USE 8Ω SPEAKERS |
| ||
|
|
|
|
|
|
|
|
| |
| 47K | CAUTION: FOR CONTINUED PROTECTION AGAINST FIRE |
|
| USE 8Ω SPEAKERS |
| |||
|
|
|
|
|
| ||||
|
|
| HAZARD USE ONLY SAME TYPE AND RATING FUSE. |
|
|
|
| 625VA | |
| 1 | 2 | A. FRONT PANEL | B. REAR PANEL |
| 3 |
|
| |
|
|
|
|
| |||||
|
|
| 1. POWER SWITCH | 1. RCA INPUT JACKS |
|
|
|
| |
|
|
| 2. ACTIVE L.E.D. | 2. RCA OUTPUT JACKS |
|
|
|
| |
|
|
| 3. POWER L.E.D. | 3. SPEAKER TERMINALS |
|
|
|
| |
4.CROSSOVER FREQUENCY 4. AUTO ON DEFEAT SWITCH
5. PHASE SWITCH | 5. | ~ POWER CORD INLET |
6. LEVEL CONTROL | 6. | FUSE |
6
5
PLACEMENT:
Keep your Sonamp® Cinema 260 out of direct sunlight and away from windows where rain may enter. It should be placed away from heat sources such as hot air ducts or radiators; do not place the unit directly on a pile carpet that could interfere with air flow into its bottom vent opening. If you stack your components, it is better to place the Sonamp above or alongside your other components; when driven hard, the unit itself may create a little heat and disturb components stacked on top of it. If it is inside a cabinet, allow ample ventilation. Very sensitive low level sources might pick up some hum radiating from its enormous power supply.
CONNECTING THE SONAMP CINEMA 260
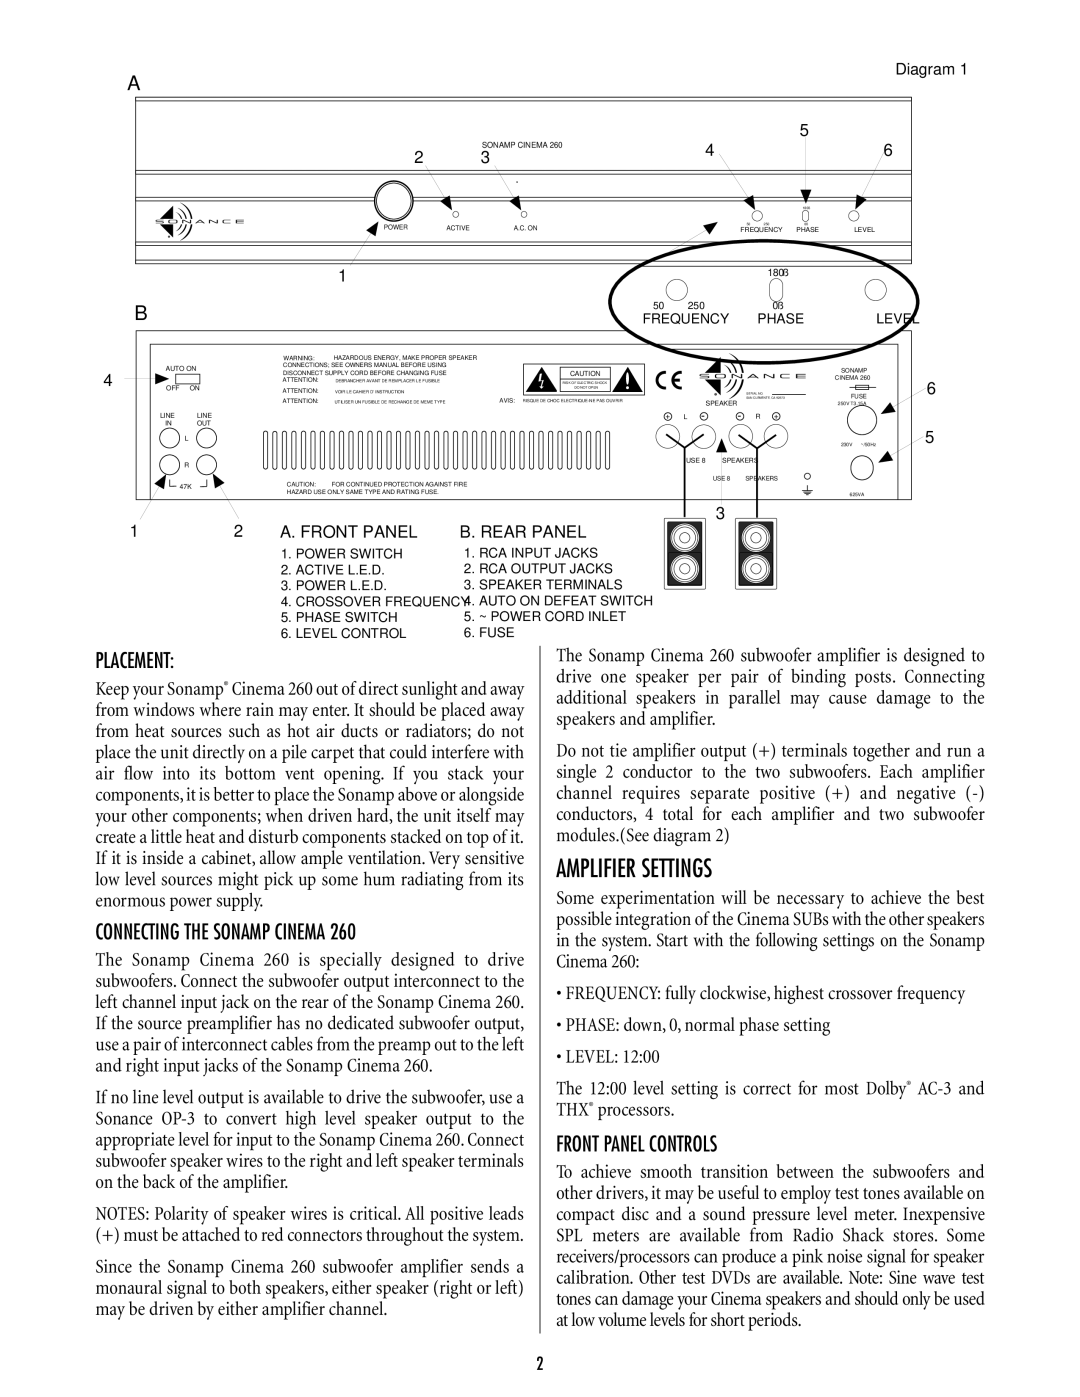
The Sonamp Cinema 260 is specially designed to drive subwoofers. Connect the subwoofer output interconnect to the left channel input jack on the rear of the Sonamp Cinema 260. If the source preamplifier has no dedicated subwoofer output, use a pair of interconnect cables from the preamp out to the left and right input jacks of the Sonamp Cinema 260.
If no line level output is available to drive the subwoofer, use a Sonance
NOTES: Polarity of speaker wires is critical. All positive leads
(+) must be attached to red connectors throughout the system.
Since the Sonamp Cinema 260 subwoofer amplifier sends a monaural signal to both speakers, either speaker (right or left) may be driven by either amplifier channel.
The Sonamp Cinema 260 subwoofer amplifier is designed to drive one speaker per pair of binding posts. Connecting additional speakers in parallel may cause damage to the speakers and amplifier.
Do not tie amplifier output (+) terminals together and run a single 2 conductor to the two subwoofers. Each amplifier channel requires separate positive (+) and negative
AMPLIFIER SETTINGS
Some experimentation will be necessary to achieve the best possible integration of the Cinema SUBs with the other speakers in the system. Start with the following settings on the Sonamp Cinema 260:
•FREQUENCY: fully clockwise, highest crossover frequency
•PHASE: down, 0, normal phase setting
•LEVEL: 12:00
The 12:00 level setting is correct for most Dolby®
FRONT PANEL CONTROLS
To achieve smooth transition between the subwoofers and other drivers, it may be useful to employ test tones available on compact disc and a sound pressure level meter. Inexpensive SPL meters are available from Radio Shack stores. Some receivers/processors can produce a pink noise signal for speaker calibration. Other test DVDs are available. Note: Sine wave test tones can damage your Cinema speakers and should only be used at low volume levels for short periods.
2
